
Blog chia sẽ kinh nghiệm lập trình và Technical VN. Nơi mà các bạn có thể học tập và tham khảo về những công nghệ mới nhất hiện nay về .NET
Hiển thị các bài đăng có nhãn Chuyên Đề WPF. Hiển thị tất cả bài đăng
Hiển thị các bài đăng có nhãn Chuyên Đề WPF. Hiển thị tất cả bài đăng
Thứ Bảy, 4 tháng 4, 2015
Sau bài "WPF Training – Drag and Drop Trong WPF Part I" nói về Drag-Drop, bài tiếp theo tôi xin nói về một Library hỗ trợ việc này theo hướng đơn giản mà hiệu quả cũng như không kém phần đẹp mắt và tùy biến.
I> Tiếp cận
Thư viện GongSolutions.Wpf.DragDrop là một sự nỗi bậc trong vấn đề Implement Drag-Drop WPF. Thư viện này có một số điểm nỗi bậc như sau:
- Hỗ trợ phát triển với mô hình MVVM, có nghĩa là phần Behavior có thể được đặc trong một ViewModel thay vì CodeBehind.
- Có nhiều sự lựa chọn khi sử dụng, hỗ trợ cả về vấn đề Drag-Drop phục vụ cho việc thay đổi Index
- Có thể làm việc với TreeViews
- Cho phép tùy chọn mặc định hoặc tự định nghĩa cách thể hiện trực quan cho Drag-Drop.
Các bạn có thể tham khảo Source tại đây
II> Ứng dụng mẫu
Công việc của bạn là tạo một project WPF Application và add reference thư viện tải ở trên. Sau đó thiết kế project theo mô hình MVVM cơ bản; hai View và một ViewModels. cấu trúc project như này:

Chúng ta chỉ cần quan tâm đến hai file. "ListBoxDDView.xaml" là phần View của ListBox với chức năng Drag-Drop với DataContext là "ListBoxDDViewModel.cs". Ngoài ra, "MainWindowVew" là View chính chứa 2 "ListBoxDDView" và "PerItem.cs" chính là class thể hiện một Item trong ListBox.
PerItem.cs
[code language="csharp"]
public class PerItem
{
public string Name { set; get; }
public PerItem(string name)
{
Name = "Item: " + name;
}
}
[/code]
Design phần View với code như sau(xem về DataTemplate để hiểu)
ListBoxDDView.xaml
[code language="xml"]
<Grid>
<ListBox ItemsSource="{Binding DataCollection, UpdateSourceTrigger=PropertyChanged}"
Foreground="White"
HorizontalContentAlignment="Stretch">
<ListBox.ItemTemplate>
<DataTemplate>
<TextBox Margin="2,2,2,2" TextWrapping="Wrap" IsReadOnly="True"
Text="{Binding Name}" VerticalAlignment="Top" VerticalContentAlignment="Center"
BorderBrush="#FF007ACC" Template="{DynamicResource TextBoxBaseTemplate}"
Background="{x:Null}" Padding="0,2"/>
</DataTemplate>
</ListBox.ItemTemplate>
</ListBox>
</Grid>
[/code]
Sau đó chúng ta thêm Attach Property vào code trên để dùng được Drag-Drop
[code language="xml"]
<Grid>
<ListBox ItemsSource="{Binding DataCollection, UpdateSourceTrigger=PropertyChanged}"
DragDrop:DragDrop.DropHandler="{Binding}"
DragDrop:DragDrop.IsDragSource="True"
DragDrop:DragDrop.IsDropTarget="True"
Foreground="White"
HorizontalContentAlignment="Stretch">
<ListBox.ItemTemplate>
<DataTemplate>
<TextBox Margin="2,2,2,2" TextWrapping="Wrap" IsReadOnly="True"
Text="{Binding Name}" VerticalAlignment="Top" VerticalContentAlignment="Center"
BorderBrush="#FF007ACC" Template="{DynamicResource TextBoxBaseTemplate}"
Background="{x:Null}" Padding="0,2"/>
</DataTemplate>
</ListBox.ItemTemplate>
</ListBox>
</Grid>
[/code]
Chú ý:
- Để dùng được Attached Property trên ta cần reference thư viện <xmlns:DragDrop="clr-namespace:GongSolutions.Wpf.DragDrop;assembly=GongSolutions.Wpf.DragDrop">
- DragDrop.DropHandler="{Binding}" chỉ ra method sẽ implement cho việc Drop data
- DragDrop.IsDragSource="True" nói rằng Control là nguồn Drag(tức có thể kéo Item của nó)
và nó sẽ gọi implement của method Drag - DragDrop.IsDropTarget="True" ý rằng Control này cho phép Drag data vào nó sẽ gọi implement của method Drop
Sau đó implement cho phần VewModel, model này implement của interface IDropTarget
ListBoxDDViewModel.cs
[code language="csharp"]
public class ListBoxExViewModel : IDropTarget
{
public ObservableCollection<PerItem> DataCollection { set; get; }
public bool IsAllowMove { set; get; }
public ListBoxExViewModel()
{
DataCollection = new ObservableCollection<PerItem>();
for (int i = 0; i < 20; i++) {
DataCollection.Add(new PerItem(i.ToString()));
}
}
// Được gọi khi bạn Kéo một Item đi
public void DragOver(IDropInfo dropInfo)
{
if (IsAllowMove)
{
// Hiệu ứng Drag
dropInfo.Effects = DragDropEffects.Move;
}
else
{
// Hiệu ứng Drag
dropInfo.Effects = DragDropEffects.Copy;
}
// Hiệu ứng Drop
dropInfo.DropTargetAdorner = DropTargetAdorners.Insert;
}
// Được gọi khi một Item được Drag lên một Control cho phép Drop
public void Drop(IDropInfo dropInfo)
{
var data = dropInfo.Data as PerItem;
// Lấy data và xử lý
if (data != null)
{
DataCollection.Add(data);
var source = dropInfo.TargetCollection;
}
else
{
var dataList = dropInfo.Data as IList<PerItem>;
if (dataList != null && dataList.Count > 0)
{
foreach (PerItem perItem in dataList)
{
DataCollection.Add(perItem);
}
}
}
}
}
[/code]
Chú ý: các bạn có thể implement interface IDragSource để có nhiều xử lý hơn khi Drag
Kết quả
 Để đẹp hơn chúng ta cần thêm đoạn code sau vào phần View( vào thẻ ListBox trong ListBoxDDDView.xaml)
- Hiệu ứng kèm theo chuột cho các Item được Drag: DragDrop:DragDrop.UseDefaultDragAdorner="True" [1]
- Hiệu ứng chú thích/ hiệu ứng Drag của chuột: DragDrop:DragDrop.UseDefaultEffectDataTemplate="True"
- Thêm hiệu ứng kèm theo chuột cho các Item được Drap: DragDrop:DragDrop.DragAdornerTemplate="{StaticResource DragAdorner}" với DragAdorner là một Template do bạn tạo(không dùng chung với [1]).
- Và còn nhiều tùy chọn khác bạn có thể tìm hiểu ......
Source tham khảo tại đây. Chúc các bạn thành công!
Phạm Tuân
Thứ Bảy, 28 tháng 3, 2015
Đối với lập trình hiện đại hiện nay, việc hỗ trợ người dùng tối đa cũng như trừu tượng hóa các công việc đến mức gần gủi và dễ hiểu nhất cho người dùng đang là tiêu chí hàng đầu của các nhà phát triển phần mềm, chúng ta có thể thấy lợi ích từ việc mà các ứng dụng hộ trợ Drag-and-Drop, công việc trở nên đơn giản hơn và chân thật hơn, thao tác kéo thả nói lên nhiều ý nghĩa hơn việc nhấn các Button. Và hôm nay, tôi sẽ hướng dẫn cở bản cho việc Implement Drag-and-Drop trong WPF.
WPF Training - Drag and Drop Trong WPF Part II...
I> Design UI
Công việc rất đơn giản, chúng ta cần chuẩn bị những thứ như sau
- WrapPanel A: nguồn chứa đối tượng - Drag
- WrapPanel B: nguồn nhận đối tượng - Drop
- Ellipse: Đối tượng được drag-drop
Chúng ta Design như sau
[code language="xml"]
<WrapPanel x:Name="_target" Drop="UIElement_OnDrop" AllowDrop="True"
Background="Chartreuse"/>
<WrapPanel x:Name="_source" MouseMove="MouseMove" Grid.Column="2">
[/code]
Trong đó,
- "UIElement_OnDrop" là method sẽ được call khi có đối tượng đang được Drag lên _target Panel
- "MouseMove" là method xử lý cho việc Drag, chúng ta có thể dùng ở nhiều sự kiện khác cũng được như MouseLeftButtonDown="MouseMove".
II> Implement behavior
Chúng ta tiến hành implement cho hai method trên như sau
[code language="csharp"]
#region
using System.Windows;
using System.Windows.Controls;
using System.Windows.Input;
using System.Windows.Media;
using System.Windows.Shapes;
#endregion
namespace Drag_Drop_Sample
{
/// <summary>
/// Interaction logic for MainWindow.xaml
/// </summary>
public partial class MainWindow : Window
{
public MainWindow()
{
InitializeComponent();
}
private void MouseMove(object sender, MouseEventArgs e)
{
// Get current obj
var ellipse = e.Source as Ellipse;
if (ellipse != null && e.LeftButton == MouseButtonState.Pressed)
{
// Send obj to target
DragDrop.DoDragDrop(ellipse,ellipse,
DragDropEffects.Move);
}
}
private void UIElement_OnDrop(object sender, DragEventArgs e)
{
// Get obj
var obj = e.Data.GetData(e.Data.GetFormats()[0]) as UIElement;
// Get source and target Panel
var parent = (obj as FrameworkElement).Parent as Panel;
var sendertarget = sender as Panel;
if (obj != null && sendertarget != null && !sendertarget.Children.Contains(obj))
{
parent.Children.Remove(obj);
sendertarget.Children.Add(obj);
}
}
}
}
[/code]
Kết quả:


Source tại đây, chúc các bạn thành công!
Tuân Phạm
Chủ Nhật, 15 tháng 3, 2015
Chào các bạn, hôm nay tôi sẽ giới thiệu đến mọi người về một thư viện khác giúp chúng ta xây dựng một ứng dụng WPF với giao diện mang đậm phong cách thiết kế của Window 8 đó là giao diện Metro.

I> Tiếp cận
MahApps.Metro là một dự án được Paul Jenkins bắt đầu phát triển vào năm 2011, nhầm mang một giao diện người dùng Metro-style vào ứng dụng WPF. Kể từ đó nó được phát triển và nhận được nhiều đóng góp từ cộng đồng nguồn mở cho đến bây giờ. Đây là một dự án vì cộng đồng, do cộng đồng - không ai trong số họ được trả tiền để làm điều này, song sản phẩm mà học tạo ra thật sự đã thay đổi được nhiều thứ.
Vậy bạn có thể tải về bộ thư viện này ở đâu? Cách đơn giản nhất là dùng NuGet
[code language="c"]
Install-Package MahApps.Metro
[/code]
Hoặc có thể tải trọn bộ mã nguồn tại Github, mời các bạn xem qua một số hình ảnh


II> Ứng dụng mẫu
Trước tiên chúng ta cần tạo một project WPF và add reference các thư viện cần thiết, hãy bắt đầu với NuGet nếu bạn cảm thấy bối rối về việc tải và add reference
Xong phần add DLLs chúng ta tiến hành tải về phần Resource của thư viện này(bạn có thể tải hoặc không tùy thích nhưng để hiểu nó làm việc thể nào thì đừng bỏ qua bước này) như hình sau.
Tool -> NuGet Package Panager -> Manage NuGet Packages For Solution
Chọn và tải về MahApps.Metro.Resource; đừng quên mục "Include Prerelease:

Hoặc bạn không thể tải resource như cách trên thì có thể dùng NuGet
[code language="c"]
Install-Package MahApps.Metro -Pre
[/code]
Chạy ứng dụng xem điều gì đã sảy ra và tiếp tục sửa nội dung các file XAML, mở file "MainWindow.xaml" thêm namespace của MahApps.Metro vào trong thẻ <Window ...>
[code language="csharp"]
xmlns:Controls="clr-namespace:MahApps.Metro.Controls;assembly=MahApps.Metro"
// Hoặc
xmlns:Controls="http://metro.mahapps.com/winfx/xaml/controls"
[/code]
Tiếp theo thay thẻ Window bằng thẻ của MahApps, file hoàn thiện sẽ là như sau nhưng đừng có coppy hết vào ứng dụng của bạn mà quên đổi namespace "x:Class="WpfApplication1.MainWindow"
[code language="xml"]
<Controls:MetroWindow x:Class="WpfApplication1.MainWindow"
xmlns="http://schemas.microsoft.com/winfx/2006/xaml/presentation"
xmlns:x="http://schemas.microsoft.com/winfx/2006/xaml"
xmlns:Controls="clr-namespace:MahApps.Metro.Controls;assembly=MahApps.Metro"
Title="MainWindow"
Height="350"
Width="525">
<!-- Tiếp tục code tại đây -->
</Controls:MetroWindow>
[/code]
Mở tiếp file MainWindow.xaml.cs và thay đổi lớp kế thừa của MainWindow
[code language="csharp"]
// using statements...
using MahApps.Metro.Controls
public partial class MainWindow : MetroWindow
{
public MainWindow()
{
InitializeComponent();
}
}
[/code]
Tạm thời đã xong về cơ bản, để đẹp hơn chúng ta dùng Resource của MahApps, mở file App.xaml lên và thêm ResourceDistionary
[code language="xml"]
<Application <!--........--> >
<!--Phần cần thêm-->
<Application.Resources>
<ResourceDictionary>
<ResourceDictionary.MergedDictionaries>
<ResourceDictionary Source="pack://application:,,,/MahApps.Metro;component/Styles/Controls.xaml" />
<ResourceDictionary Source="pack://application:,,,/MahApps.Metro;component/Styles/Fonts.xaml" />
<ResourceDictionary Source="pack://application:,,,/MahApps.Metro;component/Styles/Colors.xaml" />
<ResourceDictionary Source="pack://application:,,,/MahApps.Metro;component/Styles/Accents/Blue.xaml" />
<ResourceDictionary Source="pack://application:,,,/MahApps.Metro;component/Styles/Accents/BaseLight.xaml" />
<ResourceDictionary Source="Resources/Icons.xaml"/>
</ResourceDictionary.MergedDictionaries>
</ResourceDictionary>
</Application.Resources>
<!--Phần cần thêm-->
</Application>
[/code]
Kết quả,

[code language="xml"]
<Controls:MetroWindow ... >
<Controls:MetroWindow.RightWindowCommands>
<Controls:WindowCommands>
<Button Content="Cài đặt" />
<Button>
<StackPanel Orientation="Horizontal">
<Rectangle Width="20" Height="20"
Fill="{Binding RelativeSource={RelativeSource AncestorType=Button},
Path=Foreground}">
<Rectangle.OpacityMask>
<VisualBrush Stretch="Fill"
Visual="{StaticResource appbar_windowsphone}" />
</Rectangle.OpacityMask>
</Rectangle>
<TextBlock Margin="4 0 0 0"
VerticalAlignment="Center"
Text="Phạm Tuân" />
</StackPanel>
</Button>
</Controls:WindowCommands>
</Controls:MetroWindow.RightWindowCommands>
<Grid>
</Grid>
</Controls:MetroWindow>
[/code]
Thế là xong, mời các bạn tải về tham khảo tại đây và đọc thêm tại đây
Phạm Tuân
Thứ Tư, 11 tháng 3, 2015
Bài này sẽ giới thiệu đến các bạn một style đẹp phong cách IOS cho ToggleButton trong WPF

Các bạn chỉ việt coppy và paste đoạn Tyle sau vào nơi nào bạn muốn(nên để ở App.xaml hoặc một file Dictionary riêng được link bởi App.xaml) và Style này có thể được "nhìn thấy" trong ứng dụng của bạn.
[code language="xml"]
<ResourceDictionary>
<Style x:Key="AnimatedSwitch" TargetType="{x:Type ToggleButton}">
<Setter Property="Foreground" Value="Black" />
<Setter Property="Background" Value="#FAFAFB" />
<Setter Property="BorderBrush" Value="#EAEAEB" />
<Setter Property="Template">
<Setter.Value>
<ControlTemplate TargetType="ToggleButton">
<Viewbox Stretch="Uniform">
<Canvas Name="Layer_1" Width="20" Height="20" Canvas.Left="10" Canvas.Top="0">
<Ellipse Canvas.Left="0" Width="20" Height="20" Fill="{TemplateBinding Background}" Stroke="{TemplateBinding BorderBrush}" StrokeThickness="0.5"/>
<Ellipse Canvas.Left="15" Width="20" Height="20" Fill="{TemplateBinding Background}" Stroke="{TemplateBinding BorderBrush}" StrokeThickness="0.5"/>
<Border Canvas.Left="10" Width="15" Height="20" Name="rect416927" Background="{TemplateBinding Background}" BorderBrush="{TemplateBinding BorderBrush}" BorderThickness="0,0.5,0,0.5"/>
<Ellipse x:Name="ellipse" Canvas.Left="0" Width="20" Height="20" Fill="White" Stroke="{TemplateBinding BorderBrush}" StrokeThickness="0.3">
<Ellipse.RenderTransform>
<TranslateTransform X="0" Y="0" />
</Ellipse.RenderTransform>
<Ellipse.BitmapEffect>
<DropShadowBitmapEffect Softness="0.1" ShadowDepth="0.7" Direction="270" Color="#BBBBBB"/>
</Ellipse.BitmapEffect>
</Ellipse>
</Canvas>
</Viewbox>
<ControlTemplate.Triggers>
<Trigger Property="IsChecked" Value="True" >
<Trigger.EnterActions>
<BeginStoryboard>
<Storyboard>
<ColorAnimation Storyboard.TargetProperty="Background.Color" To="#52D468" Duration="0:0:0.2" />
<ColorAnimation Storyboard.TargetProperty="BorderBrush.Color" To="#41C955" Duration="0:0:0.2" />
<DoubleAnimationUsingKeyFrames Storyboard.TargetProperty="(Ellipse.RenderTransform).(TranslateTransform.X)" Storyboard.TargetName="ellipse">
<SplineDoubleKeyFrame KeyTime="0" Value="0"/>
<SplineDoubleKeyFrame KeyTime="0:0:0.4" Value="15" KeySpline="0, 1, 0.6, 1"/>
</DoubleAnimationUsingKeyFrames>
</Storyboard>
</BeginStoryboard>
</Trigger.EnterActions>
<Trigger.ExitActions>
<BeginStoryboard>
<Storyboard>
<ColorAnimation Storyboard.TargetProperty="Background.Color" To="#FAFAFB" Duration="0:0:0.2" />
<ColorAnimation Storyboard.TargetProperty="BorderBrush.Color" To="#EAEAEB" Duration="0:0:0.2" />
<DoubleAnimationUsingKeyFrames Storyboard.TargetProperty="(Ellipse.RenderTransform).(TranslateTransform.X)" Storyboard.TargetName="ellipse">
<SplineDoubleKeyFrame KeyTime="0" Value="15"/>
<SplineDoubleKeyFrame KeyTime="0:0:0.3" Value="0" KeySpline="0, 0.5, 0.5, 1"/>
</DoubleAnimationUsingKeyFrames>
</Storyboard>
</BeginStoryboard>
</Trigger.ExitActions>
</Trigger>
</ControlTemplate.Triggers>
</ControlTemplate>
</Setter.Value>
</Setter>
</Style>
</ResourceDictionary>
[/code]
Bạn dùng Style này như sau
[code language="xml"]
<Grid>
<ToggleButton Style="{StaticResource AnimatedSwitch}" Height="80"/>
</Grid>
[/code]
Và thế là bạn đã có một ToggleButton đẹp mắt, sau đây là mẫu hoàng chỉnh
[code language="xml"]
<Page
xmlns="http://schemas.microsoft.com/winfx/2006/xaml/presentation"
xmlns:PresentationOptions="http://schemas.microsoft.com/winfx/2006/xaml/presentation/options"
xmlns:x="http://schemas.microsoft.com/winfx/2006/xaml">
<Page.Resources>
<ResourceDictionary>
<Style x:Key="AnimatedSwitch" TargetType="{x:Type ToggleButton}">
<Setter Property="Foreground" Value="Black" />
<Setter Property="Background" Value="#FAFAFB" />
<Setter Property="BorderBrush" Value="#EAEAEB" />
<Setter Property="Template">
<Setter.Value>
<ControlTemplate TargetType="ToggleButton">
<Viewbox Stretch="Uniform">
<Canvas Name="Layer_1" Width="20" Height="20" Canvas.Left="10" Canvas.Top="0">
<Ellipse Canvas.Left="0" Width="20" Height="20" Fill="{TemplateBinding Background}" Stroke="{TemplateBinding BorderBrush}" StrokeThickness="0.5"/>
<Ellipse Canvas.Left="15" Width="20" Height="20" Fill="{TemplateBinding Background}" Stroke="{TemplateBinding BorderBrush}" StrokeThickness="0.5"/>
<Border Canvas.Left="10" Width="15" Height="20" Name="rect416927" Background="{TemplateBinding Background}" BorderBrush="{TemplateBinding BorderBrush}" BorderThickness="0,0.5,0,0.5"/>
<Ellipse x:Name="ellipse" Canvas.Left="0" Width="20" Height="20" Fill="White" Stroke="{TemplateBinding BorderBrush}" StrokeThickness="0.3">
<Ellipse.RenderTransform>
<TranslateTransform X="0" Y="0" />
</Ellipse.RenderTransform>
<Ellipse.BitmapEffect>
<DropShadowBitmapEffect Softness="0.1" ShadowDepth="0.7" Direction="270" Color="#BBBBBB"/>
</Ellipse.BitmapEffect>
</Ellipse>
</Canvas>
</Viewbox>
<ControlTemplate.Triggers>
<Trigger Property="IsChecked" Value="True" >
<Trigger.EnterActions>
<BeginStoryboard>
<Storyboard>
<ColorAnimation Storyboard.TargetProperty="Background.Color" To="#52D468" Duration="0:0:0.2" />
<ColorAnimation Storyboard.TargetProperty="BorderBrush.Color" To="#41C955" Duration="0:0:0.2" />
<DoubleAnimationUsingKeyFrames Storyboard.TargetProperty="(Ellipse.RenderTransform).(TranslateTransform.X)" Storyboard.TargetName="ellipse">
<SplineDoubleKeyFrame KeyTime="0" Value="0"/>
<SplineDoubleKeyFrame KeyTime="0:0:0.4" Value="15" KeySpline="0, 1, 0.6, 1"/>
</DoubleAnimationUsingKeyFrames>
</Storyboard>
</BeginStoryboard>
</Trigger.EnterActions>
<Trigger.ExitActions>
<BeginStoryboard>
<Storyboard>
<ColorAnimation Storyboard.TargetProperty="Background.Color" To="#FAFAFB" Duration="0:0:0.2" />
<ColorAnimation Storyboard.TargetProperty="BorderBrush.Color" To="#EAEAEB" Duration="0:0:0.2" />
<DoubleAnimationUsingKeyFrames Storyboard.TargetProperty="(Ellipse.RenderTransform).(TranslateTransform.X)" Storyboard.TargetName="ellipse">
<SplineDoubleKeyFrame KeyTime="0" Value="15"/>
<SplineDoubleKeyFrame KeyTime="0:0:0.3" Value="0" KeySpline="0, 0.5, 0.5, 1"/>
</DoubleAnimationUsingKeyFrames>
</Storyboard>
</BeginStoryboard>
</Trigger.ExitActions>
</Trigger>
</ControlTemplate.Triggers>
</ControlTemplate>
</Setter.Value>
</Setter>
</Style>
</ResourceDictionary>
</Page.Resources>
<Grid>
<ToggleButton Style="{StaticResource AnimatedSwitch}" Height="80"/>
</Grid>
</Page>
[/code]
Chúc các bạn thành công,
Tuân
Thứ Bảy, 7 tháng 3, 2015
Trong bài viết Helloworld project chúng ta đã có class Bootstrapper đơn giản, song để dùng được IoC trong Caliburn.Micro chúng ta cần viết lại class này. Qua bài này chúng ta sẽ hiểu hơn về việc đặt tên cho một class trong Caliburn và cách dùng IoC...
I> IoC là gì
IoC viết tắc của Inversion Of Control, IoC là một khái niệm/mô hình/nguyên lý lớn trong việc phát triển những ứng dụng phức tạp, mục đích làm giảm sự phụ thuộc giữa các tầng, các thành phần và các lớp bằng cách nghịch đảo luồng điểu khiển của ứng dụng, chúng ta có thể hiểu rằng IoC là một nhà cung cấp(provider hay container), trong thực tế khi một Project lớn thì việc có nhiều Component, Module, Class... là bình thường song việc quản lý cũng như khởi tạo các đối tượng trên sẽ phức tạp dần theo quy mô dự án, vì thế IoC là giải pháp tối ưu cho việc quản lý, khởi tạo và cung cấp các đối tượng khi cần thiết .
Hai triển khai phổ biến của IoC là Dependency Injection (chống lại sự phụ thuộc) và Service location.
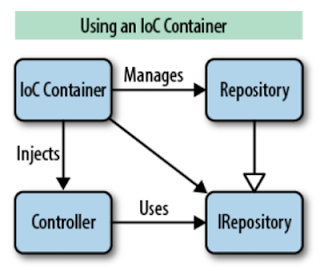
Thật tế, vấn đề quản lý việc tạo và hủy đối tượng với việc sử dụng IoC có lẽ cần một chút phép màu, vì rằng: ai sẽ giải phóng các đối tượng nếu bạn không chịu trách nhiệm khởi tạo chúng?
Điểm chính của một Framework là nó cung cấp IoC dưới dạng một thành-phần phần mềm gọi là Container. Giống như cái tên nó đã có ngụ ý, container sẽ biết những thành phần nào cần cho ứng dụng của bạn và cố gắng đủ thông minh để hiểu bạn muốn thành phần nào. Điều này xẩy ra khi bạn thực hiện một truy vấn và yêu cầu nó trả về một thành-phần mà nó là một trong những thực thể thường trú trong container . Đây chính là ý nghĩa của IoC. Sẽ không còn việc các Instance của lớp được tạo ra bằng cách sử dụng Constructor được định nghĩa sẳn trong lớp đó theo cách truyền thống(new A();). Thay vào đó chúng ta sẽ đăng ký chúng vào trong container và khi cần chung ta chỉ việc truy vấn container sau đó nó sẽ cho bạn một instance của thành phần mà bạn yêu cầu.
Đa phần IoC được các cộng đồng OpenSource phát triển là chính, Microsoft không chính thức phát tiển mô hình này cho nền tảng .NET(họ có cách khác tương tự về một số vấn đề Module) bởi vì về cơ bản nó vẫn là một điều mới mẻ và mơ hồ cho đa phần những người tiếp cận .NET. IoC đưa đến một cấu trúc tốt hơn, khả năng module hóa, khả năng kiểm lổi và bảo trì ứng ứng dụng tốt hơn. Một khi đã phát hiện ra điều này, các lập trình viên sẽ không bào giờ quay trở lại còn đường xưa cũ để xây dựng phần mềm.
II> Cấu hình Bootstrapper
Để dùng được IoC chúng ta cần phải quan tâm nhiều đến class Bootstrapper (xem và sử dụng lại Helloworld project), những class chúng ta muốn được IoC quản lý phải được Export, nếu class ấy là một trong nhiều implement cho một interface thì phải Export rõ ràng và khi GetInstance phải truy vấn với nhiều thông tin hơn. Ví dụ
[code language="csharp"]
internal interface IPage
{
}
// Implement của IPage
[Export("PageOne",typeof(IPage))]
internal class PageOne: IPage
{
}
[Export("PageTwo",typeof(IPage))]
internal class PageTwo: IPage
{
}
//------------------------------------
internal interface INews
{
}
// Implement của INews
[Export(typeof(INews))]
internal class News: INews
{
}
[/code]
class Bootstrapper.cs
[code language="csharp"]
internal sealed class Bootstrapper : BootstrapperBase
{
private CompositionContainer _container;
/// <summary>
/// Constructor
/// </summary>
public Bootstrapper()
{
StartRuntime();
}
/// <summary>
/// Override to configure the framework and setup your IoC container.
/// </summary>
protected override void Configure()
{
_container = new CompositionContainer(
new AggregateCatalog(AssemblySource.Instance.Select(x =>
new AssemblyCatalog(x)).OfType<ComposablePartCatalog>())
);
var batch = new CompositionBatch();
batch.AddExportedValue<IWindowManager>(new WindowManager());
batch.AddExportedValue<IEventAggregator>(new EventAggregator());
batch.AddExportedValue(_container);
_container.Compose(batch);
}
/// <summary>
/// Gets the instance.
/// </summary>
/// <param name="serviceType">Type of the service.</param>
/// <param name="key">The key.</param>
/// <returns></returns>
/// <exception cref="System.Exception"></exception>
protected override object GetInstance(Type serviceType, string key)
{
var contract = string.IsNullOrEmpty(key) ? AttributedModelServices.GetContractName(serviceType) : key;
var exports = _container.GetExportedValues<object>(contract);
var enumerable = exports as object[] ?? exports.ToArray();
if (enumerable.Any())
return enumerable.First();
throw new Exception(string.Format("Could not locate any instances of contract {0}.", contract));
}
/// <summary>
/// Gets all instances.
/// </summary>
/// <param name="serviceType">Type of the service.</param>
/// <returns></returns>
protected override IEnumerable<object> GetAllInstances(Type serviceType)
{
return _container.GetExportedValues<object>(AttributedModelServices.GetContractName(serviceType));
}
/// <summary>
/// Override this to provide an IoC specific implementation.
/// </summary>
/// <param name="instance">The instance to perform injection on.</param>
protected override void BuildUp(object instance)
{
_container.SatisfyImportsOnce(instance);
}
/// <summary>
/// Override this to add custom behavior to execute after the application starts.
/// </summary>
/// <param name="sender">The sender.</param>
/// <param name="e">The args.</param>
protected override void OnStartup(object sender, StartupEventArgs e)
{
base.OnStartup(sender, e);
DisplayRootViewFor<MainViewModel>();
}
}
[/code]
Đừng quên add reference "System.ComponentModel.Composition"
III> Sử dụng IoC
Tiến hành xây dựng phần sườn project
- Tạo một folder "Models"
- Tạo một interface "Models/IPage.cs"
- Tạo hai class implement cho interface "IPage" là "PageOne" và "PageTwo", tất cả ghi vào file "Models/Page.cs"
- Mở file "Views/MainView.xaml" và thêm vào hai TextBox và hai Button
- Thêm vào file "ViewModels/MainViewModels.cs" nội dung như dưới
Yêu cầu: Tôi có 2 TextBox lần lược hiển thị nội dung được Binding đến property "MainViewModel.Page" là "Page.Name" và "Page.Index", tùy và việc tôi nhấn vào Button "PageOne" hay "PageTwo" mà nội dung hiển thị được thay đổi. Các bạn chú ý rằng không hề có việc tôi new một thể hiện của interface"IPage" và gán cho property "MainViewModel.Page" ở code dưới vì tôi dùng IoC để new một class.
MainViewModel.cs
[code language="csharp"]
[Export(typeof(MainViewModel))]
internal class MainViewModel : INotifyPropertyChanged
{
private IPage _page;
public IPage Page
{
set
{
_page = value;
OnPropertyChanged("Page");
}
get { return _page; }
}
public event PropertyChangedEventHandler PropertyChanged;
private void OnPropertyChanged(string propertyName)
{
PropertyChangedEventHandler handler = PropertyChanged;
if (handler != null) handler(this, new PropertyChangedEventArgs(propertyName));
}
/// <summary>
/// Constructor
/// </summary>
public MainViewModel()
{
}
/// <summary>
/// Show PageOnr
/// </summary>
public void PageOne()
{
Page = IoC.Get<IPage>("PageOne");
}
/// <summary>
/// Show PageTwo
/// </summary>
public void PageTwo()
{
Page = IoC.Get<IPage>("PageTwo");
}
}
[/code]
IPage.cs
[code language="csharp"]
internal interface IPage
{
/// <summary>
/// Dislay name
/// </summary>
string Name { set; get; }
/// <summary>
/// Number of it
/// </summary>
int Index { set; get; }
}
[/code]
Page.cs
[code language="csharp"]
[Export("PageOne",typeof(IPage))]
internal class PageOne: IPage
{
private string _name = string.Empty;
private int _index;
/// <summary>
/// Dislay name
/// </summary>
public string Name
{
set { _name = value; }
get { return _name; }
}
/// <summary>
/// Number of it
/// </summary>
public int Index
{
get { return _index; }
set { _index = value; }
}
public PageOne()
{
Name = "PageOne";
Index = new Random().Next(100);
}
}
[Export("PageTwo",typeof(IPage))]
internal class PageTwo: IPage
{
private string _name = string.Empty;
private int _index;
/// <summary>
/// Dislay name
/// </summary>
public string Name
{
set { _name = value; }
get { return _name; }
}
/// <summary>
/// Number of it
/// </summary>
public int Index
{
get { return _index; }
set { _index = value; }
}
public PageTwo()
{
Name = "PageTwo";
Index = new Random().Next(100);
}
}
[/code]
MainView.xaml
[code language="xml"]
<Window x:Class="HelloWorl.Views.MainView"
xmlns="http://schemas.microsoft.com/winfx/2006/xaml/presentation"
xmlns:x="http://schemas.microsoft.com/winfx/2006/xaml"
Title="MainView" Height="200" Width="300">
<Grid>
<StackPanel Margin="10,20,10,50" Orientation="Vertical" VerticalAlignment="Top">
<TextBox x:Name="Name" Height="21"
Text="{Binding Page.Name, UpdateSourceTrigger=PropertyChanged}"
BorderBrush="#FF3399FF" Margin="0,1" />
<TextBox x:Name="Index" Height="21"
Text="{Binding Page.Index, UpdateSourceTrigger=PropertyChanged}"
BorderBrush="#FF3399FF" Margin="0,1" />
</StackPanel>
<StackPanel VerticalAlignment="Bottom" Margin="0,0,0,20">
<Button Content="PageOne" x:Name="PageOne" Height="21"
HorizontalAlignment="Center" VerticalAlignment="Bottom"
Padding="2,1,5,1" MaxWidth="100" MinWidth="100" Margin="0,1"
Background="#FF3399FF" Foreground="White"/>
<Button Content="PageTwo" x:Name="PageTwo" Height="21"
HorizontalAlignment="Center" VerticalAlignment="Bottom"
Padding="2,1,5,1" MaxWidth="100" MinWidth="100" Margin="0,1"
Background="#FF3399FF" Foreground="White" />
</StackPanel>
</Grid>
</Window>
[/code]
Kết quả là
 Tải sourcecode tại đây, chúc các bạn thành công,
Phạm Tuân
Sau hai bài giới thiệu về Caliburn.Micro framework, hôm nay chúng ta sẽ cùng bắt tay vào làm một dự án nhỏ - HelloWorld.
Step 1: Add reference
Khi đã tạo xong một project WPF Application, chúng ta sẽ phải tải về các DLLs của Caliburn và add vào project hoặc làm việc này tự động bằng cách mở "Package Manager Console" và paste command dưới đây vào rồi Enter.
TOOL -> NuGet Package Manager -> Package Manager Console
[code language="html"]
Install-Package Caliburn.Micro
[/code]
Step 2: Tổ chức lại project
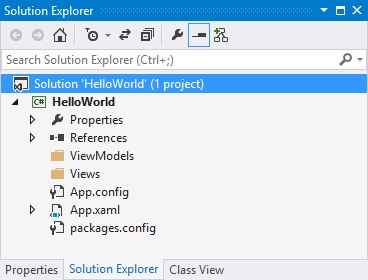
- Xóa 2 file MainWindow.*
- Xóa dòng StartupUri="MainWindow.xaml" trong file App.xaml
- Tạo mới 2 folder với tên lần lược là "Views" và "ViewModels"
Step 3: Xây dựng
- Tạo class Bootstrapper.cs
- Tạo class "ViewModels/MainViewModel.cs" và tạo một Window "Views/MainView.xaml"
- Xóa file "Views/MainView.cs"
- Changed nội dung các file "App.xaml", "App.cs" như sau
App.xaml
[code language="xml"]
<Application x:Class="HelloWorl.App"
xmlns="http://schemas.microsoft.com/winfx/2006/xaml/presentation"
xmlns:x="http://schemas.microsoft.com/winfx/2006/xaml"
xmlns:helloWorl="clr-namespace:HelloWorl">
<Application.Resources>
<ResourceDictionary>
<ResourceDictionary.MergedDictionaries>
<ResourceDictionary>
<helloWorl:Bootstrapper x:Key="bootstrapperex" />
</ResourceDictionary>
</ResourceDictionary.MergedDictionaries>
</ResourceDictionary>
</Application.Resources>
</Application>
[/code]
App.cs
[code language="csharp"]
/// <summary>
/// Interaction logic for App.xaml
/// </summary>
public partial class App : Application
{
/// <summary>
/// Constructor
/// </summary>
public App()
{
InitializeComponent();
}
}
[/code]
Bootstrapper.cs
[code language="csharp"]
internal class Bootstrapper: BootstrapperBase
{
/// <summary>
/// Constructor
/// </summary>
public Bootstrapper()
{
this.StartRuntime();
}
/// <summary>
/// Override this to add custom behavior to execute after the application starts.
/// </summary>
/// <param name="sender">The sender.</param>
/// <param name="e">The args.</param>
protected override void OnStartup(object sender, StartupEventArgs e)
{
base.OnStartup(sender, e);
// MainViewModel sẽ được hiểu là Datacontent của MainView
// Dòng dưới chỉ ra một View chính cho App
DisplayRootViewFor<MainViewModel>();
}
}
[/code]
Ta có project như sau
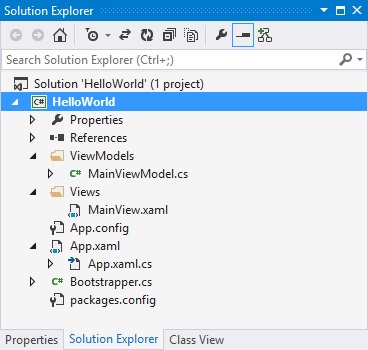
Đến đây chúng ta đã xong phần Helloworld, F5 và nhận kết quả, tải sourcecode tại đây (vì các DLLs đã được xóa nên hãy mở mạng và Rebuild project để NuGet tải lại dll).
Vậy mời các bạn đón xem phần tiếp theo!
Phạm Tuân
Thứ Năm, 5 tháng 3, 2015
Như ở bài trước tôi đã giới thiệu về caliburn.mocro, bài tiếp theo này tôi sẽ hướng dẫn các bạn về cách tạo một project WPF hợp chuẩn mô hình MVVM(*) dùng Caliburn framework. Bài này cho ta cái nhìn cơ bản về cấu trúc một Project WPF-Caliburn...
I> Hiểu MVVM Là Gì
Để tổ chức một project theo mô hình MVVM nói chung và Caliburn nói riêng chúng ta cần hiểu rõ MVVM là gì và cơ chế Mapping(View - ViewModel) mà Framework hiện tại hỗ trợ. Hai hình sau minh họa khã rõ mô hình MVVM
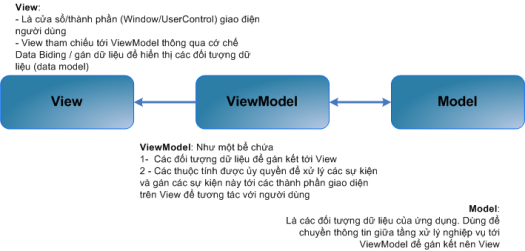

Class diagram
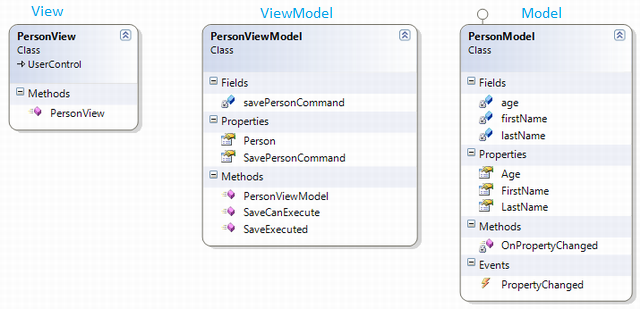
.gif)
II> Quy Ước Tổ Chức Một Project Của Caliburn

Theo quy ước của Caliburn, phần View-ViewModel-Model phải được đặt tên theo một quy ước để có thể tận dụng tối hiệu năng của framework - mà dễ thấy nhất đó là một View sẽ được tự động kết dính với một ViewModel( bạn sẽ có cơ hội cảm nhận về điều này sau) nếu bạn tuân các thủ quy ước sau.
| View Model | View | |
|---|---|---|
| Convention | <EntityName>ViewModel | <EntityName>View |
| Example 1 | ShellViewModel | ShellView |
| Example 2 | TabViewModel | TabView |
Vì View trong thực tế được thể hiện như một Page nên chúng ta hoàn toàn có thể đặt tên như bảng dưới đây
| View Model | View | |
|---|---|---|
| Convention | <EntityName>PageViewModel | <EntityName>Page |
| Example 1 | MainPageViewModel | MainPage |
| Example 2 | OrderPageViewModel | OrderPage |
Nếu chúng ta có một Namespace khá dài cho các ViewModel hoặc View, chúng ta phải tuân thủ cách đặt tên sau
| View Model | View | |
|---|---|---|
| Convention | <RootNS>.<ViewModelTypeName> | <RootNS>.<ViewTypeName> |
| Example 1 | MyProject.ShellViewModel | MyProject.ShellView |
| Example 2 | MyProject.MainPageViewModel | MyProject.MainPage |
Hoặc
| View Model | View | |
|---|---|---|
| Convention | <RootNS>.ViewModels.<ChildNS>.<ViewModelTypeName> | <RootNS>.Views.<ChildNS>.<ViewTypeName> |
| Example 1 | MyProject.ViewModels.ShellViewModel | MyProject.Views.ShellView |
| Example 2 | MyProject.ViewModels.Utilities.SettingsViewModel | MyPoject.Views.Utitlities.SettingsView |
Dưới đây là một ví dụ về cách tổ chức một project Caliburn.Micro
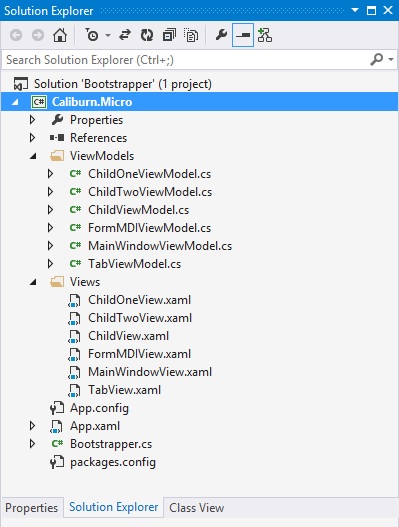
Hay

Tất cả những quy ước trên là bạn phải thực hiện chính xác nếu muốn tận dụng nhiều tính năng hay, song bạn hoàn toàn có thể thay đổi theo ý cá nhân vì đây là framework mã nguồn mở.
-----------------------------------------------------------------
- Tìm Hiểu Về Caliburn.Micro Framework Phần I
- Tìm Hiểu Về Caliburn.Micro Framework Phần II
Thứ Tư, 4 tháng 3, 2015
Caliburn.Micro Framework được những người phát triển nó nói một cách khiêm tốn là một Framework nhỏ bé nhưng cộng đồng Dev lại thấy rằng nó vô cùng mạnh mẽ. Framework này được thiết kế cho việc phát triển các ứng dụng xây dựng trên tất cả các nền tảng XAML(WPF, Silverlight, Windows Phone, Windows 8...). Hỗ trợ mạnh cho mô hình MV *, cho phép xây dựng các giải pháp của bạn một cách nhanh chóng, và bền vững.

I> Tính năng nỗi bật
Binding đơn giản từ View xuống ViewModel với x:Name, giảm thời gian thiết kế
*.XAML
[code language="xml"]
<ListBox x:Name="Products" />
[/code]
*.CS
[code language="csharp"]
// View sẽ được tự động binding đến property bênh dưới
public BindableCollection<ProductViewModel> Products
{
get; private set;
}
public ProductViewModel SelectedProduct
{
get { return _selectedProduct; }
set
{
_selectedProduct = value;
NotifyOfPropertyChange(() => SelectedProduct);
}
}
[/code]
Tự động Binding một Method với hành xử của View kèm các đối số tự động maping theo x:Name
*.XAML
[code language="xml"]
<StackPanel>
<TextBox x:Name="Username" />
<PasswordBox x:Name="Password" />
<Button x:Name="Login" Content="Log in" />
</StackPanel>
[/code]
*.CS
[code language="csharp"]
// Hàm trả giá trị cho biết có thể thực hiện Login command hay không
public bool CanLogin(string username, string password)
{
return !String.IsNullOrEmpty(username) && !String.IsNullOrEmpty(password);
}
// Hàm dưới được thực hiện với sự kiện Click của Button theo kiểu Command
// Các param sẽ được lấy giá trị từ View với name tương ứng paramName
public string Login(string username, string password)
{
// Do somethings...
}
[/code]
Ngoài ra Caliburn còn nhiều tính năng khác mạnh mẽ và thuận tiện hơn khi làm việc với mô hình MV*. Trong mô hình MVVM có sử dụng Caliburn chúng ta sẽ tuân thủ một số cấu trúc cho một project WPF-MVVM như sau( [*] ý chỉ là bất kỳ một ký tự hợp lệ nào nhập từ bàn phím)
- Các thành phần View(tức code XAML thể hiện một Window hoặc UserControl hoặc Page...) được đặc chung vào thư mục cha là "*View" hoặc "*Views"
- Các thành phần ViewModel(tức phần logic *.cs cho View tương ứng) được đặc trong cùng một thư mục cha là "*ViewMode" hoặc "*ViewModels"
II> Bắt đầu cùng Caliburn
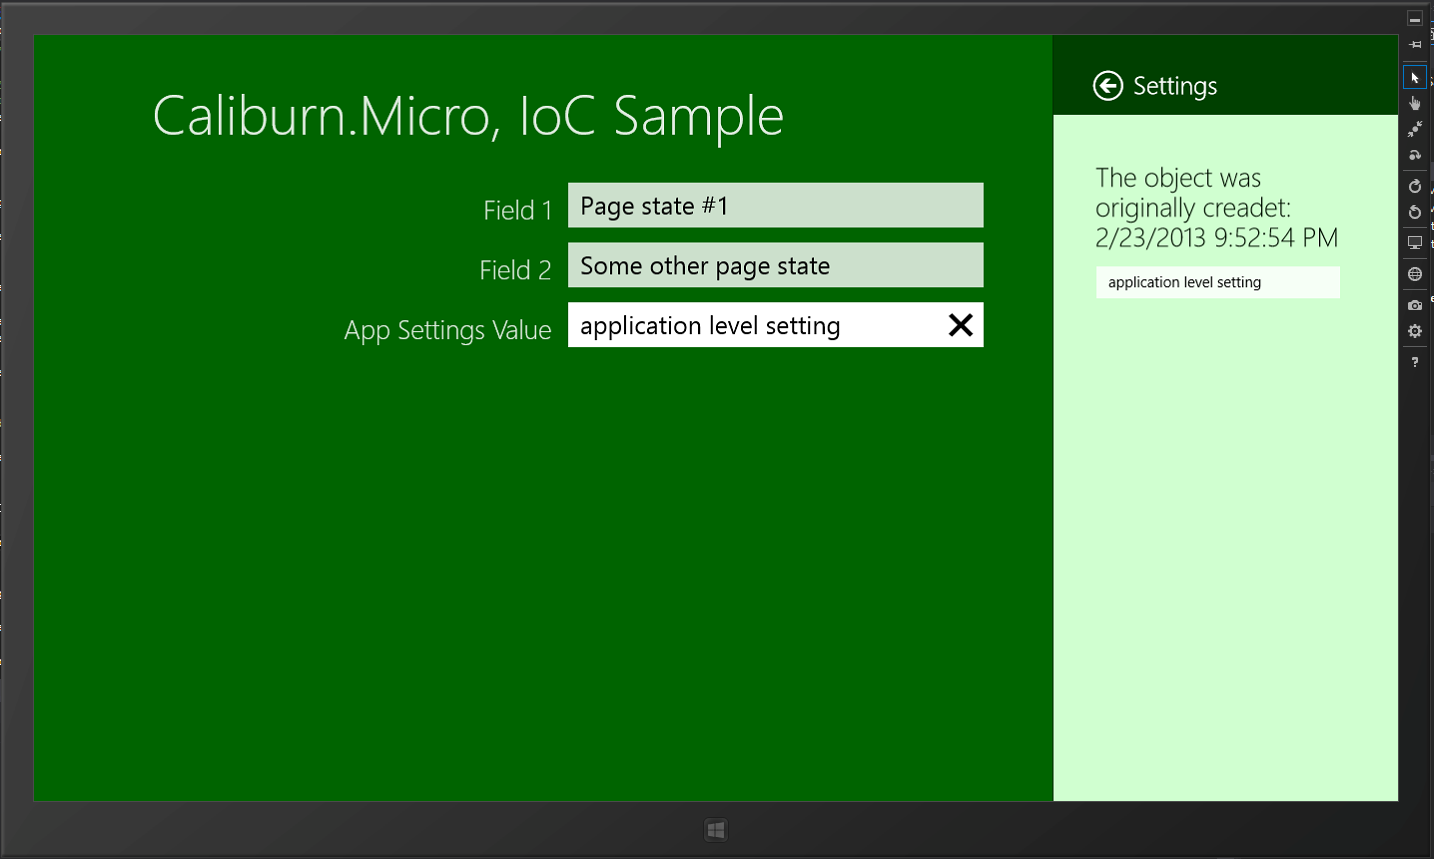
Để khởi đầu một dự án với Caliburn.Micro trước tiên chúng ta cần tải thư viện này về theo hai cách thông dụng
- Dùng Nuget với command = "PM> Install-Package Caliburn.Micro", dán code này vào Tool->...->Package Manager Console
- Download trược tiếp từ codeplex với link
Thứ quan trọng nhất và là xương sống của Caliburn.Midro cũng như các MVVMFramework khác là Bootstrapper và IoC ngoài ra chúng ta có thể đọc thêm tại trang chủ Caliburn về các thành phần quan trọng trong framework này. Tôi sẽ sớm có nhiều bài viết về chủ đề liên quan cho người mới bắt đầu tìm hiểu về WPF-MVVM có dùng Caliburn.
-----------------------------------------------------------------
- Tìm Hiểu Về Caliburn.Micro Framework Phần I
- Tìm Hiểu Về Caliburn.Micro Framework Phần II
Chúc các bạn vui vẻ,
Tuân Phạm
Chủ Nhật, 1 tháng 3, 2015
Để có thể binding được cho một group các RadioButton chúng ta cần một số thủ thuật, giới hạn trong bài này tôi sẽ chia sẽ một kỹ thuật - dùng Converter, Converter tôi đã hướng dẫn ở bài trước, các bạn có thể xem để biết thêm...
Chúng ta tạo một Enum thể hiện cho các tùy chọn của một groupRadio và class Model
[code language="csharp"]
public enum StylesChecking
{
Is,
NotIs,
Container
}
public class Model: INotifyPropertyChanged
{
StylesChecking _currentOption;
public StylesChecking CurrentOption
{
get { return _currentOption; }
internal set
{
this._currentOption = value;
OnPropertyChanged(); //Xem thêm về Databinding
}
}
#region Event
public event PropertyChangedEventHandler PropertyChanged;
[NotifyPropertyChangedInvocator]
protected virtual void OnPropertyChanged([CallerMemberName] string propertyName = null)
{
PropertyChangedEventHandler handler = PropertyChanged;
if (handler != null) handler(this, new PropertyChangedEventArgs(propertyName));
}
#endregion
}
[/code]
Tiếp theo cần implement một class Converter
[code language="csharp"]
public class EnumMatchToBooleanConverter : IValueConverter
{
public object Convert(object value, Type targetType,
object parameter, CultureInfo culture)
{
if (value == null || parameter == null)
return false;
string checkValue = value.ToString();
string targetValue = parameter.ToString();
// Nếu giá trị param trùng với giá trị hiện tại của thuộc tính trong Model => true
return checkValue.Equals(targetValue,
StringComparison.InvariantCultureIgnoreCase);
}
public object ConvertBack(object value, Type targetType,
object parameter, CultureInfo culture)
{
if (value == null || parameter == null)
return null;
bool useValue = (bool)value;
string targetValue = parameter.ToString();
if (useValue)
{
// Nếu trạng thái hiện tại của radioBtn này là true
// Parse từ string của param sang Enum
return StylesChecking.Parse(targetType, targetValue);
}
return null;
}
}
[/code]
Cuối cùng ta dùng nó như sau
[code language="xml"]
<[RootElementName].Resources>
<[localNamespace]:EnumMatchToBooleanConverter x:Key="enumConverter" />
</[RootElementName].Resources>
<!-- ... ->
<WrapPanel>
<RadioButton GroupName="Options1" Content="Is" HorizontalAlignment="Right"
IsChecked="{Binding Path=CurrentOption, Mode=TwoWay,
Converter={StaticResource enumConverter},
ConverterParameter=Is}"
Height="16" Margin="0,0,4,0"/>
<RadioButton GroupName="Options1" Content="Not is" HorizontalAlignment="Right"
IsChecked="{Binding Path=CurrentOption, Mode=TwoWay,
Converter={StaticResource enumConverter},
ConverterParameter=NotIs}"
Height="16" Margin="0,0,4,0"/>
<RadioButton GroupName="Options1" Margin="0,0,4,0"
IsChecked="{Binding Path=CurrentOption, Mode=TwoWay,
Converter={StaticResource enumConverter},
ConverterParameter=Container}"
Content="Container" HorizontalAlignment="Right" Height="16"/>
</WrapPanel>
[/code]
Lưu ý mỗi RadioButton có một ConverterParameter riêng và nó phải maping với Enum
Chúc các bạn thành công!
Phạm Tuân
Chủ Nhật, 1 tháng 2, 2015
Sau Dependency property, chúng ta sẽ tiếp tục tìm hiểu về Attached property - một loại property không thuộc đối tượng trực tiếp sử dụng nó(khác Dependency property). Dễ hiểu hơn có nghĩa là property này được định nghĩa ở một class/object khác và được dùng như một property của class/object này(na ná cách dùng của Extension methods), bởi thế mới gọi là Attached.
Bạn có thể thấy một số Attached property khi sử dụng các panel: Dock, Grid, Canvas ... Trong ví dụ dưới đây, chúng ta set giá trị DockPanel.Dock cho TextBox là "Top", xong property Dock lại không phải là một property thuộc TextBox - đó là một Attached property được định nghĩa ở DockPanel, attached property này dùng cho tất cả các control đang được chứa bởi DockPanel.
[code language="xml"]
<TextBox DockPanel.Dock=”Top”>Attached property</TextBox>
[/code]
Để tạo một attached property chúng ta phải tuân theo cấu trúc này( hãy liên tưởng đến bài Dependency property trước để có sự so sánh về cách đăng ký một attached property - không khéo là nhầm lẫn đấy)
[code language="csharp"]
public class RotationManager
{
public static propertyType Get[+ propertyName](DependencyObject obj)
{
//TODO: need to implement now
return (propertyType)obj.GetValue([propertyName+]Property);
}
public static void Set[+ propertyName](DependencyObject obj, propertyType value)
{
//TODO: need to implement now
obj.SetValue([propertyName+]Property, value);
}
public static readonly DependencyProperty [propertyName+]Property =
DependencyProperty.RegisterAttached("propertyName",
typeof(propertyType), typeof(ownerType),
new [defaultMetadata](0.5, [propertyChangedCallback]));
private static void propertyChangedCallback(DependencyObject obj, DependencyPropertyChangedEventArgs e)
{
//TODO: need to implement now
}
}
[/code]
Diễn gải:
- propertyName: Là tên của property bạn muốn tạo ví dụ "Dock"
- propertyType: Là Type mà attached property này nhận
- ownerType: là Type của đối tượng chịu trách nhiệm(Owner) property này, ví dụ DockPanel
- propertyChangedCallback: là hàm sẽ được gọi khi Value của attached property bị thay đổi
- defaultMetadata: là một object thuộc PropertyMetadata - chỉ loại các đối tượng sẽ được thừa hưởng property này
- FrameworkPropertyMetadata: tất cả các element trong XAML
- UIPropertyMetadata: là các UI element/Control trong XAML
Ví dụ trực quan: Tôi có một Path, tôi xoay nó với góc 50 độ và được như hình sau
XAML thế này

[code language="xml"]
<Grid Background="White" Margin="25">
<Path Stretch="Uniform" Fill="#FF08578B" Data="F1 M 28.4583,20.8296C 28.9254,20.4138 29.2514,19.768 29.4364,18.8921C 29.6214,18.0162 29.4554,17.0984 28.9384,16.1389C 29.3694,14.16 29.0234,12.7686 27.9003,11.9646C 26.7772,11.1607 25.4592,10.7729 23.946,10.8015L 23.274,10.8015C 23.614,10.1266 23.882,9.40756 24.0781,8.64438C 24.2741,7.8812 24.3741,7.20871 24.3781,6.62686C 24.3166,4.37555 23.8036,2.70673 22.839,1.62039C 21.8744,0.534058 20.8272,-0.006073 19.6976,0C 17.6181,0.0614014 16.274,1.37863 15.6653,3.95166C 15.6406,4.27734 15.1563,5.48642 14.2124,7.57889C 13.2686,9.67136 11.8711,11.4226 10.02,12.8326L 10.02,11.6045C 9.94067,10.959 9.57507,10.5968 8.92316,10.5181L 1.0975,10.5181C 0.445374,10.5968 0.0795288,10.959 0,11.6045L 0,30.0051C 0.0795288,30.7017 0.445374,31.086 1.0975,31.1581L 8.92316,31.1581C 9.57507,31.086 9.94067,30.7017 10.02,30.0051L 10.02,27.7953C 10.7491,28.3628 12.6754,28.989 15.7988,29.6737C 18.9222,30.3584 21.8093,30.4828 24.46,30.0469C 27.1107,29.6109 28.0914,27.9957 27.4023,25.2011C 28.0253,24.7488 28.4593,24.1283 28.7043,23.3396C 28.9493,22.551 28.8674,21.7143 28.4583,20.8296 Z M 24.2341,20.7815C 25.4911,21.0257 26.0372,21.5341 25.8722,22.3068C 25.7072,23.0794 24.7771,23.5158 23.082,23.6158C 22.812,23.6399 22.68,23.748 22.686,23.9401C 22.692,24.1323 22.872,24.2644 23.226,24.3365C 24.8361,24.7918 25.4081,25.4303 24.9421,26.252C 24.4761,27.0737 23.392,27.5081 21.6899,27.5551C 20.587,27.5541 19.0097,27.388 16.9579,27.0567C 14.9062,26.7254 12.5936,25.9468 10.02,24.7208L 10.02,16.0445C 11.9097,15.114 13.6807,13.4388 15.3332,11.0186C 16.9857,8.59857 17.9977,6.34018 18.3693,4.2435C 18.4157,3.81894 18.5482,3.46432 18.7666,3.17972C 18.985,2.89514 19.2953,2.74728 19.6976,2.73615C 20.1107,2.74524 20.5296,3.09171 20.9543,3.77557C 21.3792,4.45944 21.6083,5.42606 21.6419,6.67551C 21.5589,7.68878 21.227,8.72198 20.646,9.77512C 20.0651,10.8282 19.7331,11.6585 19.6501,12.2657C 19.6491,12.525 19.7697,12.765 20.0118,12.9858C 20.254,13.2066 20.6236,13.324 21.1207,13.3381L 23.946,13.3381C 25.3041,13.4708 26.0562,14.0019 26.2022,14.9312C 26.3482,15.8606 25.8042,16.3916 24.5701,16.5244C 24.3061,16.5867 24.1741,16.7006 24.1741,16.8661C 24.1741,17.0316 24.3061,17.1356 24.5701,17.1781C 25.8192,17.3445 26.4172,17.853 26.3642,18.7038C 26.3112,19.5545 25.6012,20.0389 24.2341,20.157C 23.9221,20.177 23.7661,20.2691 23.7661,20.4332C 23.7661,20.5974 23.9221,20.7135 24.2341,20.7815 Z "
RenderTransformOrigin="0.5,0.5">
<!-- Xoay -->
<Path.RenderTransform>
<TransformGroup>
<ScaleTransform/>
<SkewTransform/>
<RotateTransform Angle="50"/>
<TranslateTransform/>
</TransformGroup>
</Path.RenderTransform>
</Path>
</Grid>
[/code]
Chú ý rằng tôi xoay Path trên nhờ đoạn XAML sau
[code language="xml"]
<Path Stretch="Uniform" Fill="#FF08578B" Data="............."
RenderTransformOrigin="0.5,0.5">
<Path.RenderTransform>
<TransformGroup>
<ScaleTransform/>
<SkewTransform/>
<RotateTransform Angle="50"/>
<TranslateTransform/>
</TransformGroup>
</Path.RenderTransform>
</Path></pre>
<pre>[/code]
Nhưng tôi thấy nó quá dài - đến vài thẻ XAML cho một giá trị Angle="50", nếu tôi dùng phép xoay này nhiều lần trong một file XAML hoặc nhiều file XAML khác thì thật rối mắt, vậy nên tôi tạo ra một attached property thay thế đoạn XAML kia như sau
[code language="csharp"]
public class RotationManager
{
/// <summary>
/// Get giá trị của attached property
/// </summary>
/// <param name="obj">Đối tượng Dependency</param>
/// <returns>Giá trị của attached property</returns>
public static double GetAngle(DependencyObject obj)
{
return (double)obj.GetValue(AngleProperty);
}
/// <summary>
/// Set giá trị góc cho đối tượng
/// </summary>
/// <param name="obj">Đối tượng Dependency</param>
/// <param name="value">Giá trị do user input</param>
public static void SetAngle(DependencyObject obj, double value)
{
obj.SetValue(AngleProperty, value);
throw new NoNullAllowedException();
}
public static readonly DependencyProperty AngleProperty =
DependencyProperty.RegisterAttached("Angle",
typeof(double), typeof(RotationManager),
new UIPropertyMetadata(0.5, OnAngleChanged));
/// <summary>
/// CallBack khi value của property thay đổi
/// </summary>
/// <param name="obj">Đối tượng Dependency</param>
/// <param name="e"></param>
private static void OnAngleChanged(DependencyObject obj, DependencyPropertyChangedEventArgs e)
{
var element = obj as UIElement;
if (element != null)
{
element.RenderTransformOrigin = new Point(.5, .5);
element.RenderTransform = new RotateTransform((double)e.NewValue);
}
}
}
[/code]
Và dùng đơn giản thế này, tôi tiến hành xoay góc 180 độ
[code language="xml"]
<Grid Background="White" Margin="25">
<Path Stretch="Uniform" Fill="#FF08578B" Data="Như củ" RenderTransformOrigin="0.5,0.5"
local:RotationManager.Angle="180"/>
</Grid>
[/code]
Hãy so sánh với đoạn code trước
[code language="xml"]
<!-- khi không dùng attached property -->
<Path Stretch="Uniform" Fill="#FF08578B" Data="............."
RenderTransformOrigin="0.5,0.5">
<Path.RenderTransform>
<TransformGroup>
<ScaleTransform/>
<SkewTransform/>
<RotateTransform Angle="50"/>
<TranslateTransform/>
</TransformGroup>
</Path.RenderTransform>
</Path>
<!-- khi dùng attached property thì code chỉ thế này -->
<Path Stretch="Uniform" Fill="#FF08578B" Data="............."
RenderTransformOrigin="0.5,0.5"
local:RotationManager.Angle="180"/>
[/code]
Kết quả

Chúc mọi người thành công!
Phạm Tuân
Thứ Bảy, 31 tháng 1, 2015
Khi các bạn làm một dự án khá lớn, nhu cầu tạo ra các Custom Control là không tránh khỏi, trong WinForm hay WPF đều cho phép chúng ta tạo ra các User-Control(userCtrl) với mục đích trên; Nói về khía cạnh WPF, để tạo ra một user-control có tính thuận tiện và linh hoạt cao chúng ta cần áp dụng nhiều kỹ thuật trong thiết kế cũng như lập trình - hôm nay chúng ta sẽ nói về một điều trong nhiều điều phải nắm nếu có ý định tạo một Control mang phong cách cá nhân.
Trong ví dụ sau đây tôi có một user-Control, userCtrl này chứa một TextBox, một Button và một Lable.

Trong XAML tôi thiết kế như sau
[code language="xml"]
<UserControl x:Name="userControl" x:Class="Dependency_property.userControls.MyuserControl"
xmlns="http://schemas.microsoft.com/winfx/2006/xaml/presentation"
xmlns:x="http://schemas.microsoft.com/winfx/2006/xaml"
xmlns:mc="http://schemas.openxmlformats.org/markup-compatibility/2006"
xmlns:d="http://schemas.microsoft.com/expression/blend/2008"
mc:Ignorable="d"
d:DesignHeight="100" d:DesignWidth="300">
<Grid>
<Grid.ColumnDefinitions>
<ColumnDefinition Width="Auto"/>
<ColumnDefinition Width="*"/>
<ColumnDefinition Width="Auto"/>
</Grid.ColumnDefinitions>
<Grid Background="#FF3399FF">
<Label Content="Header" VerticalContentAlignment="Center" Padding="5,1" Foreground="White"/>
</Grid>
<TextBox Grid.Column="1" VerticalContentAlignment="Center" Padding="5,1"/>
<Button x:Name="btnAction"Grid.Column="2"/>
</Grid>
</UserControl>
[/code]
Vấn đề phát sinh khi tôi dùng userCtrl này, tôi không thể nào thay đổi được nội dung của Button và cũng như không thể Get giá trị từ TextBox bởi vì các control này đã được che phủ bởi userCtrl nên tôi không thể nào truy cập được đến các thuộc tính của các control trong nó; giải quyết vấn đề này bằng Code-behind thì khá đơn giản nhưng chúng ta lại đang làm việc với WPF - XAML và vấn đề trực quan trong design là quan trọng.
[code language="xml"]
<StackPanel>
<!-- Làm sao để set Content cho Button bên trong userCtrl đây -->
<!-- Làm gì thấy được Button mà set trực tiếp -->
<local:MyuserControl x:Name="txtAdv"/>
</StackPanel>
[/code]
Cách giải quyết tôi đề cập ở trên cho code-behind là chúng ta tạo một số property của userCtrl làm cầu nối để set hoặc get value của các control bên trong - giống như cách nhìn nhận trong bài viết Create intance ; xong cách làm này có một số nhược điểm và Microsoft không khuyến cáo dùng(Cứ thử làm với các project lớn đi rồi sẽ gặp một vài vấn đề... hihi); Vì thế chúng ta dùng Dependency Property, ưu điểm là Dependency Property sẽ hỗ trợ nhiều khía cạnh hơn trong WPF(Style, Template, kế thừa property, hình ảnh động, 3D...) Cách dùng Dependency Property như sau:
1> Đăng ký Dependency Property
Trong code behind của userCtrl chúng ta tạo một Dependency Property
[code language="csharp"]
// Cho button
public static readonly DependencyProperty
ButtonContentproperty = DependencyProperty.Register(
"ButtonContent", typeof (object), typeof (MyuserControl),
new UIPropertyMetadata("Action"));
// Cho textBox
public static readonly DependencyProperty
TextBoxTextproperty = DependencyProperty.Register(
"TextBoxText", typeof (string), typeof (MyuserControl),
new UIPropertyMetadata("No text", OnValueChanged));
// Sự khác biệt khi textBox có thêm method "OnValueChanged"
// Vì tôi muốn làm một vài điều khi nội dung textBox bị changed
[/code]
Lưu ý:
- "ButtonContentproperty" là tên của DependencyProperty, property này sẽ được đăng ký với Type là object vì Content của Button là một object, Type của userCtrl sẽ sử dụng được nó là MyuserControl, và giá trị mặc định là một chuổi "Action".
- ButtonContentproperty này sẽ không thật sự dùng để chúng ta làm việc với XAML đâu nhé, trong XAML chúng ta truy xuất đến DependencyProperty với tên "ButtonContent" - lưu ý tên này(*)
2> Tạo một property thông thường
Tiếp theo tạo lần lược các property với kiểu trùng kiểu của DependencyProperty tương ứng, tên là tên tương ứng (ví dụ "ButtonContent" trùng với (*))
[code language="csharp"]
// Cho button
public object ButtonContent
{
// Property này sẽ truy xuất đến DependencyProperty trên kia
get { return GetValue(ButtonContentproperty); }
set { SetValue(ButtonContentproperty, value); }
}
// Cho textBox
public string TextBoxText
{
// Property này sẽ truy xuất đến DependencyProperty trên kia
get { return (string) GetValue(TextBoxTextproperty); }
set { SetValue(TextBoxTextproperty, value); }
}
[/code]
3> Làm việc với Event
Tới đây chúng ta đã xong phần DependencyProperty, để hoàn chỉnh userCtrl này chúng ta cần xử lý việc Click button, đơn giản là tại code-behind của userCtrl ta public một event "ButtonClick" kiểu RoutedEventHandler để bên ngoài có thể tiếp cận; tại XAML của userCtrl, sự kiện Click của Button được chỉ định đến một Method "ActionExecuting" trong code-behind của userCtrl - tại đây chúng ta kiểm tra và thực thi event "ButtonClick"
[code language="csharp"]
// Nơi dùng userCtrl sẽ đăng ký event này
public event RoutedEventHandler ButtonClick;
// Khi Button.Click sảy ra, hàm dưới đây sẽ được gọi để thực thi các đăng ký event
private void ActionExecuting(object sender, RoutedEventArgs e)
{
if (ButtonClick != null)
{
ButtonClick.Invoke(this, new RoutedEventArgs());
}
}
[/code]
XAML của userCtrl
[code language="xml"]
<!-- nội dung khác -->
<Button x:Name="btnAction" Grid.Column="2" Margin="2,0,0,0"
Content="{Binding ButtonContent, ElementName=userControl,
UpdateSourceTrigger=PropertyChanged}"
Click="ActionExecuting"/>
<!-- nội dung khác -->
[/code]
Lưu ý: cách xử lý này vẫn cùi mía, cách rồ hơn đề cập sau
4> Cách dùng
Hãy xem về Binding nếu bạn chưa biết nhé, sau đây tôi binding Content/Text của các control đến property của userCtrl(là property chứ không phải DependencyProperty nha)
[code language="xml"]
<UserControl x:Name="userControl" x:Class="Dependency_property.userControls.MyuserControl"
xmlns="http://schemas.microsoft.com/winfx/2006/xaml/presentation"
xmlns:x="http://schemas.microsoft.com/winfx/2006/xaml"
xmlns:mc="http://schemas.openxmlformats.org/markup-compatibility/2006"
xmlns:d="http://schemas.microsoft.com/expression/blend/2008"
mc:Ignorable="d"
d:DesignHeight="100" d:DesignWidth="300">
<Grid>
<Grid.ColumnDefinitions>
<ColumnDefinition Width="Auto"/>
<ColumnDefinition Width="*"/>
<ColumnDefinition Width="Auto"/>
</Grid.ColumnDefinitions>
<Grid Background="#FF3399FF">
<Label Content="Header" VerticalContentAlignment="Center" Padding="5,1" Foreground="White"/>
</Grid>
<TextBox Text="{Binding TextBoxText, ElementName=userControl, UpdateSourceTrigger=PropertyChanged}" Grid.Column="1"
VerticalContentAlignment="Center" Padding="5,1"/>
<Button x:Name="btnAction"
Content="{Binding ButtonContent, ElementName=userControl, UpdateSourceTrigger=PropertyChanged}"
Click="ActionExecuting" Grid.Column="2"/>
</Grid>
</UserControl>
<!-- trong nội dung binding, ElementName=userControl là chỉ userCtrl cha -->
[/code]
Gọi dùng user-Control ở MainWindow
[code language="xml"]
<Window x:Class="Dependency_property.MainWindow"
xmlns="http://schemas.microsoft.com/winfx/2006/xaml/presentation"
xmlns:x="http://schemas.microsoft.com/winfx/2006/xaml"
xmlns:local ="clr-namespace:Dependency_property.userControls"
Title="MainWindow" Height="200" Width="525">
<Grid>
<local:MyuserControl x:Name="txtAdv" VerticalAlignment="Center" Margin="10,0" Height="30"
ButtonClick="TxtAdv_OnButtonClick"
TextBoxText="Hello world! this is user-control"
ButtonContent="Show" />
</Grid>
</Window>
[/code]
Kết quả

Chúc các bạn thành công! source code
Phạm Tuân
"Làm sao để tạo một thể hiện của một class bằng việc sử dụng code XAML?", việc tạo một Instance trong code Behind là quá đơn giản (var intance = new ABC{ PrA = "property", PrB = 10};) xong để khởi tạo một Intance và gán giá trị cho các property cho nó thông qua code XAML thế nào chúng ta sẽ cùng xem ví dụ sau đâu.
I> Phần I: Tạo một Intance từ Internal class
Tôi tạo một Class như sau trong chính project của mình
[code language="csharp"]
public class Book
{
public string Name { get; set; }
public string Author { get; set; }
public decimal Price { get; set; }
public int YearPublished { get; set; }
}
[/code]
Tôi gọi là internal class vì class này cùng namespace với class MainWindow và chúng có quan hệ nội bộ
Để tạo intance của Class Book bằng code XAML tôi làm như sau
[code language="xml"]
<Window x:Class="Creating_instances_in_XAML.MainWindow"
xmlns="http://schemas.microsoft.com/winfx/2006/xaml/presentation"
xmlns:x="http://schemas.microsoft.com/winfx/2006/xaml"
xmlns:local="clr-namespace:Creating_instances_in_XAML"
Title="MainWindow" Height="200" Width="400">
<StackPanel>
<Button>
<local:Book Name="Study WPF"
Author="Phạm Tuân" Price="40"
YearPublished="2015" />
</Button>
<ContentControl>
<local:Book Name="Study WPF QuickStart"
Author="Phạm Tuân" Price="40"
YearPublished="2015" />
</ContentControl>
</StackPanel>
</Window>
[/code]
Hãy chú ý rằng:
- "local" là một từ khóa đại diện cho một namespace chứa class mà bạn muốn tạo intance
- <local:Book /> chính là class Book sẽ được tạo intance, các property của class Book được gọi tên và gán giá trị bên trong thẻ này.
- Một intance không kế thừa từ Controls sẽ phải được bao bọc bởi một control intance nào đó - tức thẻ <local:Book /> phải nằm trong thẻ của một số control chứ không được viết trực tiếp trong một thẻ panel

Kết quả hiển thị cho ta điểu này

Các bạn sẽ tự hỏi cái chúng ta nhận được trên GUI liệu có mục đích gì khi phần nội dung không có ý nhĩa, vâng! chúng là vô dụng nếu chỉ hiển có thế. Quay lại class Book vừa tạo và thay đổi như sau
[code language="csharp"]
public class Book
{
public string Name { get; set; }
public string Author { get; set; }
public decimal Price { get; set; }
public int YearPublished { get; set; }
public override string ToString()
{
return string.Format("{0} by {1}, Published {2}", Name,
Author, YearPublished);
}
}
[/code]
ToString() sẽ được tự động gọi để in dữ liệu ra GUI. Kết quả ta nhận được là

Đó là điều chúng ta cần trong một số trường hợp với Binding.
II> Phần II: Tạo một Intance từ External class
Trước tiên tôi tạo mới một project là Class Library, trong project này tôi tạo một class là Book như ở phần I
[code language="csharp"]
namespace ClassLibrary
{
public class Book
{
public string Name { get; set; }
public string Author { get; set; }
public decimal Price { get; set; }
public int YearPublished { get; set; }
public override string ToString()
{
return string.Format("{0} by {1}, Published {2}", Name,
Author, YearPublished);
}
}
}
[/code]
Quay lại project WPF tôi add reference đến project library trên, code XAML tôi dùng như dưới
[code language="xml"]
<Window x:Class="Creating_instances_in_XAML.MainWindow"
xmlns="http://schemas.microsoft.com/winfx/2006/xaml/presentation"
xmlns:x="http://schemas.microsoft.com/winfx/2006/xaml"
xmlns:local="clr-namespace:Creating_instances_in_XAML"
xmlns:classLibrary="clr-namespace:ClassLibrary;assembly=ClassLibrary"
Title="MainWindow" Height="200" Width="400">
<StackPanel>
<Button>
<local:Book Name="Study WPF"
Author="Phạm Tuân" Price="40"
YearPublished="2015" />
</Button>
<Button>
<classLibrary:Book Name="Study WPF QuickStart"
Author="Phạm Tuân" Price="80"
YearPublished="2019" />
</Button>
</StackPanel>
</Window>
[/code]
Chú ý hai từ khóa local và classLibrary, bạn đã thấy sự khác biệt chưa, hãy lưu ý cách khai báo này cho internal và external class
[code language="csharp"]
xmlns:local="clr-namespace:Creating_instances_in_XAML"
xmlns:classLibrary1="clr-namespace:ClassLibrary;assembly=ClassLibrary"
[/code]
Ngoài ra chúng ta còn cách khác để khai báo trước khi dùng thư viện ngoài như sau - cách này chuyên nghiệp và chính thống hơn. Bạn có để ý thấy rằng để refer đến một library của Microsoft trong XAML người ta chỉ dùng Web Address không, để dùng được như thế ta quay lại Class Book ở project Library và thêm một Attribute vào namspace như thế này
[code language="csharp"]
using System.Windows.Markup;
[assembly: XmlnsDefinition("http://mylibrary.com", "ClassLibrary")]
namespace ClassLibrary
{
public class Book
{
public string Name { get; set; }
public string Author { get; set; }
public decimal Price { get; set; }
public int YearPublished { get; set; }
public override string ToString()
{
return string.Format("{0} by {1}, Published {2}", Name,
Author, YearPublished);
}
}
}
[/code]
Ở XAML chúng ta thay thế cái cần thay thế
[code language="xml"]
<!-- Thay dòng sau -->
xmlns:classLibrary="clr-namespace:ClassLibrary;assembly=ClassLibrary"
<!-- bằng dòng dưới này-->
xmlns:classLibrary="http://mylibrary.com"
[/code]
Chúng ta có cùng một kết quả như phần I. Nếu chúng ta có các sub-namspace thì làm như sau
[code language="csharp"]
using System.Windows.Markup;
// Address sẽ thêm như sau
[assembly: XmlnsDefinition("http://mylibrary.com/OrtherBook", "ClassLibrary.OrtherBook")]
namespace ClassLibrary.OrtherBook
{
public class StoryBook
{
public string Name { get; set; }
public string Author { get; set; }
public decimal Price { get; set; }
public int YearPublished { get; set; }
public override string ToString()
{
return string.Format("{0} by {1}, Published {2}", Name,
Author, YearPublished);
}
}
}
[/code]
Code XAML dùng khác hơn một xíu
[code language="xml"]
<Window x:Class="Creating_instances_in_XAML.MainWindow"
xmlns="http://schemas.microsoft.com/winfx/2006/xaml/presentation"
xmlns:x="http://schemas.microsoft.com/winfx/2006/xaml"
xmlns:local="clr-namespace:Creating_instances_in_XAML"
<!-- Lưu ý sự thay đổi tại dòng dưới-->
xmlns:ortherBook="http://mylibrary.com/OrtherBook"
Title="MainWindow" Height="200" Width="400">
<StackPanel>
<Button>
<ortherBook:StoryBook Name="Study WPF QuickStart"
Author="Phạm Tuân" Price="80"
YearPublished="2019" />
</Button>
</StackPanel>
</Window>
[/code]
Chúc các bạn thành công
Phạm Tuân
Đăng ký:
Bài đăng (Atom)