
Blog chia sẽ kinh nghiệm lập trình và Technical VN. Nơi mà các bạn có thể học tập và tham khảo về những công nghệ mới nhất hiện nay về .NET
Hiển thị các bài đăng có nhãn Caliburn framework. Hiển thị tất cả bài đăng
Hiển thị các bài đăng có nhãn Caliburn framework. Hiển thị tất cả bài đăng
Thứ Bảy, 7 tháng 3, 2015
Sau hai bài giới thiệu về Caliburn.Micro framework, hôm nay chúng ta sẽ cùng bắt tay vào làm một dự án nhỏ - HelloWorld.
Step 1: Add reference
Khi đã tạo xong một project WPF Application, chúng ta sẽ phải tải về các DLLs của Caliburn và add vào project hoặc làm việc này tự động bằng cách mở "Package Manager Console" và paste command dưới đây vào rồi Enter.
TOOL -> NuGet Package Manager -> Package Manager Console
[code language="html"]
Install-Package Caliburn.Micro
[/code]
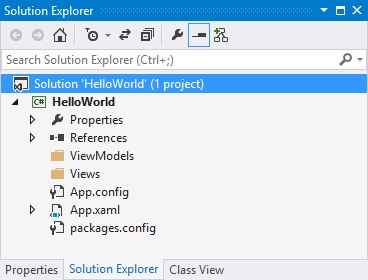
Step 2: Tổ chức lại project
- Xóa 2 file MainWindow.*
- Xóa dòng StartupUri="MainWindow.xaml" trong file App.xaml
- Tạo mới 2 folder với tên lần lược là "Views" và "ViewModels"
Step 3: Xây dựng
- Tạo class Bootstrapper.cs
- Tạo class "ViewModels/MainViewModel.cs" và tạo một Window "Views/MainView.xaml"
- Xóa file "Views/MainView.cs"
- Changed nội dung các file "App.xaml", "App.cs" như sau
App.xaml
[code language="xml"]
<Application x:Class="HelloWorl.App"
xmlns="http://schemas.microsoft.com/winfx/2006/xaml/presentation"
xmlns:x="http://schemas.microsoft.com/winfx/2006/xaml"
xmlns:helloWorl="clr-namespace:HelloWorl">
<Application.Resources>
<ResourceDictionary>
<ResourceDictionary.MergedDictionaries>
<ResourceDictionary>
<helloWorl:Bootstrapper x:Key="bootstrapperex" />
</ResourceDictionary>
</ResourceDictionary.MergedDictionaries>
</ResourceDictionary>
</Application.Resources>
</Application>
[/code]
App.cs
[code language="csharp"]
/// <summary>
/// Interaction logic for App.xaml
/// </summary>
public partial class App : Application
{
/// <summary>
/// Constructor
/// </summary>
public App()
{
InitializeComponent();
}
}
[/code]
Bootstrapper.cs
[code language="csharp"]
internal class Bootstrapper: BootstrapperBase
{
/// <summary>
/// Constructor
/// </summary>
public Bootstrapper()
{
this.StartRuntime();
}
/// <summary>
/// Override this to add custom behavior to execute after the application starts.
/// </summary>
/// <param name="sender">The sender.</param>
/// <param name="e">The args.</param>
protected override void OnStartup(object sender, StartupEventArgs e)
{
base.OnStartup(sender, e);
// MainViewModel sẽ được hiểu là Datacontent của MainView
// Dòng dưới chỉ ra một View chính cho App
DisplayRootViewFor<MainViewModel>();
}
}
[/code]
Ta có project như sau
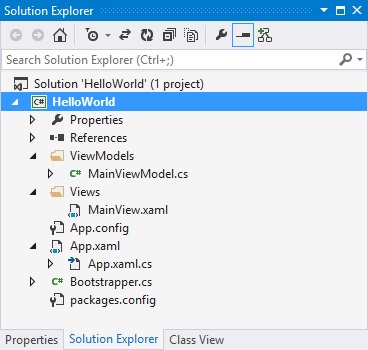
Đến đây chúng ta đã xong phần Helloworld, F5 và nhận kết quả, tải sourcecode tại đây (vì các DLLs đã được xóa nên hãy mở mạng và Rebuild project để NuGet tải lại dll).
Vậy mời các bạn đón xem phần tiếp theo!
Phạm Tuân
Thứ Năm, 5 tháng 3, 2015
Như ở bài trước tôi đã giới thiệu về caliburn.mocro, bài tiếp theo này tôi sẽ hướng dẫn các bạn về cách tạo một project WPF hợp chuẩn mô hình MVVM(*) dùng Caliburn framework. Bài này cho ta cái nhìn cơ bản về cấu trúc một Project WPF-Caliburn...
I> Hiểu MVVM Là Gì
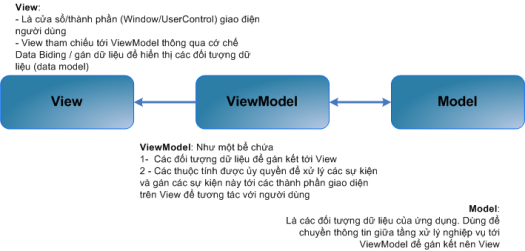
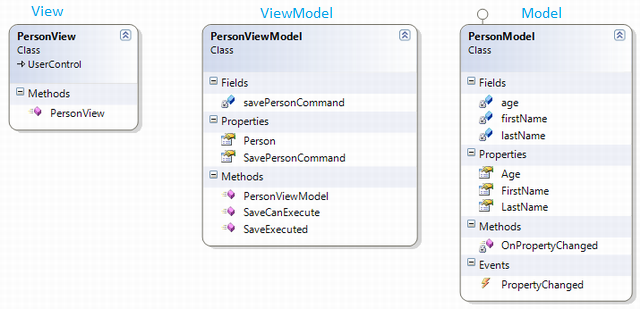
Để tổ chức một project theo mô hình MVVM nói chung và Caliburn nói riêng chúng ta cần hiểu rõ MVVM là gì và cơ chế Mapping(View - ViewModel) mà Framework hiện tại hỗ trợ. Hai hình sau minh họa khã rõ mô hình MVVM

Class diagram
.gif)
II> Quy Ước Tổ Chức Một Project Của Caliburn

Theo quy ước của Caliburn, phần View-ViewModel-Model phải được đặt tên theo một quy ước để có thể tận dụng tối hiệu năng của framework - mà dễ thấy nhất đó là một View sẽ được tự động kết dính với một ViewModel( bạn sẽ có cơ hội cảm nhận về điều này sau) nếu bạn tuân các thủ quy ước sau.
| View Model | View | |
|---|---|---|
| Convention | <EntityName>ViewModel | <EntityName>View |
| Example 1 | ShellViewModel | ShellView |
| Example 2 | TabViewModel | TabView |
Vì View trong thực tế được thể hiện như một Page nên chúng ta hoàn toàn có thể đặt tên như bảng dưới đây
| View Model | View | |
|---|---|---|
| Convention | <EntityName>PageViewModel | <EntityName>Page |
| Example 1 | MainPageViewModel | MainPage |
| Example 2 | OrderPageViewModel | OrderPage |
Nếu chúng ta có một Namespace khá dài cho các ViewModel hoặc View, chúng ta phải tuân thủ cách đặt tên sau
| View Model | View | |
|---|---|---|
| Convention | <RootNS>.<ViewModelTypeName> | <RootNS>.<ViewTypeName> |
| Example 1 | MyProject.ShellViewModel | MyProject.ShellView |
| Example 2 | MyProject.MainPageViewModel | MyProject.MainPage |
Hoặc
| View Model | View | |
|---|---|---|
| Convention | <RootNS>.ViewModels.<ChildNS>.<ViewModelTypeName> | <RootNS>.Views.<ChildNS>.<ViewTypeName> |
| Example 1 | MyProject.ViewModels.ShellViewModel | MyProject.Views.ShellView |
| Example 2 | MyProject.ViewModels.Utilities.SettingsViewModel | MyPoject.Views.Utitlities.SettingsView |
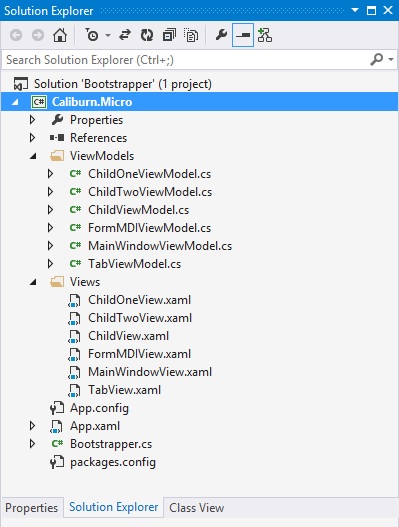
Dưới đây là một ví dụ về cách tổ chức một project Caliburn.Micro
Hay

Tất cả những quy ước trên là bạn phải thực hiện chính xác nếu muốn tận dụng nhiều tính năng hay, song bạn hoàn toàn có thể thay đổi theo ý cá nhân vì đây là framework mã nguồn mở.
-----------------------------------------------------------------
- Tìm Hiểu Về Caliburn.Micro Framework Phần I
- Tìm Hiểu Về Caliburn.Micro Framework Phần II
Đăng ký:
Bài đăng (Atom)