
Blog chia sẽ kinh nghiệm lập trình và Technical VN. Nơi mà các bạn có thể học tập và tham khảo về những công nghệ mới nhất hiện nay về .NET
Thứ Ba, 28 tháng 4, 2015
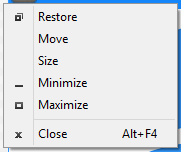
SystemMenuPhysicalCoordinatesTiêu đề có vẻ khó hình dung - thật sự tôi cũng không biết diễn đạt thế nào; hôm nay tôi sẽ mang đến cho các bạn một cách để giải quyết vấn đề mà tôi gặp phải và tôi nghĩ cũng nhiều người có cùng thắc mắc như tôi. Vấn đề nảy sinh nhiều khi bạn làm một ứng dụng WPF, bạn muốn làm một Window cho riêng mình, không có phần Border hay Style mặc định của Windows, bạn chọn cách ẩn hết những thứ mặc định đi sau đó thiết kế lại; và một số thứ bạn ẩn nó đi rồi không thể tìm thấy được khi cần thiết. Một trong những thứ mất đi nhưng cần thiết đó là một số SystemMenu, nó chính là phần menu ở góc trái trên, xuất hiện khi bạn nhấn vào logo/icon của window; Vậy làm thế nào hiện nó lại mà vẫn giữ được việc ẩn những thứ không cần thiết.
I> SystemMenu-Physical-Coordinates là gì?
Trong một số trường hợp SystemMenu ở góc 10h thật sự phát huy tác dụng và riêng tôi một phần mềm chuyên nghiệp không nên bỏ qua nó nếu đặc thù lĩnh vực vẫn cho phép. Đến với một ứng dụng WPF thông thường chúng ta sẽ thấy nó như thế này
Nhưng với tôi nó có vẻ không ổn, tôi muốn ẩn hết các đường Border mặc định kia đi, các Button góc 2h cũng không cần thiết vì Style này không đồng nhất với mẫu Design của tôi -> Tôi bỏ nó ra khỏi ứng dụng của mình và design thêm một chút
Window.XAML
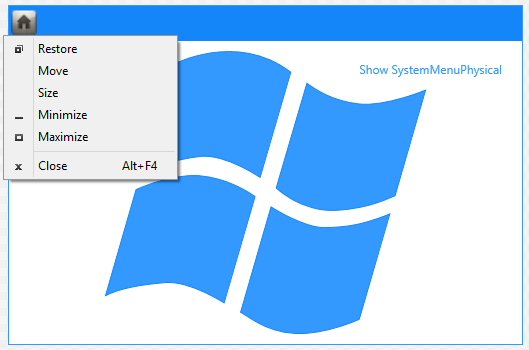
Và tôi được kết quả thế này

Chú ý rằng cái logo kia chỉ là một Icon tôi vừa đặt nó ở đó, khi tôi Click chuột vào lẽ dĩ nhiên vẫn vắng bóng cái Menu thường thấy ở Windows. Nhưng tôi muốn hiển thị cái menu thường thấy ấy ngay dưới vị trí Icon khi tôi Click chuột; Đơn giản chúng ta chỉ cần bắc sự kiện Logo_OnMouseLeftButtonDown(sender, e).
Window.CS
private void Logo_OnMouseLeftButtonDown(object sender, MouseButtonEventArgs e)
{
// Sẽ xử lý việc hiện SysMenu ở đây
}
II> Cách lấy và Show SystemMenu Physical-Coordinates
Trước tiên chúng ta cần Import một số thư viện WinAPI cần thiết, tôi tạo Class sauUnsafeNativeMethods.CS
internal class UnsafeNativeMethods
{
///
[DllImport("user32", CharSet = CharSet.Auto, ExactSpelling = true)]
// Kiểm tra một obj có phải là Windows?
internal static extern bool IsWindow([In] [Optional] IntPtr hWnd);
///
[DllImport("user32")]
// Get SysMenu mặc định
internal static extern IntPtr GetSystemMenu([In] IntPtr hWnd, [In] bool bRevert);
///
[DllImport("user32")]
// Show SysMenu trên Window
internal static extern uint TrackPopupMenuEx([In] IntPtr hmenu, [In] uint fuFlags, [In] int x, [In] int y,
[In] IntPtr hwnd, [In] [Optional] IntPtr lptpm);
///
[DllImport("user32", EntryPoint = "PostMessage", SetLastError = true)]
// PostMessage cho hệ thống Windows về hành vi của chúng ta
private static extern bool _PostMessage([In] [Optional] IntPtr hWnd, [In] uint Msg, [In] IntPtr wParam,
[In] IntPtr lParam);
internal static void PostMessage(IntPtr hWnd, uint Msg, IntPtr wParam, IntPtr lParam)
{
if (!_PostMessage(hWnd, Msg, wParam, lParam))
{
throw new Win32Exception();
}
}
}
Xong phần NativeMethods chúng ta tạo static class sau
SystemMenuPhysicalCoordinates.CS
internal static class SystemMenuPhysicalCoordinates
{
internal const uint SYSCOMMAND = 0x0112;
internal const uint TPM_LEFTBUTTON = 0x0;
internal const uint TPM_RETURNCMD = 0x0100;
///
/// Show SysMenu on Cureent Window
///
/// Window bạn muốn hiển thị /// Vị trí muốn hiển thị menu internal static void Show(Window window, Point physicalScreenLocation) { if (window == null) return; IntPtr hwnd = new WindowInteropHelper(window).Handle; if (hwnd == IntPtr.Zero || !UnsafeNativeMethods.IsWindow(hwnd)) return; // Get Menu IntPtr hmenu = UnsafeNativeMethods.GetSystemMenu(hwnd, false); // Show menu uint cmd = UnsafeNativeMethods.TrackPopupMenuEx(hmenu, TPM_LEFTBUTTON | TPM_RETURNCMD, (int) physicalScreenLocation.X, (int) physicalScreenLocation.Y, hwnd, IntPtr.Zero); if (0 != cmd) UnsafeNativeMethods.PostMessage(hwnd, SYSCOMMAND, new IntPtr(cmd), IntPtr.Zero); } } Thế là xong phần cở bản, chúng ta quay lại Handle cho Logo_OnMouseLeftButtonDown
 Các bạn có thể phát triển rộng hơn bằng cách đóng gói thành một Behavior độc lập để Attaching khi cần thiết. Tải source tại đây, chúc các bạn thành công! Phạm Tuân WPF.
Trong bài viết trước tôi có giới thiệu về Extension Methods trong nguôn ngữ lập trình C#; hôm nay tôi sẽ nói về một vấn đề có ý nghĩa tương tự nhưng lại chuyên biệt cho ứng dụng WPF. Ngoài ra các bạn cũng có thể thấy rằng trong WPF chúng ta có thể Attach khá nhiều thứ ví dụ như Property, đó là điểm mạnh của WPF mà Winform muốn làm được cũng khó.
I> Attached Behaviors là gì?
Tôi sẽ không định nghĩa suông về Attached Behaviors mà tôi sẽ nêu ra tình huống mà chúng ta sẽ phải dùng đến Attached Behaviors, nhưng nôm na chúng ta có thể hiểu Attached Behaviors là việc bạn thêm một hành vi vào một đối tượng Control nào đó mà bản thân nó trước đó không có - bạn sẽ nghĩ đến việc viết một control mới và thêm Behaviors nhưng thật sự không cần thiết khi mà chúng ta có thể đơn giản vấn đề hơn, ngoài ra với mô hình MVVM thì việc viết một control mới và thêm Behaviors thì có khá nhiều vấn đề nảy sinh(các sự kiện về chuột, key..). Tình huống khác đó là Behaviors này cần cho một số các Control khác nhau, vậy Attached tốt hơn hay viết lại hết tất cả các control tốt hơn chưa kể việc bạn sẽ phải thay thế lại hết tất cả các control nếu đã xây dựng trước đó.
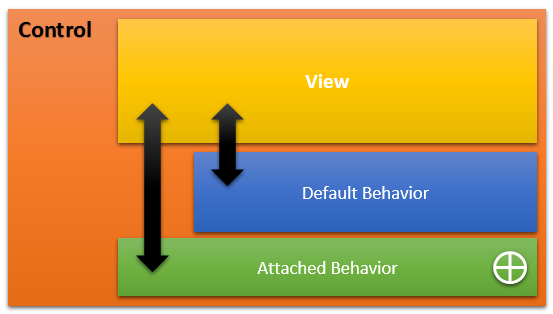
Attached Behaviors không can thiệp quá sâu vào hành vi ứng xử của Control, không làm mất đi tính hướng đối tượng
Chú ý: khi bạn gặp khó khăn trong việc xử lý sự kiện chuột, phím... đối với mô hình MVVM bạn nên cân nhắc việc dùng Attached Behaviors; Trong bộ công cụ Expression Blend bạn cũng có sẵn khá nhiều Attached Behaviors để dùng
II> Cách dùng Attached Behaviors
Trước tiên để có thể sử dụng được chúng ta cần tải về bộ thư viện hỗ trợ Attached Behaviors sau về và Reference:
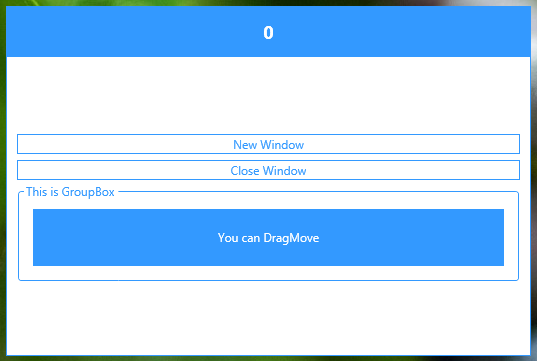
Sau đó tôi sẽ tạo một lớp DragMoveBehavior là Implament của Behavior<UIElement> . Mục đích lớp này là thêm tính năng DragMove cho các đối tượng là UIElement - nghĩa là khi tôi giữ chuột TRÁI và kéo thì Form/Window chứa UIElement đó sẽ di chuyển theo(UIElement là một thẻ bất kỳ có chức năng UI).
MainWindow.cs
#region
using System.Windows;
using System.Windows.Interactivity;
#endregion
namespace Attach_Behaviors
{
internal class DragMoveBehavior : Behavior
{
protected override void OnAttached()
{
base.OnAttached();
// Lấy ra Windows đang chứa đối tượng bị tác người dùng động
// Đối tượng bị tác người dùng động chính là AssociatedObject
Window parentwindow = Window.GetWindow(AssociatedObject);
AssociatedObject.MouseLeftButtonDown +=
(sender, e) =>
{
if (parentwindow != null)
// Tiến hành DragMove
parentwindow.DragMove();
};
}
}
}
Chú ý:
- AssociatedObject chính là đối tượng UIElement phát sinh Event
- Không phải tất cả các UIElement đều cho cùng một kết quả DragMove khi MouseLeftButtonDown vì cần xử lý nhiều hơn những dòng code trên với các control đặc thù
MainWindow.XAML
- Reference namespace "http://schemas.microsoft.com/expression/2010/interactivity"
- Reference namespace "clr-namespace:Attach_Behaviors" - chính là namespace của Project hiện tại
- Chọn đúng đối tượng cần behavior này và type mà behavior hỗ trợ cần trùng với type của đối tượng thừa hưởng behavior(ở đây là UIElement: Button, Grid, TextBox, GroupBox...)
Kết quả
Bạn có thể tải về SourceCode tại đây. Chúc các bạn thành công!
Phạm Tuân
Chủ Nhật, 26 tháng 4, 2015
Hôm nay tôi sẽ giới thiệu đến các bạn một thư viện mở(GalaSoft.Utilities) giúp chúng ta có thể tạo một ứng dụng có thể zoom.

Tôi có thiết kế giao diện như sau:
- CheckBox để ẩn/hiện kính Lúp
- Slider thay đổi chiều rộng kính
- Slider thay đổi chiều cao kính
- Slider thay đổi độ thu/phóng của kính
Chú ý: Kính lúp được mặc định là hình TRÒN, điều này có thể được thay đổi.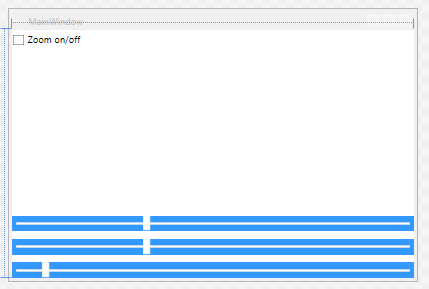
Chúng ta sẽ Attach Zoom Behavior trong thư viện GalaSoft.Utilities vào Root Grid Control(là vùng chúng ta muốn kính hoạt động)và binding đến các control đã thiết kế ở trên:
Kết quả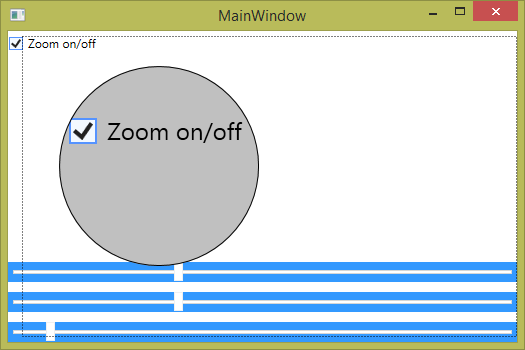
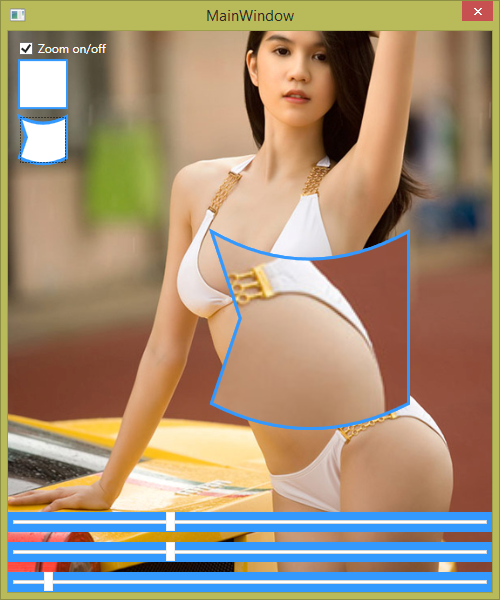
Chúng ta có thể thay đổi hình chiếc kính lúp bằng cách thay đổi Control Template của nó:
1-> Đầu tiên tôi định nghĩa 2 Template
2 -> Sau đó tôi tạo một group RadioButton (Rb1 và Rb2):
Thể hiện lại 2 Template trên, khi người dùng chọn một trong hai RadioButton này thì tôi sẽ gán Template mà nó đang giữ cho ZoomControl(tức x:Name="MyZoom")
Kết quả ta có 2 button để select kiểu kính lúp(góc trên trái 10h)

Code.CS
#region
using System.Windows;
using System.Windows.Controls;
#endregion
namespace ZoomBehavior
{
///
/// Interaction logic for MainWindow.xaml
///
public partial class MainWindow : Window
{
public MainWindow()
{
InitializeComponent();
}
///
/// Change the magnifier's template
///
private void TemplateRadioButton_Click(object s, RoutedEventArgs e)
{
var sender = s as RadioButton;
// Thay đổi hình dạng kính lúp
MyZoom.Template = sender.Template;
}
}
}
Đến đây bạn có thể làm Thánh Soi được rồi, có thể thêm tính năng mở file ảnh để show cho tiện soi
Tải về source tại đây
Vậy là chúng ta đã hoàn thiện một chiếc kính lúp cho ứng dụng của mình, chúc các bạn thành công!
Phạm Tuân.
Về khía cạnh náo đó chúng ta sẽ thấy giữa StaticResource và DynamicResource không có nhiều sự khác biệt và chúng có thể thay thế lẫn nhau mà không có vấn đề gì. Tuy vậy, ở một khía cạnh khác việc dùng chúng không đúng mục đích là hết sức nguy hiểm.
Giống nhau:
WPF giới thiệu một khái niệm rất tiện dụng: Khả năng lưu trữ dữ liệu/thông tin như một nguồn tài nguyên(Resource) cho một/một số Control hay cho Windows/Page hoặc cho toàn bộ ứng dụng. Các dữ liệu có thể được lưu trữ dưới nhiều dạng(Type) khác nhau và trong WPF chúng ta thường thấy nó khi các Style/Template được định nghĩa. Điều này cho phép bạn đặt dữ liệu ở một nơi và sau đó sử dụng nó từ hoặc một nơi khác một cách đơn giản.
Tôi xét đến một ví dụ như sau:
Và chúng ta có cùng một kết quả:

Khác nhau:
- Nếu dùng StaticResource bạn sẽ thấy nó giống với cách dùng Constant trong các ngôn ngữ lập trình cấp cao - có nghĩa là nó sẽ được loading một lần duy nhất để xử lý, việc bạn thay đồi giá trị của "Resource" sau đó đều không có ý nghĩa. Nếu dùng DynamicResource thì ngược lại, bạn có thể thay đổi giá trị của "Resource" để thay đổi thông tin nơi reference nó.
- Nếu dùng StaticResource chúng ta sẽ phải gặp rắc rối khi "Resource" đang được reference lại không tồn tại. Với DynamicResource thì nếu đối tượng được reference không tồn tại nó sẽ có giá trị default(Việc này có thể sẩy ra vì lúc bạn Building Project sẽ không hề nhận được thông báo lỗi 'Resource not found')
- Khi bạn dùng DynamicResource bạn sẽ phải tốn nhiều chi phí hơn, giảm hiệu xuất ứng dụng, ý (1) cũng cho thấy điều đó.
Minh chứng:
Sample.XAML
User Name:
Password:
Sample.CS
public partial class MainWindow : Window
{
public MainWindow()
{
InitializeComponent();
}
private void btnBlack_Click(object sender, RoutedEventArgs e)
{
Brush blackBrush = new SolidColorBrush { Color = Colors.Black };
this.Resources["WindowBrush"] = blackBrush;
}
private void btnRed_Click(object sender, RoutedEventArgs e)
{
Brush blackBrush = new SolidColorBrush { Color = Colors.Red };
this.Resources["WindowBrush"] = blackBrush;
}
}
Lời khuyên:
Nên cân nhắc việc dùng StaticResource và DynamicResource
Các StaticResource luôn được load lên trước và chúng sẽ ready khi ứng dụng đã Start vì thế ứng dụng của bạn sẽ khởi động rất lâu nếu dữ liệu Static là phức tạp và quá lớn.
Nếu bạn dùng DynamicResource thì hiệu xuất ứng dụng sẽ giảm đi đáng kể nhưng bạn lại có thể thay đổi giá trị của Resource lúc Runtime - cái mà StaticResource không làm được.
Hi vọng các bạn sẽ có cái nhìn rõ ràng hơn về StaticResource và DynamicResource, chúc các bạn thành công!
Phạm Tuân
Phạm Tuân
Thứ Bảy, 18 tháng 4, 2015
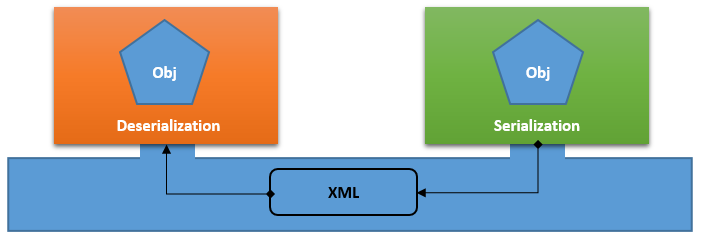
Hôm nay chúng ta sẽ tìm hiểu về XML Serialization and Deserialization(XS&D) - Serialization có thể tạm dịch là "Tuần tự hóa", về cơ bản nó giải quyết được vấn đề như sau: chúng ta có một obj và muốn truyền tải obj đó từ server đến client bằng internet chúng ta sẽ Serialization obj đó thành dạng XML và truyền đi, sau đó ở đầu kia client sẽ Deserialization XML nhận được thành một obj nguyên vẹn như ở server.
Ngoài ra XML Serialization and Deserialization còn có nhiều ứng dụng khác ví dụ như lưu trữ trạng thái một Application ngay trước khi nó bị Exit và khôi phục trạng thái khi nó Start trở lại hay lưu các thay đổi hệ thống, các setting của người dùng... Thay vì lưu ra file bình thường và đọc chúng khi cần thiết để xậy dụng lại một obj thì chúng ta sử dụng XS&D để tối ưu hóa tốc độ đọc file và building obj.
I> Đặc điểm
XML Serialization and Deserialization có một số điểm cần lưu ý:
- XML serialization không chuyển đổi methods, indexers, private fields, hoặc read-only properties (read-only collections)
- Các dòng XML được tạo ra bởi các XmlSerializer luôn phù hợp với chuẩn World Wide Web Consortium (www.w3.org) ngôn ngữ định nghĩa lược đồ XML (XSD) 1.0.
- Lớp XmlSerializer có thể tuần tự hóa một đối tượng và tạo ra một định dạng SOAP XML mã hóa. Việc tạo ra XML tuân thủ tài liệu về World Wide Web Consortium mang tên "Simple Object Access Protocol (SOAP) 1.1."
XMLSerialize có thể Serializeting những gì:
- Public read/write properties và các trường của một public classes.
- Các class là implement của ICollection hoặc IEnumerable.
- XmlElement objects.
- XmlNode objects.
- DataSet objects.
II> Code mẫu Serializing
* Serializing một DataSet
private void SerializeDataSet(string filename){
XmlSerializer ser = new XmlSerializer(typeof(DataSet));
// Creates a DataSet; adds a table, column, and ten rows.
DataSet ds = new DataSet("myDataSet");
DataTable t = new DataTable("table1");
DataColumn c = new DataColumn("thing");
t.Columns.Add(c);
ds.Tables.Add(t);
DataRow r;
for(int i = 0; i<10;i++){ r = t.NewRow(); r[0] = "Thing " + i; t.Rows.Add(r); } TextWriter writer = new StreamWriter(filename); ser.Serialize(writer, ds); writer.Close(); }
* Serializing XmlElement và XmlNode
private void SerializeElement(string filename){
XmlSerializer ser = new XmlSerializer(typeof(XmlElement));
XmlElement myElement=
new XmlDocument().CreateElement("MyElement", "ns");
myElement.InnerText = "Hello World";
TextWriter writer = new StreamWriter(filename);
ser.Serialize(writer, myElement);
writer.Close();
}
private void SerializeNode(string filename){
XmlSerializer ser = new XmlSerializer(typeof(XmlNode));
XmlNode myNode= new XmlDocument().
CreateNode(XmlNodeType.Element, "MyNode", "ns");
myNode.InnerText = "Hello Node";
TextWriter writer = new StreamWriter(filename);
ser.Serialize(writer, myNode);
writer.Close();
}
* Serializing một Class có chứa các trường public
public class PurchaseOrder
{
public Address MyAddress;
}
public class Address
{
public string FirstName;
}
Kết quả XML
* Serializing mảng
public class PurchaseOrder
{
public Item [] ItemsOrders
}
public class Item
{
public string ItemID
public decimal ItemPrice
}
Kết quả XML
* Serializing một class Implements từ Interface ICollection
using System;
using System.IO;
using System.Collections;
using System.Xml.Serialization;
public class Test{
static void Main(){
Test t = new Test();
t.SerializeCollection("coll.xml");
}
private void SerializeCollection(string filename){
Employees Emps = new Employees();
// Note that only the collection is serialized -- not the
// CollectionName or any other public property of the class.
Emps.CollectionName = "Employees";
Employee John100 = new Employee("John", "100xxx");
Emps.Add(John100);
XmlSerializer x = new XmlSerializer(typeof(Employees));
TextWriter writer = new StreamWriter(filename);
x.Serialize(writer, Emps);
}
}
public class Employees:ICollection{
public string CollectionName;
private ArrayList empArray = new ArrayList();
public Employee this[int index]{
get{return (Employee) empArray[index];}
}
public void CopyTo(Array a, int index){
empArray.CopyTo(a, index);
}
public int Count{
get{return empArray.Count;}
}
public object SyncRoot{
get{return this;}
}
public bool IsSynchronized{
get{return false;}
}
public IEnumerator GetEnumerator(){
return empArray.GetEnumerator();
}
public void Add(Employee newEmployee){
empArray.Add(newEmployee);
}
}
public class Employee{
public string EmpName;
public string EmpID;
public Employee(){}
public Employee(string empName, string empID){
EmpName = empName;
EmpID = empID;
}
}
* Tổng hợp
using System;
using System.Xml;
using System.Xml.Serialization;
using System.IO;
// The XmlRootAttribute allows you to set an alternate name
// (PurchaseOrder) for the XML element and its namespace. By
// default, the XmlSerializer uses the class name. The attribute
// also allows you to set the XML namespace for the element. Lastly,
// the attribute sets the IsNullable property, which specifies whether
// the xsi:null attribute appears if the class instance is set to
// a null reference.
[XmlRootAttribute("PurchaseOrder", Namespace="http://www.cpandl.com",
IsNullable = false)]
public class PurchaseOrder
{
public Address ShipTo;
public string OrderDate;
// The XmlArrayAttribute changes the XML element name
// from the default of "OrderedItems" to "Items".
[XmlArrayAttribute("Items")]
public OrderedItem[] OrderedItems;
public decimal SubTotal;
public decimal ShipCost;
public decimal TotalCost;
}
public class Address
{
// The XmlAttribute instructs the XmlSerializer to serialize the
// Name field as an XML attribute instead of an XML element (the
// default behavior).
[XmlAttribute]
public string Name;
public string Line1;
// Setting the IsNullable property to false instructs the
// XmlSerializer that the XML attribute will not appear if
// the City field is set to a null reference.
[XmlElementAttribute(IsNullable = false)]
public string City;
public string State;
public string Zip;
}
public class OrderedItem
{
public string ItemName;
public string Description;
public decimal UnitPrice;
public int Quantity;
public decimal LineTotal;
// Calculate is a custom method that calculates the price per item
// and stores the value in a field.
public void Calculate()
{
LineTotal = UnitPrice * Quantity;
}
}
public class Test
{
public static void Main()
{
// Read and write purchase orders.
Test t = new Test();
t.CreatePO("po.xml");
t.ReadPO("po.xml");
}
private void CreatePO(string filename)
{
// Creates an instance of the XmlSerializer class;
// specifies the type of object to serialize.
XmlSerializer serializer =
new XmlSerializer(typeof(PurchaseOrder));
TextWriter writer = new StreamWriter(filename);
PurchaseOrder po=new PurchaseOrder();
// Creates an address to ship and bill to.
Address billAddress = new Address();
billAddress.Name = "Teresa Atkinson";
billAddress.Line1 = "1 Main St.";
billAddress.City = "AnyTown";
billAddress.State = "WA";
billAddress.Zip = "00000";
// Sets ShipTo and BillTo to the same addressee.
po.ShipTo = billAddress;
po.OrderDate = System.DateTime.Now.ToLongDateString();
// Creates an OrderedItem.
OrderedItem i1 = new OrderedItem();
i1.ItemName = "Widget S";
i1.Description = "Small widget";
i1.UnitPrice = (decimal) 5.23;
i1.Quantity = 3;
i1.Calculate();
// Inserts the item into the array.
OrderedItem [] items = {i1};
po.OrderedItems = items;
// Calculate the total cost.
decimal subTotal = new decimal();
foreach(OrderedItem oi in items)
{
subTotal += oi.LineTotal;
}
po.SubTotal = subTotal;
po.ShipCost = (decimal) 12.51;
po.TotalCost = po.SubTotal + po.ShipCost;
// Serializes the purchase order, and closes the TextWriter.
serializer.Serialize(writer, po);
writer.Close();
}
protected void ReadPO(string filename)
{
// Creates an instance of the XmlSerializer class;
// specifies the type of object to be deserialized.
XmlSerializer serializer = new XmlSerializer(typeof(PurchaseOrder));
// If the XML document has been altered with unknown
// nodes or attributes, handles them with the
// UnknownNode and UnknownAttribute events.
serializer.UnknownNode+= new
XmlNodeEventHandler(serializer_UnknownNode);
serializer.UnknownAttribute+= new
XmlAttributeEventHandler(serializer_UnknownAttribute);
// A FileStream is needed to read the XML document.
FileStream fs = new FileStream(filename, FileMode.Open);
// Declares an object variable of the type to be deserialized.
PurchaseOrder po;
// Uses the Deserialize method to restore the object's state
// with data from the XML document. */
po = (PurchaseOrder) serializer.Deserialize(fs);
// Reads the order date.
Console.WriteLine ("OrderDate: " + po.OrderDate);
// Reads the shipping address.
Address shipTo = po.ShipTo;
ReadAddress(shipTo, "Ship To:");
// Reads the list of ordered items.
OrderedItem [] items = po.OrderedItems;
Console.WriteLine("Items to be shipped:");
foreach(OrderedItem oi in items)
{
Console.WriteLine("\t"+
oi.ItemName + "\t" +
oi.Description + "\t" +
oi.UnitPrice + "\t" +
oi.Quantity + "\t" +
oi.LineTotal);
}
// Reads the subtotal, shipping cost, and total cost.
Console.WriteLine(
"\n\t\t\t\t\t Subtotal\t" + po.SubTotal +
"\n\t\t\t\t\t Shipping\t" + po.ShipCost +
"\n\t\t\t\t\t Total\t\t" + po.TotalCost
);
}
protected void ReadAddress(Address a, string label)
{
// Reads the fields of the Address.
Console.WriteLine(label);
Console.Write("\t"+
a.Name +"\n\t" +
a.Line1 +"\n\t" +
a.City +"\t" +
a.State +"\n\t" +
a.Zip +"\n");
}
protected void serializer_UnknownNode
(object sender, XmlNodeEventArgs e)
{
Console.WriteLine("Unknown Node:" + e.Name + "\t" + e.Text);
}
protected void serializer_UnknownAttribute
(object sender, XmlAttributeEventArgs e)
{
System.Xml.XmlAttribute attr = e.Attr;
Console.WriteLine("Unknown attribute " +
attr.Name + "='" + attr.Value + "'");
}
}
Kết quả XML
II> XML Serialization sử dụng Attributes
* XmlArrayAttribute
Không sử dụng XmlArrayAttributepublic class Group{
public Employee[] Employees;
}
public class Employee{
public string Name;
}
Kết quả XML
Sử dụng XmlArrayAttribute thay đổi tên một XML element
public class Group{
[XmlArray("TeamMembers")]
public Employee[] Employees;
}
Kết quả XML
* XmlArrayItemAttribute
public class Group{
[XmlArrayItem("MemberName")]
public Employee[] Employees;
}
Kết quả XML
hay
public class Group{
[XmlArrayItem(Type = typeof(Employee)),
XmlArrayItem(Type = typeof(Manager))]
public Employee[] Employees;
}
public class Employee{
public string Name;
}
public class Manager:Employee{
public int Level;
}
Kết quả XML
* XmlElementAttribute
public class Group{
[XmlElement]
public Employee[] Employees;
}
Kết quả XML
IV> Deserializing XML Data
Cách đọc ngược xml build thành objectusing System;
using System.IO;
using System.Xml.Serialization;
namespace XMLTest1
{
public class Test
{
public String value1;
public String value2;
}
class Program
{
static void Main(string[] args)
{
String xData = "
XmlSerializer x = new XmlSerializer(typeof(Test));
Test myTest = (Test)x.Deserialize(new StringReader(xData)/* đọc từ string hoặc từ file*/);
Console.WriteLine("V1: " + myTest.value1);
Console.WriteLine("V2: " + myTest.value2);
Console.ReadKey();
}
}
}
(tham khảo nguồn Microsoft)
Chúc các bạn thành công!
Phạm Tuân
Chúng ta thường thấy các ứng dụng chuyên nghiệp thường có tùy chọn cho phép ứng dụng khởi động cùng Windows, vậy chúng ta làm điều đó như thế nào.

Cơ chế để các ứng dụng được windows gọi start tự động khi mở máy đó là nó sẽ tìm các ứng dụng có đăng ký Startup trong thư mục Run của Registry và khởi động lần lượt các ứng dụng. Vậy để thực hiện việc đăng ký này chúng ta làm như sau.
private void RegisterInStartup(bool isChecked)
{
RegistryKey registryKey = Registry.CurrentUser.OpenSubKey
("SOFTWARE\\Microsoft\\Windows\\CurrentVersion\\Run", true);
if (isChecked)
{
// Đăng ký stratup cùng Windows
registryKey.SetValue("HoverNote", Directory.GetCurrentDirectory() + "\\HoverNote.exe");
}
else
{
// Hủy đăng ký
registryKey.DeleteValue("HoverNote");
}
}
Chú ý: Hàm SetValue(string1, string2) nhận hai giá trị
- string1: Tên khóa cho một registry, tên này bạn đặt tùy ý và nó sẽ là khóa cho các lần làm việc sau
- string2: là đường dẫn bạn muốn Windows gọi để start một cái gì đó (ở đây là file *.exe)
private bool CheckStartup()
{
bool result;
RegistryKey registryKey = Registry.CurrentUser.OpenSubKey
("SOFTWARE\\Microsoft\\Windows\\CurrentVersion\\Run", true);
// Nếu key này tồn tại thì việc đăng ký là thành công
var rg = registryKey.GetValue("HoverNote");
if (rg != null)
{
result = true;
}
}
Chủ Nhật, 5 tháng 4, 2015
Data Binding là kĩ thuật dùng để tạo gắn kết giữa phần giao diện (UI) và dữ liệu thông qua phần business logic hoặc giữa các đối tượng UI với nhau. Nhờ Data Binding, UI có thể tự động cập nhật lại để hiển thị các thay đổi trong dữ liệu mà không cần sự can thiệp từ code behind.Ngoài ra, Data Binding trong WPF còn hỗ trợ các chiều khác nhau, nghĩa là các thay đổi có thể cập nhật từ UI vào dữ liệu hay ngược lại.
I> Giới thiệu
Một Binding bao gồm 4 thành phần chính là: binding target, target property, binding source và path (đường dẫn) đến giá trị cần thiết trong binding source, thông thường path này là một source property.
Ví dụ: bạn muốn gắn property Name của một đối tượng Person cho property Text của một TextBox. Khi đó:
- Binding target: TextBox
- Target property: property Text của TextBox
- Binding source: đối tượng Person
- Path: đường dẫn đếnproperty Name của đối tượng Person.
Mô hình Data Binding của WPF theo hình minh họa như sau

Cần lưu ý là target property phải là một dependency property. Đa số các property của lớp UIElement đều là các dependency property. Đối với binding source, bạn có thể sử dụng bất kì đối tượng .NET nào, chẳng hạn như các đối tượng trong ADO.NET, XML hay các control trong WPF.
II> Binding Mode
Binding mode sẽ chỉ ra hướng mà dữ liệu sẽ được cập nhật. Bao gồm 5 giá trị từ enum BindingMode là:
| Name | Description |
| OneWay | Cập nhật target property theo source property |
| TwoWay | Cập nhật hai chiều giữa target property và source property. |
| OneTime | Khởi tạo target property từ source property. Sau đó việc cập nhật dữ liệu sẽ không được thực hiện. |
| OneWayToSource | Giống OneWay nhưng theo hướng ngược lại: cập nhật từ target property sang source property. |
| Default | Hướng binding dựa trên target property. Với target property mà người dùng có thể thay đổi giá trị (như TextBox.Text) thì nó là TwoWay, còn lại là OneWay |
* Nhưng khi nào thì dữ liệu sẽ bắt đầu được cập nhật, chúng ta sẽ nói sau về phần UpdateSourceTrigger
Ví dụ: Giả sử tôi muốn cập nhật nội dung của một TextBox theo giá trị được nhập vào TextBox khác. Cửa sổ minh họa cho ví dụ này cần hai control chính là txtHvà txtS:
Bản chất của việc tạo binding bao gồm 2 bước:
-Tạo một đối tượng System.Windows.Data.Binding và thiết lập các giá trị cần thiết.
-Gọi phương thức instance FrameworkElement.SetBinding() của target binding. FrameworkElement được thừa kế từ UIElement và là lớp cha của các control trong WPF. Phương thức này có tham số đầu tiên là một dependency property.
Bạn có thể tạo trong XAML theo cách thông thường sau:
Tuy nhiên, XAML còn hỗ trợ một dạng cú pháp gọn hơn với cùng chức năng như đoạn mã trên:
Kết quả:

Ví dụ về binding màu:

Thứ Bảy, 4 tháng 4, 2015
1. WPF là gì?WPF, viết tắt của Windows Presentation Foundation, là hệ thống API mới hỗ trợ việc xây dựng giao diện đồ hoạ trên nền Windows. Được xem như thế hệ kế tiếp của WinForms, WPF tăng cường khả năng lập trình giao diện của lập trình viên bằng cách cung cấp các API cho phép tận dụng những lợi thế về đa phương tiện hiện đại. Là một bộ phận của .NET Framework 3.0, WPF sẵn có trong Windows Vista và Windows Server 2008. Đồng thời, WPF cũng có thể hoạt động trên nền Windows XP Service Pack 2 hoặc mới hơn, và cả Windows Server 2003.
WPF được xây dựng nhằm vào ba mục tiêu cơ bản:
- Cung cấp một nền tảng thống nhất để xây dựng giao diện người dùng;
- Cho phép người lập trình và người thiết kế giao diện làm việc cùng nhau một cách dễ dàng;
- Cung cấp một công nghệ chung để xây dựng giao diện người dùng trên cả Windows và trình duyệt Web
2. Nền tảng thống nhất để xây dựng giao diện người dùng
Trước khi WPF ra đời, việc tạo giao diện người dùng theo những yêu cầu mô tả ở ví dụ trên đòi hỏi sử dụng rất nhiều công nghệ khác nhau (xem Bảng 2.1). Để tạo form, các control và các tính năng kinh điển khác của một giao diện đồ họa Windows, thông thường lập trình viên sẽ chọn Windows Forms, một phần của .NET Framework. Nếu cần hiển thị văn bản, Windows Forms có một số tính năng hỗ trợ văn bản trực tiếp hoặc có thể sử dụng Adobe’s PDF để hiển thị văn bản có khuôn dạng cố định.
Đối với hình ảnh và đồ họa 2 chiều, lập trình viên sẽ dùng GDI+, một mô hình lập trình riêng biệt có thể truy nhập qua Windows Forms. Để hiển thị video hay phát âm thanh, lập trình viên lại phải sử dụng Windows Media Player, và với đồ họa 3 chiều, anh ta lại phải dùng Direct3D, một thành phần chuẩn khác của Windows. Tóm lại, quá trình phát triển giao diện người dùng theo yêu cầu trở nên phức tạp, đòi hỏi lập trình viên quá nhiều kỹ năng công nghệ.

Bảng 0.1 – Thành phần giao diện theo yêu cầu và những công nghệ chuyên biệt ần thiết để tạo chúng. (nguồn msdn.vietnam)
WPF là giải pháp hợp nhất nhằm giải quyết tất cả những vấn đề công nghệ nêu trên, hay nói cách khác, WPF cung cấp nhiều tính năng lập trình giao diện trong cùng một công nghệ đơn nhất. Điều này giúp cho quá trình tạo giao diện người dùng trở nên dễ dàng hơn đáng kể.
Hình 0.1 cho thấy một giao diện quản lý và theo dõi bệnh nhân có sự kết hợp của hình ảnh, text, đồ họa 2 chiều/3 chiều và nhiều thông tin trực quan khác. Tất cả đều được tạo ra bằng WPF – lập trình viên không cần viết code để sử dụng các công nghệ chuyên biệt như GDI+ hay Direct3D.

Hình 0.1 – Một giao diễn người dùng quản lý và theo dõi bệnh nhân sử dụng WPF có thể kết hợp hình ảnh, text, đồ họa 2 chiều/3chiều và nhiều tính năng trực quan khác. (nguồn http://msdn.microsoft.com)
Tuy nhiên, WPF ra đời không có nghĩa là tất cả những công nghệ nêu trên bị thay thế. Windows Forms vẫn có giá trị, thậm trí trong WPF, một số ứng dụng mới vẫn sẽ sử dụng Windows Forms. Windows Media Player vẫn đóng một vai trò công cụ độc lập để chơi nhạc và trình chiếu video. PDF cho văn bản vẫn tiếp tục được sử dụng. Direct3D vẫn là công nghệ quan trọng trong games và các dạng ứng dụng khác (Trong thực tế, bản thân WPF dựa trên Direct3D để thực hiện mọi biểu diễn đồ họa).
Việc tạo ra một giao diện người dùng hiện đại không chỉ là việc hợp nhất các công nghệ sẵn có khác nhau. Nó còn thể hiện ở việc tận dụng lợi điểm của card đồ họa hiện đại. Để giải phóng những hạn chế của đồ họa bitmap, WPF dựa hoàn toàn trên đồ họa vector, cho phép hình ảnh tự động thay đổi kích thước để phù hợp với kích thước và độ phân giải của màn hình mà nó được hiển thị.
Bằng việc hợp nhất tất cả các công nghệ cần thiết để tạo ra một giao diện người dùng vào một nền tảng đơn nhất, WPF đơn giản hóa đáng kể công việc của lập trình viên giao diện. Với việc yêu cầu lập trình viên học một môi trường phát triển duy nhất, WPF góp phần làm giảm chi phí cho việc xây dựng và bảo trì ứng dụng. Và bằng việc cho phép tích hợp đa dạng nhiều cách biểu diễn thông tin trên giao diện người dùng, WPF góp phần nâng cao chất lượng, và theo đó là giá trị công việc, của cách thức người dùng tương tác với ứng dụng trên Windows.
3. Khả năng làm việc chung giữa người thiết kế giao diện và lập trình viên
Trong thực tế, việc xây dựng một giao diện người dùng phức hợp như trong ví dụ về ứng dụng quản lý bệnh nhân trên đòi hỏi những kỹ năng ít thấy ở những lập trình viên đơn thuần, mà chỉ có thể tìm thấy ở những người thiết kế giao diện chuyên nghiệp. Nhưng câu hỏi đặt ra là làm sao để người thiết kế và lập trình viên có thể làm việc cùng nhau?
Thông thường, người thiết kế giao diện sử dụng một công cụ đồ họa để tạo ra những ảnh tĩnh về cách bố trí giao diện trên màn hình. Những hình ảnh này sau đó được chuyển tới lập trình viên với nhiệm vụ tạo ra mã trình để hiện thực hóa giao diện đã thiết kế. Đôi lúc vẽ ra một giao diện thì đơn giản với người thiết kế, nhưng để biến nó thành hiện thực có thể là khó khăn hoặc bất khả thi với lập trình viên.
Hạn chế về công nghệ, sức ép tiến độ, thiếu kỹ năng, hiểu nhầm hoặc đơn giản là bất đồng quan điểm có thể khiến lập trình viên không đáp ứng được đầy đủ yêu cầu từ người thiết kế. Do vậy, điều cần thiết ở đây là một cách thức để hai nhóm công tác độc lập này có thể làm việc với nhau mà không làm thay đổi chất lượng của giao diện đã thiết kế.
Để thực hiện được điều này, WPF đưa ra ngôn ngữ đặc tả eXtensible Application Markup Language (XAML). XAML định ra một tập các phần tử XML như Button, TextBox, Label…, nhằm định nghĩa các đối tượng đồ họa tương ứng như nút bấm, hộp thoại, nhãn…, và nhờ đó cho phép mô tả chính xác diện mạo của giao diện người dùng. Các phần tử XAML cũng chứa các thuộc tính, cho phép thiết lập nhiều tính chất khác nhau của đối tượng đồ họa tương ứng.
Ví dụ, đoạn mã sau sẽ tạo ra một nút bấm màu đỏ có nhan đề “No”.
Mỗi phần tử XAML lại tương ứng với một lớp WPF, và mỗi thuộc tính của phần tử đó lại tương ứng với thuộc tính hay sự kiện của lớp này. Chẳng hạn, nút bấm màu đỏ trong ví dụ trên có thể tạo bằng C# code như sau:

Hình 0.2 – XAML hỗ trợ lập trình viên và người thiết kế làm việc chung. (nguồn http://msdn.microsoft.com/en-us/library/aa663364.aspx)
Người thiết kế có thể mô tả giao diện người dùng và tương tác với nó thông qua một công cụ, chẳng hạn như Microsoft Expression Interactive Designer. Chỉ tập trung vào việc định ra diện mạo và cảm quan cho giao diện đồ họa WPF, công cụ này sinh các đoạn mô tả giao diện thể hiện qua ngôn ngữ XAML. Lập trình viên sau đó sẽ nhập đoạn mô tả XAML đó vào môi trường lập trình, chẳng hạn như Microsoft Visual Studio.
Thay vì lập trình viên phải tái tạo lại giao diện từ đầu dựa trên một ảnh tĩnh mà người thiết kế cung cấp, bản thân các đoạn XAML này sẽ được Microsoft Visual Studio biên dịch để tái tạo thành giao diện đồ họa đúng theo mô tả. Lập trình viên chỉ tập trung vào việc viết mã trình cho giao diện được sinh ra, chẳng hạn như xử lý các sự kiện, theo những chức năng đề ra của ứng dụng.
Việc cho phép người thiết kế và lập trình viên làm việc chung như vậy sẽ hạn chế những lỗi phát sinh khi hiện thực hóa giao diện từ thiết kế. Thêm vào đó, nó còn cho phép hai nhóm công tác này làm việc song song, khiến mỗi bước lặp trong quy trình phát triển phần mềm ngắn đi và việc phản hồi được tốt hơn. Vì cả hai môi trường đều có khả năng hiểu và sử dụng XAML, ứng dụng WPF có thể chuyển qua lại giữa hai môi trường phát triển để sửa đổi hay bổ sung giao diện. Với tất cả những lợi điểm này, vai trò của người thiết kế trong việc xây dựng giao diện được đặt lên hàng đầu.
4. Công nghệ chung cho giao diện trên Windows và trên trình duyệt Web
Trong thời đại bùng nổ của Internet, các ứng dụng Web ngày một phát triển. Việc trang bị giao diện người dùng với đầy đủ tính năng như một ứng dụng desktop sẽ thu hút nhiều người sử dụng;, và do đó góp phần làm tăng giá trị doanh nghiệp. Tuy nhiên, như đã nêu trong phần đầu, với những công nghệ truyền thống, để phát triển một giao diện đồ họa vừa hoạt động trên desktop vừa trên trình duyệt Web, đòi hỏi phải sử dụng những công nghệ hoàn toàn khác nhau, giống như việc xây dựng hai giao diện hoàn toàn độc lập. Điều này tạo ra chi phí không cần thiết để phát triển giao diện.
WPF là một giải pháp cho vấn đề này. Lập trình viên có thể tạo ra một ứng dụng trình duyệt XAML (XBAP) sử dụng WPF chạy trên Internet Explore. Trên thực tế, cùng đoạn code này có thể được dùng để sinh ứng dụng WPF chạy độc lập trên Windows. Hình 0.4 minh họa một ứng dụng dịch vụ tài chính hoạt động như một ứng dụng WPF độc lập. Trong khi đó, hình 0.4 minh họa giao diện của cùng ứng dụng chạy trên Internet Explore dưới dạng XBAP.

Hình 0.3. Úng dụng WPF độc lập cung cấp dịch vụ tài chính chạy trong cửa sổ riêng. (nguồn http://msdn.microsoft.com)

Hình 0.4. Giao diện của cùng ứng dụng nêu trên dưới dạng một XBAP chạy trên Internet Explore. (nguồn http://msdn.microsoft.com)
Như đã thấy trong Hình 0.4, phần giao diện của ứng dụng dạng XBAP được trình duyệt chia thành các frame thay vì chạy trên các cửa sổ riêng, ngoài ra, các chức năng đều được bảo toàn. Cùng một đoạn mã được sử dụng chung cho cả hai trường hợp sẽ làm giảm khối lượng công việc cần thiết để phát triển hai dạng giao diện. Thêm vào đó, sử dụng cùng một đoạn mã cũng có nghĩa là sử dụng cùng kỹ năng của lập trình viên.
Do đó, lập trình viên chỉ cần có học một kiến thức chung là có thể sử dụng trong cả hai trường hợp. Một lợi điểm nữa của việc dùng chung công nghệ cho cả giao diện Windows và giao diện Web là người xây dựng ứng dụng không nhất thiết phải quyết định trước loại giao diện nào được sử dụng. Miễn là máy client đáp ứng được những yêu cầu hệ thống để chạy XBAP, một ứng dụng có thể cung cấp cả giao diện Windows và giao diện Web, mà chỉ sử dụng phần lớn những đoạn mã giống nhau.
Mỗi ứng dụng XBAP được download khi cần từ một Web server, nên nó phải tuân theo những yêu cầu về an ninh khắt khe hơn đối với một ứng dụng Windows độc lập. Theo đó, XBAP chạy trong phạm vi sandbox an ninh do hệ thống an ninh truy nhập mã của .NET Framework cung cấp. XBAP chỉ chạy với các hệ thống Windows có cài đặt WPF và chỉ với Internet Explore phiên bản 6 và 7 trở lên.
Bộ công cụ phục vụ thiết kế giao diện WPF đây
Tư liệu Microsoft VN
Sau bài "WPF Training – Drag and Drop Trong WPF Part I" nói về Drag-Drop, bài tiếp theo tôi xin nói về một Library hỗ trợ việc này theo hướng đơn giản mà hiệu quả cũng như không kém phần đẹp mắt và tùy biến.
I> Tiếp cận
Thư viện GongSolutions.Wpf.DragDrop là một sự nỗi bậc trong vấn đề Implement Drag-Drop WPF. Thư viện này có một số điểm nỗi bậc như sau:
- Hỗ trợ phát triển với mô hình MVVM, có nghĩa là phần Behavior có thể được đặc trong một ViewModel thay vì CodeBehind.
- Có nhiều sự lựa chọn khi sử dụng, hỗ trợ cả về vấn đề Drag-Drop phục vụ cho việc thay đổi Index
- Có thể làm việc với TreeViews
- Cho phép tùy chọn mặc định hoặc tự định nghĩa cách thể hiện trực quan cho Drag-Drop.
Các bạn có thể tham khảo Source tại đây
II> Ứng dụng mẫu
Công việc của bạn là tạo một project WPF Application và add reference thư viện tải ở trên. Sau đó thiết kế project theo mô hình MVVM cơ bản; hai View và một ViewModels. cấu trúc project như này:

Chúng ta chỉ cần quan tâm đến hai file. "ListBoxDDView.xaml" là phần View của ListBox với chức năng Drag-Drop với DataContext là "ListBoxDDViewModel.cs". Ngoài ra, "MainWindowVew" là View chính chứa 2 "ListBoxDDView" và "PerItem.cs" chính là class thể hiện một Item trong ListBox.
PerItem.cs
[code language="csharp"]
public class PerItem
{
public string Name { set; get; }
public PerItem(string name)
{
Name = "Item: " + name;
}
}
[/code]
Design phần View với code như sau(xem về DataTemplate để hiểu)
ListBoxDDView.xaml
[code language="xml"]
<Grid>
<ListBox ItemsSource="{Binding DataCollection, UpdateSourceTrigger=PropertyChanged}"
Foreground="White"
HorizontalContentAlignment="Stretch">
<ListBox.ItemTemplate>
<DataTemplate>
<TextBox Margin="2,2,2,2" TextWrapping="Wrap" IsReadOnly="True"
Text="{Binding Name}" VerticalAlignment="Top" VerticalContentAlignment="Center"
BorderBrush="#FF007ACC" Template="{DynamicResource TextBoxBaseTemplate}"
Background="{x:Null}" Padding="0,2"/>
</DataTemplate>
</ListBox.ItemTemplate>
</ListBox>
</Grid>
[/code]
Sau đó chúng ta thêm Attach Property vào code trên để dùng được Drag-Drop
[code language="xml"]
<Grid>
<ListBox ItemsSource="{Binding DataCollection, UpdateSourceTrigger=PropertyChanged}"
DragDrop:DragDrop.DropHandler="{Binding}"
DragDrop:DragDrop.IsDragSource="True"
DragDrop:DragDrop.IsDropTarget="True"
Foreground="White"
HorizontalContentAlignment="Stretch">
<ListBox.ItemTemplate>
<DataTemplate>
<TextBox Margin="2,2,2,2" TextWrapping="Wrap" IsReadOnly="True"
Text="{Binding Name}" VerticalAlignment="Top" VerticalContentAlignment="Center"
BorderBrush="#FF007ACC" Template="{DynamicResource TextBoxBaseTemplate}"
Background="{x:Null}" Padding="0,2"/>
</DataTemplate>
</ListBox.ItemTemplate>
</ListBox>
</Grid>
[/code]
Chú ý:
- Để dùng được Attached Property trên ta cần reference thư viện <xmlns:DragDrop="clr-namespace:GongSolutions.Wpf.DragDrop;assembly=GongSolutions.Wpf.DragDrop">
- DragDrop.DropHandler="{Binding}" chỉ ra method sẽ implement cho việc Drop data
- DragDrop.IsDragSource="True" nói rằng Control là nguồn Drag(tức có thể kéo Item của nó)
và nó sẽ gọi implement của method Drag - DragDrop.IsDropTarget="True" ý rằng Control này cho phép Drag data vào nó sẽ gọi implement của method Drop
Sau đó implement cho phần VewModel, model này implement của interface IDropTarget
ListBoxDDViewModel.cs
[code language="csharp"]
public class ListBoxExViewModel : IDropTarget
{
public ObservableCollection<PerItem> DataCollection { set; get; }
public bool IsAllowMove { set; get; }
public ListBoxExViewModel()
{
DataCollection = new ObservableCollection<PerItem>();
for (int i = 0; i < 20; i++) {
DataCollection.Add(new PerItem(i.ToString()));
}
}
// Được gọi khi bạn Kéo một Item đi
public void DragOver(IDropInfo dropInfo)
{
if (IsAllowMove)
{
// Hiệu ứng Drag
dropInfo.Effects = DragDropEffects.Move;
}
else
{
// Hiệu ứng Drag
dropInfo.Effects = DragDropEffects.Copy;
}
// Hiệu ứng Drop
dropInfo.DropTargetAdorner = DropTargetAdorners.Insert;
}
// Được gọi khi một Item được Drag lên một Control cho phép Drop
public void Drop(IDropInfo dropInfo)
{
var data = dropInfo.Data as PerItem;
// Lấy data và xử lý
if (data != null)
{
DataCollection.Add(data);
var source = dropInfo.TargetCollection;
}
else
{
var dataList = dropInfo.Data as IList<PerItem>;
if (dataList != null && dataList.Count > 0)
{
foreach (PerItem perItem in dataList)
{
DataCollection.Add(perItem);
}
}
}
}
}
[/code]
Chú ý: các bạn có thể implement interface IDragSource để có nhiều xử lý hơn khi Drag
Kết quả
 Để đẹp hơn chúng ta cần thêm đoạn code sau vào phần View( vào thẻ ListBox trong ListBoxDDDView.xaml)
- Hiệu ứng kèm theo chuột cho các Item được Drag: DragDrop:DragDrop.UseDefaultDragAdorner="True" [1]
- Hiệu ứng chú thích/ hiệu ứng Drag của chuột: DragDrop:DragDrop.UseDefaultEffectDataTemplate="True"
- Thêm hiệu ứng kèm theo chuột cho các Item được Drap: DragDrop:DragDrop.DragAdornerTemplate="{StaticResource DragAdorner}" với DragAdorner là một Template do bạn tạo(không dùng chung với [1]).
- Và còn nhiều tùy chọn khác bạn có thể tìm hiểu ......
Source tham khảo tại đây. Chúc các bạn thành công!
Phạm Tuân
Đăng ký:
Nhận xét (Atom)