
Blog chia sẽ kinh nghiệm lập trình và Technical VN. Nơi mà các bạn có thể học tập và tham khảo về những công nghệ mới nhất hiện nay về .NET
Thứ Bảy, 28 tháng 3, 2015
Đối với lập trình hiện đại hiện nay, việc hỗ trợ người dùng tối đa cũng như trừu tượng hóa các công việc đến mức gần gủi và dễ hiểu nhất cho người dùng đang là tiêu chí hàng đầu của các nhà phát triển phần mềm, chúng ta có thể thấy lợi ích từ việc mà các ứng dụng hộ trợ Drag-and-Drop, công việc trở nên đơn giản hơn và chân thật hơn, thao tác kéo thả nói lên nhiều ý nghĩa hơn việc nhấn các Button. Và hôm nay, tôi sẽ hướng dẫn cở bản cho việc Implement Drag-and-Drop trong WPF.
WPF Training - Drag and Drop Trong WPF Part II...
I> Design UI
Công việc rất đơn giản, chúng ta cần chuẩn bị những thứ như sau
- WrapPanel A: nguồn chứa đối tượng - Drag
- WrapPanel B: nguồn nhận đối tượng - Drop
- Ellipse: Đối tượng được drag-drop
Chúng ta Design như sau
[code language="xml"]
<WrapPanel x:Name="_target" Drop="UIElement_OnDrop" AllowDrop="True"
Background="Chartreuse"/>
<WrapPanel x:Name="_source" MouseMove="MouseMove" Grid.Column="2">
[/code]
Trong đó,
- "UIElement_OnDrop" là method sẽ được call khi có đối tượng đang được Drag lên _target Panel
- "MouseMove" là method xử lý cho việc Drag, chúng ta có thể dùng ở nhiều sự kiện khác cũng được như MouseLeftButtonDown="MouseMove".
II> Implement behavior
Chúng ta tiến hành implement cho hai method trên như sau
[code language="csharp"]
#region
using System.Windows;
using System.Windows.Controls;
using System.Windows.Input;
using System.Windows.Media;
using System.Windows.Shapes;
#endregion
namespace Drag_Drop_Sample
{
/// <summary>
/// Interaction logic for MainWindow.xaml
/// </summary>
public partial class MainWindow : Window
{
public MainWindow()
{
InitializeComponent();
}
private void MouseMove(object sender, MouseEventArgs e)
{
// Get current obj
var ellipse = e.Source as Ellipse;
if (ellipse != null && e.LeftButton == MouseButtonState.Pressed)
{
// Send obj to target
DragDrop.DoDragDrop(ellipse,ellipse,
DragDropEffects.Move);
}
}
private void UIElement_OnDrop(object sender, DragEventArgs e)
{
// Get obj
var obj = e.Data.GetData(e.Data.GetFormats()[0]) as UIElement;
// Get source and target Panel
var parent = (obj as FrameworkElement).Parent as Panel;
var sendertarget = sender as Panel;
if (obj != null && sendertarget != null && !sendertarget.Children.Contains(obj))
{
parent.Children.Remove(obj);
sendertarget.Children.Add(obj);
}
}
}
}
[/code]
Kết quả:


Source tại đây, chúc các bạn thành công!
Tuân Phạm
Thứ Sáu, 20 tháng 3, 2015
Sau bài "Parallel Class Trong C# và Vấn Đề Xử lý Song Song" tôi nhận được khá nhiều câu hỏi về vấn đề này, ví dụ như chúng ta có nên dùng hoàn toàn Parallel.* thay cho cách truyền thống để được lợi về thời gian cũng như đỡ tốn công đồng bộ Data khi dùng Multi Thread. Hôm nay tôi sẽ nói về vấn đề này
I> Parallel và Multi Thread

Chúng ta có thể thấy rằng bản chất của Parallel cũng chỉ là Multi-Thread, song tại sao lại có Parallel khi trước đó đã có Multi Thread:
- Chúng ta được lợi nhiều hơn khi dùng Parallel thay cho Multi Thread bởi việc đồng bộ Data, quản lý Thread, các vấn đề về deadlock... đều đã có người làm việc đó thay mình(Microsoft chịu hoàn toàn trách nhiệm về sản phẩm của họ .. hi)
- Là multi Thread nhưng việc Executeing Thread đó trên hệ thống mà CPU là đa nhân thì làm sao cho hiệu quả cao nhất, Microsoft cũng giải quyết vấn đề này ở tần Framework rồi sau đó "đẻ" ra Parallel hay còn gọi là Multi-Core.
Vậy nên, Parallel xét về mặt tiện lợi và an toàn(phó thác sự tin tưởng) cũng như sẳn dùng cũng như multi-core thì hơn hẳn Multi Thread, xét về việc mà Dev có thể linh hoạt quản lý các Thread và data thì multi Thread đáng dùng hơn.
II> Parallel.* và cách duyệt/lặp truyền thống

Hình trên cho ta thấy cách mà Parallel.* làm việc, nếu mới biết về khái niệm Parallel một số bạn sẽ ưu ái sử dụng nó thay cho cách truyền thống(Parallel.For/ForEach thay cho for/foreach) nhưng chúng ta cần hiểu hơn về cách mà nó làm việc. Ví dụ:
- Dưới đây là một ví dụ mà Pararallel khai thác hết hiệu xuất CPU. Chúng ta có một công việc "my Job", parallel.* sẽ chia công việc của chúng ta ra n phần( tức for chạy từ 1 - n), những phần này không có sự ràng buộc với nhau về dữ liệu trong suốt time xử lý vì thế sẽ không có sự đợi chờ giữa các Thread và các Core. Chúng ta rất lợi về thời gian khi kết quả "my Result" không cần sự tuân thủ về thứ tự các Thread.
Thực tế: Một đám ruộng cần phải gặt song càng sớm càng tốt, chúng ta có 5 người( tức Parallel.For chạy từ 1 - 5) , mỗi người sẽ gặt 1/5 đám ruộng, ai song trước thì nghĩ( là Parallel.For/ForEach) . Y vậy, nếu việc gặt lúa song song cho ta lợi 3t về time và việc chia phần đám ruộng cho 5 người mất 1t thì chúng ta vẫn lợi 2t về thời gian hơn so với việc 5 người lần lược thay nhau gặt ( là for/foreach). => Parallel.* lợi hơn
=> Lưu ý rằng trong trường hợp trên nhưng time bị mất cho việc chia phần công việc lớn hơn nhiều so với tổng chi phí công việc phải làm thì Parallel không phát huy hiệu quả => rất chậm. Chia phần công việc được hiểu là việc hệ thống sẽ tiến hành phân tích và chia Thread chia Core, tính toán đủ thứ.


- Dưới đây là ví dụ về việc dùng Parallel không mang lại hiệu quả. Chúng ta có một công việc, Parallel sẽ chia công việc thành n phần, chúng xử lý song song nhưng thực tế không phải vậy khi mà các Thread phải đợi nhau để đồng bộ dữ liệu hoặc truyền data cho nhau. Kết quả phụ thuộc vào thứ tự công việc của từng Thread.
Thực tế: Một đám ruộng cần phải gặt song càng sớm càng tốt, chúng ta có 5 người( tức Parallel.For chạy từ 1 - 5) , vấn đề ở đây là chiếc "Liềm" của 5 người đều bị "Cùn" nên cần mài cho "Bén", ngan trái thay chỉ có một cục đá mài nên phải Share nhau. Giả sử trường hợp tệ nhất là 5 cái "Liềm" cùng cần mài trong một thời điểm, thế thì phải xếp hàng đợi mài liềm rồi mới đi gặt(t2); cộng thêm thời gian chia phần đám ruộng(t1) cho 5 người trước khi gặt thì ta có t1 + t2 thời gian. Trong khi nếu trước đó chúng ta chọn phương án là thay nhau gặt lúa thì chúng ta chỉ mất có t2 thời gian. => for.foreach lợi hơn


III> Kết luận
Đây là bài test lý tưởng với Parallel
[code language="csharp"]
namespace ParallelTests
{
class Program
{
private static int Fibonacci(int x)
{
if (x <= 1)
{
return 1;
}
return Fibonacci(x - 1) + Fibonacci(x - 2);
}
private static void DummyWork()
{
var result = Fibonacci(10);
// inspect the result so it is no optimised away.
// We know that the exception is never thrown. The compiler does not.
if (result > 300)
{
throw new Exception("failed to to it");
}
}
private const int TotalWorkItems = 2000000;
private static void SerialWork(int outerWorkItems)
{
int innerLoopLimit = TotalWorkItems / outerWorkItems;
for (int index1 = 0; index1 < outerWorkItems; index1++)
{
InnerLoop(innerLoopLimit);
}
}
private static void InnerLoop(int innerLoopLimit)
{
for (int index2 = 0; index2 < innerLoopLimit; index2++)
{
DummyWork();
}
}
private static void ParallelWork(int outerWorkItems)
{
int innerLoopLimit = TotalWorkItems / outerWorkItems;
var outerRange = Enumerable.Range(0, outerWorkItems);
Parallel.ForEach(outerRange, index1 =>
{
InnerLoop(innerLoopLimit);
});
}
private static void TimeOperation(string desc, Action operation)
{
Stopwatch timer = new Stopwatch();
timer.Start();
operation();
timer.Stop();
string message = string.Format("{0} took {1:mm}:{1:ss}.{1:ff}", desc, timer.Elapsed);
Console.WriteLine(message);
}
static void Main(string[] args)
{
TimeOperation("serial work: 1", () => Program.SerialWork(1));
TimeOperation("serial work: 2", () => Program.SerialWork(2));
TimeOperation("serial work: 3", () => Program.SerialWork(3));
TimeOperation("serial work: 4", () => Program.SerialWork(4));
TimeOperation("serial work: 8", () => Program.SerialWork(8));
TimeOperation("serial work: 16", () => Program.SerialWork(16));
TimeOperation("serial work: 32", () => Program.SerialWork(32));
TimeOperation("serial work: 1k", () => Program.SerialWork(1000));
TimeOperation("serial work: 10k", () => Program.SerialWork(10000));
TimeOperation("serial work: 100k", () => Program.SerialWork(100000));
TimeOperation("parallel work: 1", () => Program.ParallelWork(1));
TimeOperation("parallel work: 2", () => Program.ParallelWork(2));
TimeOperation("parallel work: 3", () => Program.ParallelWork(3));
TimeOperation("parallel work: 4", () => Program.ParallelWork(4));
TimeOperation("parallel work: 8", () => Program.ParallelWork(8));
TimeOperation("parallel work: 16", () => Program.ParallelWork(16));
TimeOperation("parallel work: 32", () => Program.ParallelWork(32));
TimeOperation("parallel work: 64", () => Program.ParallelWork(64));
TimeOperation("parallel work: 1k", () => Program.ParallelWork(1000));
TimeOperation("parallel work: 10k", () => Program.ParallelWork(10000));
TimeOperation("parallel work: 100k", () => Program.ParallelWork(100000));
Console.WriteLine("done");
Console.ReadLine();
}
}
}
[/code]
Kết quả
[code language="c"]
serial work: 1 took 00:02.31
serial work: 2 took 00:02.27
serial work: 3 took 00:02.28
serial work: 4 took 00:02.28
serial work: 8 took 00:02.28
serial work: 16 took 00:02.27
serial work: 32 took 00:02.27
serial work: 1k took 00:02.27
serial work: 10k took 00:02.28
serial work: 100k took 00:02.28
parallel work: 1 took 00:02.33
parallel work: 2 took 00:01.14
parallel work: 3 took 00:00.96
parallel work: 4 took 00:00.78
parallel work: 8 took 00:00.84
parallel work: 16 took 00:00.86
parallel work: 32 took 00:00.82
parallel work: 64 took 00:00.80
parallel work: 1k took 00:00.77
parallel work: 10k took 00:00.78
parallel work: 100k took 00:00.77
[/code]
Parallel là một giải pháp tốt cho multi-Thread và multi-Core, nhưng chúng ta không nên lạm dụng. Hãy hiểu rõ bản chất vấn đề và hiện thực bạn đang đối mặt để chọn gải pháp tốt nhất. Phải chắc chắn rằng bài toán ban đang giải quyết là một bài toán Parallelizable thì mới dùng parallel. Cuối cùng, nên nhớ rằng "đừng lấy dao mổ trâu đi giết gà" và ngược lại. Trên đây là sự hiểu biết cá nhân, rất mong được góp ý.
Phạm Tuân
Chủ Nhật, 15 tháng 3, 2015
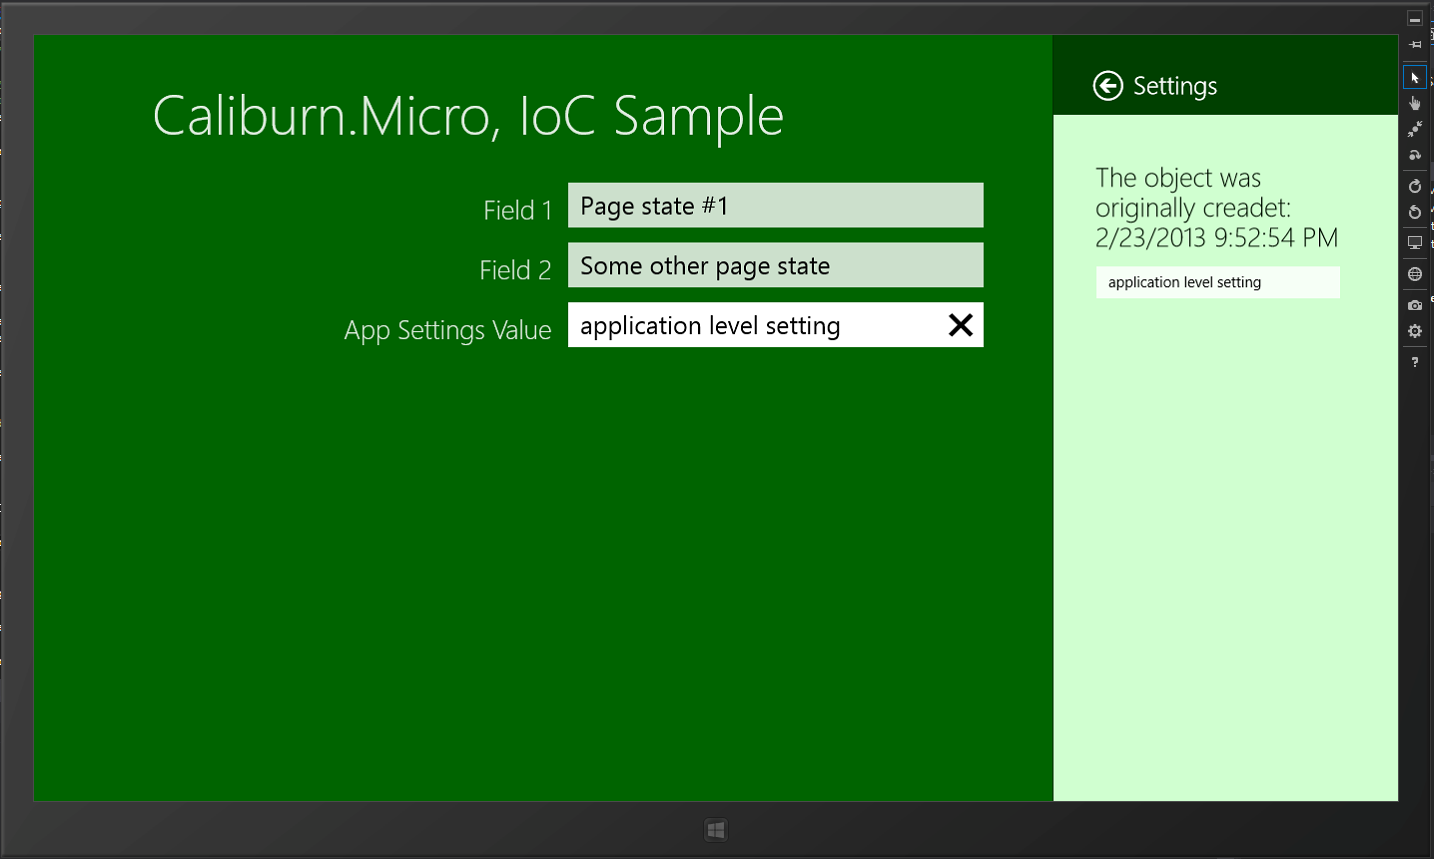
Chào các bạn, hôm nay tôi sẽ giới thiệu đến mọi người về một thư viện khác giúp chúng ta xây dựng một ứng dụng WPF với giao diện mang đậm phong cách thiết kế của Window 8 đó là giao diện Metro.
I> Tiếp cận
MahApps.Metro là một dự án được Paul Jenkins bắt đầu phát triển vào năm 2011, nhầm mang một giao diện người dùng Metro-style vào ứng dụng WPF. Kể từ đó nó được phát triển và nhận được nhiều đóng góp từ cộng đồng nguồn mở cho đến bây giờ. Đây là một dự án vì cộng đồng, do cộng đồng - không ai trong số họ được trả tiền để làm điều này, song sản phẩm mà học tạo ra thật sự đã thay đổi được nhiều thứ.
Vậy bạn có thể tải về bộ thư viện này ở đâu? Cách đơn giản nhất là dùng NuGet
[code language="c"]
Install-Package MahApps.Metro
[/code]
Hoặc có thể tải trọn bộ mã nguồn tại Github, mời các bạn xem qua một số hình ảnh


II> Ứng dụng mẫu
Trước tiên chúng ta cần tạo một project WPF và add reference các thư viện cần thiết, hãy bắt đầu với NuGet nếu bạn cảm thấy bối rối về việc tải và add reference
Xong phần add DLLs chúng ta tiến hành tải về phần Resource của thư viện này(bạn có thể tải hoặc không tùy thích nhưng để hiểu nó làm việc thể nào thì đừng bỏ qua bước này) như hình sau.
Tool -> NuGet Package Panager -> Manage NuGet Packages For Solution
Chọn và tải về MahApps.Metro.Resource; đừng quên mục "Include Prerelease:

Hoặc bạn không thể tải resource như cách trên thì có thể dùng NuGet
[code language="c"]
Install-Package MahApps.Metro -Pre
[/code]
Chạy ứng dụng xem điều gì đã sảy ra và tiếp tục sửa nội dung các file XAML, mở file "MainWindow.xaml" thêm namespace của MahApps.Metro vào trong thẻ <Window ...>
[code language="csharp"]
xmlns:Controls="clr-namespace:MahApps.Metro.Controls;assembly=MahApps.Metro"
// Hoặc
xmlns:Controls="http://metro.mahapps.com/winfx/xaml/controls"
[/code]
Tiếp theo thay thẻ Window bằng thẻ của MahApps, file hoàn thiện sẽ là như sau nhưng đừng có coppy hết vào ứng dụng của bạn mà quên đổi namespace "x:Class="WpfApplication1.MainWindow"
[code language="xml"]
<Controls:MetroWindow x:Class="WpfApplication1.MainWindow"
xmlns="http://schemas.microsoft.com/winfx/2006/xaml/presentation"
xmlns:x="http://schemas.microsoft.com/winfx/2006/xaml"
xmlns:Controls="clr-namespace:MahApps.Metro.Controls;assembly=MahApps.Metro"
Title="MainWindow"
Height="350"
Width="525">
<!-- Tiếp tục code tại đây -->
</Controls:MetroWindow>
[/code]
Mở tiếp file MainWindow.xaml.cs và thay đổi lớp kế thừa của MainWindow
[code language="csharp"]
// using statements...
using MahApps.Metro.Controls
public partial class MainWindow : MetroWindow
{
public MainWindow()
{
InitializeComponent();
}
}
[/code]
Tạm thời đã xong về cơ bản, để đẹp hơn chúng ta dùng Resource của MahApps, mở file App.xaml lên và thêm ResourceDistionary
[code language="xml"]
<Application <!--........--> >
<!--Phần cần thêm-->
<Application.Resources>
<ResourceDictionary>
<ResourceDictionary.MergedDictionaries>
<ResourceDictionary Source="pack://application:,,,/MahApps.Metro;component/Styles/Controls.xaml" />
<ResourceDictionary Source="pack://application:,,,/MahApps.Metro;component/Styles/Fonts.xaml" />
<ResourceDictionary Source="pack://application:,,,/MahApps.Metro;component/Styles/Colors.xaml" />
<ResourceDictionary Source="pack://application:,,,/MahApps.Metro;component/Styles/Accents/Blue.xaml" />
<ResourceDictionary Source="pack://application:,,,/MahApps.Metro;component/Styles/Accents/BaseLight.xaml" />
<ResourceDictionary Source="Resources/Icons.xaml"/>
</ResourceDictionary.MergedDictionaries>
</ResourceDictionary>
</Application.Resources>
<!--Phần cần thêm-->
</Application>
[/code]
Kết quả,

[code language="xml"]
<Controls:MetroWindow ... >
<Controls:MetroWindow.RightWindowCommands>
<Controls:WindowCommands>
<Button Content="Cài đặt" />
<Button>
<StackPanel Orientation="Horizontal">
<Rectangle Width="20" Height="20"
Fill="{Binding RelativeSource={RelativeSource AncestorType=Button},
Path=Foreground}">
<Rectangle.OpacityMask>
<VisualBrush Stretch="Fill"
Visual="{StaticResource appbar_windowsphone}" />
</Rectangle.OpacityMask>
</Rectangle>
<TextBlock Margin="4 0 0 0"
VerticalAlignment="Center"
Text="Phạm Tuân" />
</StackPanel>
</Button>
</Controls:WindowCommands>
</Controls:MetroWindow.RightWindowCommands>
<Grid>
</Grid>
</Controls:MetroWindow>
[/code]
Thế là xong, mời các bạn tải về tham khảo tại đây và đọc thêm tại đây
Phạm Tuân
Thứ Tư, 11 tháng 3, 2015
Bài này sẽ giới thiệu đến các bạn một style đẹp phong cách IOS cho ToggleButton trong WPF

Các bạn chỉ việt coppy và paste đoạn Tyle sau vào nơi nào bạn muốn(nên để ở App.xaml hoặc một file Dictionary riêng được link bởi App.xaml) và Style này có thể được "nhìn thấy" trong ứng dụng của bạn.
[code language="xml"]
<ResourceDictionary>
<Style x:Key="AnimatedSwitch" TargetType="{x:Type ToggleButton}">
<Setter Property="Foreground" Value="Black" />
<Setter Property="Background" Value="#FAFAFB" />
<Setter Property="BorderBrush" Value="#EAEAEB" />
<Setter Property="Template">
<Setter.Value>
<ControlTemplate TargetType="ToggleButton">
<Viewbox Stretch="Uniform">
<Canvas Name="Layer_1" Width="20" Height="20" Canvas.Left="10" Canvas.Top="0">
<Ellipse Canvas.Left="0" Width="20" Height="20" Fill="{TemplateBinding Background}" Stroke="{TemplateBinding BorderBrush}" StrokeThickness="0.5"/>
<Ellipse Canvas.Left="15" Width="20" Height="20" Fill="{TemplateBinding Background}" Stroke="{TemplateBinding BorderBrush}" StrokeThickness="0.5"/>
<Border Canvas.Left="10" Width="15" Height="20" Name="rect416927" Background="{TemplateBinding Background}" BorderBrush="{TemplateBinding BorderBrush}" BorderThickness="0,0.5,0,0.5"/>
<Ellipse x:Name="ellipse" Canvas.Left="0" Width="20" Height="20" Fill="White" Stroke="{TemplateBinding BorderBrush}" StrokeThickness="0.3">
<Ellipse.RenderTransform>
<TranslateTransform X="0" Y="0" />
</Ellipse.RenderTransform>
<Ellipse.BitmapEffect>
<DropShadowBitmapEffect Softness="0.1" ShadowDepth="0.7" Direction="270" Color="#BBBBBB"/>
</Ellipse.BitmapEffect>
</Ellipse>
</Canvas>
</Viewbox>
<ControlTemplate.Triggers>
<Trigger Property="IsChecked" Value="True" >
<Trigger.EnterActions>
<BeginStoryboard>
<Storyboard>
<ColorAnimation Storyboard.TargetProperty="Background.Color" To="#52D468" Duration="0:0:0.2" />
<ColorAnimation Storyboard.TargetProperty="BorderBrush.Color" To="#41C955" Duration="0:0:0.2" />
<DoubleAnimationUsingKeyFrames Storyboard.TargetProperty="(Ellipse.RenderTransform).(TranslateTransform.X)" Storyboard.TargetName="ellipse">
<SplineDoubleKeyFrame KeyTime="0" Value="0"/>
<SplineDoubleKeyFrame KeyTime="0:0:0.4" Value="15" KeySpline="0, 1, 0.6, 1"/>
</DoubleAnimationUsingKeyFrames>
</Storyboard>
</BeginStoryboard>
</Trigger.EnterActions>
<Trigger.ExitActions>
<BeginStoryboard>
<Storyboard>
<ColorAnimation Storyboard.TargetProperty="Background.Color" To="#FAFAFB" Duration="0:0:0.2" />
<ColorAnimation Storyboard.TargetProperty="BorderBrush.Color" To="#EAEAEB" Duration="0:0:0.2" />
<DoubleAnimationUsingKeyFrames Storyboard.TargetProperty="(Ellipse.RenderTransform).(TranslateTransform.X)" Storyboard.TargetName="ellipse">
<SplineDoubleKeyFrame KeyTime="0" Value="15"/>
<SplineDoubleKeyFrame KeyTime="0:0:0.3" Value="0" KeySpline="0, 0.5, 0.5, 1"/>
</DoubleAnimationUsingKeyFrames>
</Storyboard>
</BeginStoryboard>
</Trigger.ExitActions>
</Trigger>
</ControlTemplate.Triggers>
</ControlTemplate>
</Setter.Value>
</Setter>
</Style>
</ResourceDictionary>
[/code]
Bạn dùng Style này như sau
[code language="xml"]
<Grid>
<ToggleButton Style="{StaticResource AnimatedSwitch}" Height="80"/>
</Grid>
[/code]
Và thế là bạn đã có một ToggleButton đẹp mắt, sau đây là mẫu hoàng chỉnh
[code language="xml"]
<Page
xmlns="http://schemas.microsoft.com/winfx/2006/xaml/presentation"
xmlns:PresentationOptions="http://schemas.microsoft.com/winfx/2006/xaml/presentation/options"
xmlns:x="http://schemas.microsoft.com/winfx/2006/xaml">
<Page.Resources>
<ResourceDictionary>
<Style x:Key="AnimatedSwitch" TargetType="{x:Type ToggleButton}">
<Setter Property="Foreground" Value="Black" />
<Setter Property="Background" Value="#FAFAFB" />
<Setter Property="BorderBrush" Value="#EAEAEB" />
<Setter Property="Template">
<Setter.Value>
<ControlTemplate TargetType="ToggleButton">
<Viewbox Stretch="Uniform">
<Canvas Name="Layer_1" Width="20" Height="20" Canvas.Left="10" Canvas.Top="0">
<Ellipse Canvas.Left="0" Width="20" Height="20" Fill="{TemplateBinding Background}" Stroke="{TemplateBinding BorderBrush}" StrokeThickness="0.5"/>
<Ellipse Canvas.Left="15" Width="20" Height="20" Fill="{TemplateBinding Background}" Stroke="{TemplateBinding BorderBrush}" StrokeThickness="0.5"/>
<Border Canvas.Left="10" Width="15" Height="20" Name="rect416927" Background="{TemplateBinding Background}" BorderBrush="{TemplateBinding BorderBrush}" BorderThickness="0,0.5,0,0.5"/>
<Ellipse x:Name="ellipse" Canvas.Left="0" Width="20" Height="20" Fill="White" Stroke="{TemplateBinding BorderBrush}" StrokeThickness="0.3">
<Ellipse.RenderTransform>
<TranslateTransform X="0" Y="0" />
</Ellipse.RenderTransform>
<Ellipse.BitmapEffect>
<DropShadowBitmapEffect Softness="0.1" ShadowDepth="0.7" Direction="270" Color="#BBBBBB"/>
</Ellipse.BitmapEffect>
</Ellipse>
</Canvas>
</Viewbox>
<ControlTemplate.Triggers>
<Trigger Property="IsChecked" Value="True" >
<Trigger.EnterActions>
<BeginStoryboard>
<Storyboard>
<ColorAnimation Storyboard.TargetProperty="Background.Color" To="#52D468" Duration="0:0:0.2" />
<ColorAnimation Storyboard.TargetProperty="BorderBrush.Color" To="#41C955" Duration="0:0:0.2" />
<DoubleAnimationUsingKeyFrames Storyboard.TargetProperty="(Ellipse.RenderTransform).(TranslateTransform.X)" Storyboard.TargetName="ellipse">
<SplineDoubleKeyFrame KeyTime="0" Value="0"/>
<SplineDoubleKeyFrame KeyTime="0:0:0.4" Value="15" KeySpline="0, 1, 0.6, 1"/>
</DoubleAnimationUsingKeyFrames>
</Storyboard>
</BeginStoryboard>
</Trigger.EnterActions>
<Trigger.ExitActions>
<BeginStoryboard>
<Storyboard>
<ColorAnimation Storyboard.TargetProperty="Background.Color" To="#FAFAFB" Duration="0:0:0.2" />
<ColorAnimation Storyboard.TargetProperty="BorderBrush.Color" To="#EAEAEB" Duration="0:0:0.2" />
<DoubleAnimationUsingKeyFrames Storyboard.TargetProperty="(Ellipse.RenderTransform).(TranslateTransform.X)" Storyboard.TargetName="ellipse">
<SplineDoubleKeyFrame KeyTime="0" Value="15"/>
<SplineDoubleKeyFrame KeyTime="0:0:0.3" Value="0" KeySpline="0, 0.5, 0.5, 1"/>
</DoubleAnimationUsingKeyFrames>
</Storyboard>
</BeginStoryboard>
</Trigger.ExitActions>
</Trigger>
</ControlTemplate.Triggers>
</ControlTemplate>
</Setter.Value>
</Setter>
</Style>
</ResourceDictionary>
</Page.Resources>
<Grid>
<ToggleButton Style="{StaticResource AnimatedSwitch}" Height="80"/>
</Grid>
</Page>
[/code]
Chúc các bạn thành công,
Tuân
Thứ Hai, 9 tháng 3, 2015
Hôm nay tôi sẽ giới thiệu với các bạn một Framework đến từ Microsoft - framework này không quá lớn nhưng là khá mạnh khi các bạn làm việc với Module/Plug-in trong một dự án .NET thuần túy. Hy vọng chúng ta sẽ hiểu về "Managed Extensibility Framework" hay còn gọi là MEF phần nào qua bài viết này.
I> MEF là gì
Như tôi nói ở trên, MEF được Microsoft phát triển và bổ sung vào .NET 4.0 và cao hơn vì thế chúng ta không cần phải tải thêm DLLs cũng như không phải có một cấu hình phức tạp nào để có thể sử dụng nó. MEF cho phép chúng ta làm việc theo dạng module một cách đơn giản, giảm thiểu sự ràng buộc giữa các lớp các đối tượng với nhau. Trước kia khi mà MEF chưa ra đời chúng ta thường chật vật với một dự án với quá nhiều thành phần liên kết với nhau, việc khởi tạo cũng như quản lý các thành phần này vô cùng phức tạp cho các nhà phát triển phần mềm, sau đó MS đã cho ra mắt ý tưởng là module hóa các dự án với nhiều thành phần gắn kết nhau - thứ nhất chúng ta sẽ có cái nhìn rõ ràng và sáng sủa hơn, thứ hai việc nâng cấp và mở rộng ứng dụng cũng trở nên dễ dàng hơn khi mà mã nguồn không cần phải thay đổi nhiều. Các bạn có thể hình dung qua hình ảnh sau:
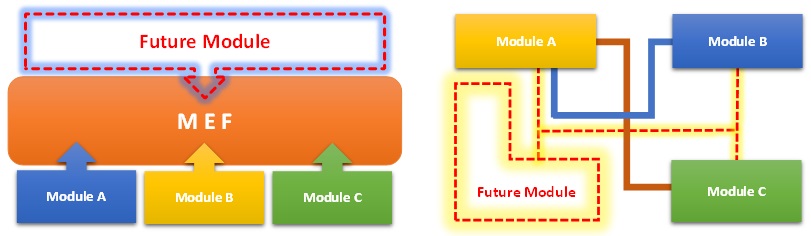
Nếu các bạn để ý, MEF có phần giống với IoC, về mặt nào đó chúng giống nhau song lại không trùng lắp, MEF có một số chức năng thua xa IoC nhưng nó không bị đào thải vì nó có điểm mạnh riêng và không quá phức tạp cho việc cài đặt..png)
II> Ví dụ ứng dụng
Trước tiên chúng ta cần tạo hai project, một là "Program console" và một là "Library" như sau, trong đó ModuleA là "Library project"

Để có thể sử dụng được MEF chúng ta cần add reference cho hai project như hình trên
- "Microsoft.Practices.ServiceLocation"
- "System.ComponentModel.Composition"
Tiến hành cấu hình MEF cho "RUN.MEF project" bằng cách tạo class "MEFServiceLocator" kế thừa "ServiceLocatorImplBase", class này khi được tạo ra sẽ chịu trách nhiệm cung cấp Instance khi cần thiết.
MEFServiceLocator.cs
[code language="csharp"]
internal class MEFServiceLocator : ServiceLocatorImplBase
{
/// <summary>
/// MEF Compisition container
/// </summary>
private readonly CompositionContainer compositionContainer;
/// <summary>
/// Initializes a new instance of the <see cref="MEFServiceLocator"/> class.
/// </summary>
/// <param name="compositionContainer">The MEF composition container.</param>
public MEFServiceLocator(CompositionContainer compositionContainer)
{
this.compositionContainer = compositionContainer;
}
/// <summary>
/// Resolves the instance of the requested service.
/// </summary>
/// <param name="serviceType">Type of instance requested.</param>
/// <returns>
/// The requested service instance.
/// </returns>
protected override IEnumerable<object> DoGetAllInstances(Type serviceType)
{
var list = new List<object>();
IEnumerable<Lazy<object, object>> exports = this.compositionContainer.GetExports(serviceType, null, null);
list.AddRange(exports.Select(export => export.Value));
return list;
}
/// <summary>
/// Resolves all the instances of the requested service.
/// </summary>
/// <param name="serviceType">Type of service requested.</param><param name="key">Name of registered service you want. May be null.</param>
/// <returns>
/// Sequence of service instance objects.
/// </returns>
protected override object DoGetInstance(Type serviceType, string key)
{
List<Lazy<object, object>> exports = this.compositionContainer.GetExports(serviceType, null, key).ToList();
IOrderedEnumerable<Lazy<object, object>> orderByDescending = exports
.Where(export => ((IDictionary<string, object>) export.Metadata).ContainsKey("Priority"))
.OrderByDescending(export => ((IDictionary<string, object>) export.Metadata)["Priority"]);
if (orderByDescending.Any())
{
return orderByDescending.First().Value;
}
if (exports.Any())
{
if (exports.Count > 1)
{
return exports[0].Value;
}
return exports.Single().Value;
}
throw new ActivationException(
this.FormatActivationExceptionMessage(new CompositionException("Export not found"), serviceType, key));
}
[/code]
Quay lại "ModuleA project" chúng ta define một interface và một lớp implement cho interface này như sau
IHello.cs
[code language="csharp"]
public interface IHelloWorld
{
/// <summary>
/// Say hello
/// </summary>
void Hello();
}
[/code]
Hello.cs
[code language="csharp"]
[Export(typeof (IHelloWorld))]
public class HelloWorld : IHelloWorld
{
private int count = 0;
/// <summary>
/// Say hello
/// </summary>
public void Hello()
{
Console.WriteLine("{0} - Hello world", count);
count++;
}
}
[/code]
Chú ý rằng : các module bạn muốn MEF quản lý và làm việc thì cần phải "Export", nếu trường hợp bạn có nhiều implement cho một interface thì bạn cần export thêm key và khi getInstance cần truyền vào key đó(xem thêm ở SourceCode kèm theo)
Và bây giờ chúng ta sẽ sử dụng MEF, quay về class program.cs của "RUN.MEF", trước khi làm việc gì đó chúng ta cần Created Data cho Container, ở đây tôi làm việc đó qua hàm Create(), ở hàm này cứ mỗi module tương ứng một file Dll và tôi sẽ load file này lên và watch tất cả các Class được "Export". Tại hàm Main() tôi dùng như bình thường nhưng các bạn có để ý rằng tôi không hề new một object nào và gán cho property trước khi dùng chúng mà các property được set giá trị bằng "ServiceLocator.Current.GetInstance();" - đó là điều quan trọng và ở bất kỳ đâu trong ứng dụng, bạn chỉ cần get instance như thế là lấy đc instance mong muốn và không cần thông qua các obj khác(instance này có thể được nhiều instance khác dùng chung và updated data bằng cách này).
Program.cs
[code language="csharp"]
public class Program
{
private static CompositionContainer _compositionContainer;
private static IHelloWorld ModuleA
{
get { return ServiceLocator.Current.GetInstance<IHelloWorld>(); }
}
private static void Main(string[] args)
{
Create();
ModuleA.Hello();
ModuleA.Hello();
Console.ReadLine();
}
public static void Create()
{
var aggregateCatalog = new AggregateCatalog();
aggregateCatalog.Catalogs.Add(new DirectoryCatalog(AppDomain.CurrentDomain.BaseDirectory,
"ModuleA.Dll"));
aggregateCatalog.Catalogs.Add(new DirectoryCatalog(AppDomain.CurrentDomain.BaseDirectory,
"ModuleB.Dll"));
_compositionContainer = new CompositionContainer(aggregateCatalog);
var mefServiceLocator = new MEFServiceLocator(_compositionContainer);
ServiceLocator.SetLocatorProvider(() => mefServiceLocator);
}
}
[/code]
Còn tiếp...
Sourcecode tại đây, chúc các bạn thành công!
Phạm Tuân
Chủ Nhật, 8 tháng 3, 2015
Hôm nay chúng ta sẽ thử đo xem thời gian query Data của "Foreach vs LinQ vs LinQasParallel" như thế nào. Tôi tạo một tool nhỏ để làm việc này.
I> Testing
Bài test 1: Tôi tạo một tool với chức năng là tìm trong một List<int> các số chia hết cho 9, tôi dùng thuật toán vét cạn với độ phức tạp là O(n). Các bạn có thể kiểm tra cách tôi làm sau đây
[code language="csharp"]
IList<int> lstData = new List<int>();
private IList<int> GenerateList(Double max)
{
IList<int> result = new List<int>();
var rand = new Random();
for (int i = 0; i < max; i++)
{
var randInt = rand.Next(50000);
result.Add(randInt);
}
return result;
}
// Executing for test
private void CheckingWithLinqAsParallel()
{
var stopwatch = new Stopwatch();
var countResult = new List<int>();
// Begin timing
stopwatch.Start();
countResult = (from itemValue in lstData.AsParallel()
where (CheckingValue(itemValue))
select itemValue).ToList();
// Stop timing
stopwatch.Stop();
// Write result
txtResult.Text = countResult.Count.ToString();
txtTime.Text = stopwatch.ElapsedTicks.ToString();
}
private void CheckingWithLinq()
{
var stopwatch = new Stopwatch();
var countResult = new List<int>();
// Begin timing
stopwatch.Start();
countResult = (from itemValue in lstData
where (CheckingValue(itemValue))
select itemValue).ToList();
// Stop timing
stopwatch.Stop();
// Write result
txtResult.Text = countResult.Count.ToString();
txtTime.Text = stopwatch.ElapsedTicks.ToString();
}
private void CheckingWithForeach()
{
var stopwatch = new Stopwatch();
var countResult = new List<int>();
// Begin timing
stopwatch.Start();
foreach(var itemValue in lstData)
{
if (CheckingValue(itemValue))
{
countResult.Add(itemValue);
}
}
// Stop timing
stopwatch.Stop();
// Write result
txtResult.Text = countResult.Count.ToString();
txtTime.Text = stopwatch.ElapsedTicks.ToString();
}
[/code]
Kết quả test:
[code language="c"]
--------------- O(1000) -----------------
Foreach: Time = 133
Linq: Time = 13246
LinqAsParallel: Time = 69348
--------------- O(900000) -----------------
Foreach: Time = 31887
Linq: Time = 25718
LinqAsParallel: Time = 27008
--------------- O(9000000) -----------------
Foreach: Time = 314022
Linq: Time = 263684
LinqAsParallel: Time = 265144
LinqAsParallel: Time = 302023
LinqAsParallel: Time = 264581
Linq: Time = 259860
Linq: Time = 261858
--------------- O(90000000) -----------------
Foreach: Time = 3361146
Linq: Time = 2707332
LinqAsParallel: Time = 2717361
LinqAsParallel: Time = 3562806
LinqAsParallel: Time = 3608036
Linq: Time = 2751347
LinqAsParallel: Time = 2726033
[/code]
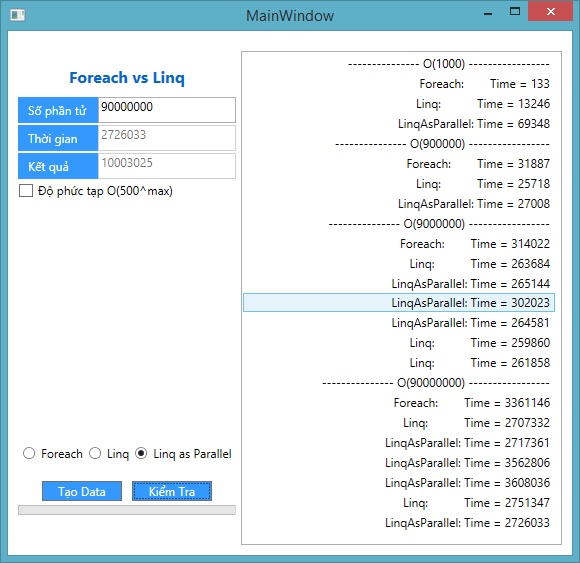
Tạm luận: Chúng ta có thể thấy rằng xét về mặt thời gian
- Khi lượng dữ liệu nhỏ và vừa thì Foreach trội hơn nhiều so với LinQ và LinQAsParallel
- Khi lượng dữ liệu lớn dần chạm một ngưỡng nào đó thì Foreach xuống dần phong độ so với LinQ và LinQAsParallel, dữ liệu càng tăng Foreach càng chậm.
- Giữa LinQ và LinQAsParallel, khi Parallel làm việc, nó phụ thuộc nhiều vào sự nhàn rỗi của CPU vì vậy tốc độ không ổn định, khi dữ liệu quá nhỏ Parallel trở nên chậm đáng kể, khi dữ liệu vừa phải Parallel trở nên rất nhanh - vừa phải ở đây phụ thuộc vào khả năng cung ứng Thread của CPU, khi dữ liệu tăng cao, vượt quá lượng Thread mà CPU hiện tại có thể cung cấp - Parallel trở nên chậm lại(Chú ý rằng công việc này là cần sự đồng bộ data).
Bài test 2: Độ phức tạp được nâng lên O(500^n) tức có hai vòng for lòng nhau, 500 là số lần lập cho vòng for trong, tôi không thể test với dữ liệu lớn đáng kể vì sẽ bị ERROR "out of memmory", lượng RAM mà tool chiếm > 2.2GB
[code language="csharp"]
IDictionary<int, IList<int>> lstDataUP = new Dictionary<int, IList<int>>();
private Dictionary<int, IList<int>> GenerateListUP(Double max)
{
var result = new Dictionary<int, IList<int>>();
var rand = new Random();
for (int i = 0; i < max; i++)
{
IList<int> subresult = new List<int>();
for (int j = 0; j < maxsubItem; j++)
{
var randInt = rand.Next(500);
subresult.Add(randInt);
}
result.Add(i,subresult);
}
return result;
}
// Excuteing for test
private void CheckingWithLinqAsParallelUP()
{
var stopwatch = new Stopwatch();
var countResult = new List<int>();
// Begin timing
stopwatch.Start();
countResult = (from itemValue in lstDataUP.AsParallel()
from subitemValue in itemValue.Value.AsParallel()
where (CheckingValue(subitemValue))
select subitemValue).ToList();
// Stop timing
stopwatch.Stop();
txtResult.Text = countResult.Count.ToString();
// Write result
txtTime.Text = stopwatch.ElapsedTicks.ToString();
}
private void CheckingWithLinqUP()
{
var stopwatch = new Stopwatch();
var countResult = new List<int>();
// Begin timing
stopwatch.Start();
countResult = (from itemValue in lstDataUP
from subitemValue in itemValue.Value
where (CheckingValue(subitemValue))
select subitemValue).ToList();
// Stop timing
stopwatch.Stop();
txtResult.Text = countResult.Count.ToString();
// Write result
txtTime.Text = stopwatch.ElapsedTicks.ToString();
}
private void CheckingWithForeachUP()
{
var stopwatch = new Stopwatch();
var countResult = new List<int>();
// Begin timing
stopwatch.Start();
foreach (var itemValue in lstDataUP)
{
foreach (var subitemValue in itemValue.Value)
{
if (CheckingValue(subitemValue))
{
countResult.Add(subitemValue);
}
}
}
// Stop timing
stopwatch.Stop();
txtResult.Text = countResult.Count.ToString();
// Write result
txtTime.Text = stopwatch.ElapsedTicks.ToString();
}
[/code]
Kết quả test
[code language="c"]
--------------- O(500^1000) -----------------
Foreach: Time = 99412
Linq: Time = 1085896
LinqAsParallel: Time = 3105398
--------------- O(500^9000) -----------------
Foreach: Time = 202546
Linq: Time = 695352
LinqAsParallel: Time = 582843
--------------- O(500^90000) -----------------
Foreach: Time = 1605131
Linq: Time = 5647985
LinqAsParallel: Time = 4189570
--------------- O(500^100000) -----------------
Foreach: Time = 1784048
Linq: Time = 6613424
LinqAsParallel: Time = 4496013
--------------- O(500^500000) -----------------
Foreach: Time = 9376404
Linq: Time = 32156749
LinqAsParallel: Time = 22864588
[/code]

Tạm luận: qua bài test trên chúng ta thấy rằng
- Foreach luôn chiếm ưu thế trong tình huống này, dữ liệu càng lớn sự chênh lệch càng rõ
- Giữa LinQ và LinQAsParallel, khi dữ liệu lớn đến một mốc nào đó LinQAsParallel tỏ ra nhanh hơn và ngược lại
- Khi chúng ta quan tâm đến một vài điều kiện để cho phép vòng for con thực thi hoặc không thì sự chênh lệch giữa LinQ và LinQAsParallel càng xa
II> Kết luận
Như vậy, chúng ta có thể tạm kết luận rằng LinQ nhanh hơn hẳn Foreach nếu dữ liệu lớn đáng kể(> trăm ngàn dòng) và độ phức tạp tương đương O(n), nó thật sự chậm chạp khi dữ liệu là nhỏ ở mức vài ngàn dòng; trong khi đó nếu độ phức tạp tăng lên LinQ không phải là một sự lựu chọn tối ưu về tốc độ nếu đứng cạnh Foreach. Hãy cân nhắc đến việc sử dụng LinQ thay cho LinQAsParallel vì Parallel là một con dao hai lưỡi nếu chúng ta không hiểu hết thực trạng hệ thống và khả năng hiện tại của CPU cũng như lượng dữ liệu không cố định. Trong một số trường hợp chúng ta dùng Parallel sẽ bị Exception vì dữ liệu quá lớn trong khi Data cần thiết phải đồng bộ.
Các bài test được thực hiện trên Lap HP probook, I3 và 4G RAM, tình trạng sử dụng tài nguyên không nhiều.
Trên đây là những đánh giá chủ quan về mặt Query data(có đồng bộ) trong một dữ liệu dạng danh sách, tốc độ phụ thuộc nhiều vào thiết kế phần cứng của máy vì vậy hãy tham khảo các kết luận trên như một ý kiến cá nhân, các bạn có thể Comment để thảo luận về đề tài này.
Download SourceCode tại đây, chúc các bạn thành công!
Phạm Tuân
Thứ Bảy, 7 tháng 3, 2015
Trong bài viết Helloworld project chúng ta đã có class Bootstrapper đơn giản, song để dùng được IoC trong Caliburn.Micro chúng ta cần viết lại class này. Qua bài này chúng ta sẽ hiểu hơn về việc đặt tên cho một class trong Caliburn và cách dùng IoC...
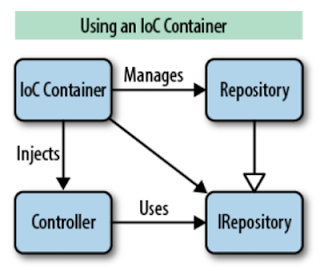
I> IoC là gì
IoC viết tắc của Inversion Of Control, IoC là một khái niệm/mô hình/nguyên lý lớn trong việc phát triển những ứng dụng phức tạp, mục đích làm giảm sự phụ thuộc giữa các tầng, các thành phần và các lớp bằng cách nghịch đảo luồng điểu khiển của ứng dụng, chúng ta có thể hiểu rằng IoC là một nhà cung cấp(provider hay container), trong thực tế khi một Project lớn thì việc có nhiều Component, Module, Class... là bình thường song việc quản lý cũng như khởi tạo các đối tượng trên sẽ phức tạp dần theo quy mô dự án, vì thế IoC là giải pháp tối ưu cho việc quản lý, khởi tạo và cung cấp các đối tượng khi cần thiết .
Hai triển khai phổ biến của IoC là Dependency Injection (chống lại sự phụ thuộc) và Service location.
Thật tế, vấn đề quản lý việc tạo và hủy đối tượng với việc sử dụng IoC có lẽ cần một chút phép màu, vì rằng: ai sẽ giải phóng các đối tượng nếu bạn không chịu trách nhiệm khởi tạo chúng?
Điểm chính của một Framework là nó cung cấp IoC dưới dạng một thành-phần phần mềm gọi là Container. Giống như cái tên nó đã có ngụ ý, container sẽ biết những thành phần nào cần cho ứng dụng của bạn và cố gắng đủ thông minh để hiểu bạn muốn thành phần nào. Điều này xẩy ra khi bạn thực hiện một truy vấn và yêu cầu nó trả về một thành-phần mà nó là một trong những thực thể thường trú trong container . Đây chính là ý nghĩa của IoC. Sẽ không còn việc các Instance của lớp được tạo ra bằng cách sử dụng Constructor được định nghĩa sẳn trong lớp đó theo cách truyền thống(new A();). Thay vào đó chúng ta sẽ đăng ký chúng vào trong container và khi cần chung ta chỉ việc truy vấn container sau đó nó sẽ cho bạn một instance của thành phần mà bạn yêu cầu.
Đa phần IoC được các cộng đồng OpenSource phát triển là chính, Microsoft không chính thức phát tiển mô hình này cho nền tảng .NET(họ có cách khác tương tự về một số vấn đề Module) bởi vì về cơ bản nó vẫn là một điều mới mẻ và mơ hồ cho đa phần những người tiếp cận .NET. IoC đưa đến một cấu trúc tốt hơn, khả năng module hóa, khả năng kiểm lổi và bảo trì ứng ứng dụng tốt hơn. Một khi đã phát hiện ra điều này, các lập trình viên sẽ không bào giờ quay trở lại còn đường xưa cũ để xây dựng phần mềm.
II> Cấu hình Bootstrapper
Để dùng được IoC chúng ta cần phải quan tâm nhiều đến class Bootstrapper (xem và sử dụng lại Helloworld project), những class chúng ta muốn được IoC quản lý phải được Export, nếu class ấy là một trong nhiều implement cho một interface thì phải Export rõ ràng và khi GetInstance phải truy vấn với nhiều thông tin hơn. Ví dụ
[code language="csharp"]
internal interface IPage
{
}
// Implement của IPage
[Export("PageOne",typeof(IPage))]
internal class PageOne: IPage
{
}
[Export("PageTwo",typeof(IPage))]
internal class PageTwo: IPage
{
}
//------------------------------------
internal interface INews
{
}
// Implement của INews
[Export(typeof(INews))]
internal class News: INews
{
}
[/code]
class Bootstrapper.cs
[code language="csharp"]
internal sealed class Bootstrapper : BootstrapperBase
{
private CompositionContainer _container;
/// <summary>
/// Constructor
/// </summary>
public Bootstrapper()
{
StartRuntime();
}
/// <summary>
/// Override to configure the framework and setup your IoC container.
/// </summary>
protected override void Configure()
{
_container = new CompositionContainer(
new AggregateCatalog(AssemblySource.Instance.Select(x =>
new AssemblyCatalog(x)).OfType<ComposablePartCatalog>())
);
var batch = new CompositionBatch();
batch.AddExportedValue<IWindowManager>(new WindowManager());
batch.AddExportedValue<IEventAggregator>(new EventAggregator());
batch.AddExportedValue(_container);
_container.Compose(batch);
}
/// <summary>
/// Gets the instance.
/// </summary>
/// <param name="serviceType">Type of the service.</param>
/// <param name="key">The key.</param>
/// <returns></returns>
/// <exception cref="System.Exception"></exception>
protected override object GetInstance(Type serviceType, string key)
{
var contract = string.IsNullOrEmpty(key) ? AttributedModelServices.GetContractName(serviceType) : key;
var exports = _container.GetExportedValues<object>(contract);
var enumerable = exports as object[] ?? exports.ToArray();
if (enumerable.Any())
return enumerable.First();
throw new Exception(string.Format("Could not locate any instances of contract {0}.", contract));
}
/// <summary>
/// Gets all instances.
/// </summary>
/// <param name="serviceType">Type of the service.</param>
/// <returns></returns>
protected override IEnumerable<object> GetAllInstances(Type serviceType)
{
return _container.GetExportedValues<object>(AttributedModelServices.GetContractName(serviceType));
}
/// <summary>
/// Override this to provide an IoC specific implementation.
/// </summary>
/// <param name="instance">The instance to perform injection on.</param>
protected override void BuildUp(object instance)
{
_container.SatisfyImportsOnce(instance);
}
/// <summary>
/// Override this to add custom behavior to execute after the application starts.
/// </summary>
/// <param name="sender">The sender.</param>
/// <param name="e">The args.</param>
protected override void OnStartup(object sender, StartupEventArgs e)
{
base.OnStartup(sender, e);
DisplayRootViewFor<MainViewModel>();
}
}
[/code]
Đừng quên add reference "System.ComponentModel.Composition"
III> Sử dụng IoC
Tiến hành xây dựng phần sườn project
- Tạo một folder "Models"
- Tạo một interface "Models/IPage.cs"
- Tạo hai class implement cho interface "IPage" là "PageOne" và "PageTwo", tất cả ghi vào file "Models/Page.cs"
- Mở file "Views/MainView.xaml" và thêm vào hai TextBox và hai Button
- Thêm vào file "ViewModels/MainViewModels.cs" nội dung như dưới
Yêu cầu: Tôi có 2 TextBox lần lược hiển thị nội dung được Binding đến property "MainViewModel.Page" là "Page.Name" và "Page.Index", tùy và việc tôi nhấn vào Button "PageOne" hay "PageTwo" mà nội dung hiển thị được thay đổi. Các bạn chú ý rằng không hề có việc tôi new một thể hiện của interface"IPage" và gán cho property "MainViewModel.Page" ở code dưới vì tôi dùng IoC để new một class.
MainViewModel.cs
[code language="csharp"]
[Export(typeof(MainViewModel))]
internal class MainViewModel : INotifyPropertyChanged
{
private IPage _page;
public IPage Page
{
set
{
_page = value;
OnPropertyChanged("Page");
}
get { return _page; }
}
public event PropertyChangedEventHandler PropertyChanged;
private void OnPropertyChanged(string propertyName)
{
PropertyChangedEventHandler handler = PropertyChanged;
if (handler != null) handler(this, new PropertyChangedEventArgs(propertyName));
}
/// <summary>
/// Constructor
/// </summary>
public MainViewModel()
{
}
/// <summary>
/// Show PageOnr
/// </summary>
public void PageOne()
{
Page = IoC.Get<IPage>("PageOne");
}
/// <summary>
/// Show PageTwo
/// </summary>
public void PageTwo()
{
Page = IoC.Get<IPage>("PageTwo");
}
}
[/code]
IPage.cs
[code language="csharp"]
internal interface IPage
{
/// <summary>
/// Dislay name
/// </summary>
string Name { set; get; }
/// <summary>
/// Number of it
/// </summary>
int Index { set; get; }
}
[/code]
Page.cs
[code language="csharp"]
[Export("PageOne",typeof(IPage))]
internal class PageOne: IPage
{
private string _name = string.Empty;
private int _index;
/// <summary>
/// Dislay name
/// </summary>
public string Name
{
set { _name = value; }
get { return _name; }
}
/// <summary>
/// Number of it
/// </summary>
public int Index
{
get { return _index; }
set { _index = value; }
}
public PageOne()
{
Name = "PageOne";
Index = new Random().Next(100);
}
}
[Export("PageTwo",typeof(IPage))]
internal class PageTwo: IPage
{
private string _name = string.Empty;
private int _index;
/// <summary>
/// Dislay name
/// </summary>
public string Name
{
set { _name = value; }
get { return _name; }
}
/// <summary>
/// Number of it
/// </summary>
public int Index
{
get { return _index; }
set { _index = value; }
}
public PageTwo()
{
Name = "PageTwo";
Index = new Random().Next(100);
}
}
[/code]
MainView.xaml
[code language="xml"]
<Window x:Class="HelloWorl.Views.MainView"
xmlns="http://schemas.microsoft.com/winfx/2006/xaml/presentation"
xmlns:x="http://schemas.microsoft.com/winfx/2006/xaml"
Title="MainView" Height="200" Width="300">
<Grid>
<StackPanel Margin="10,20,10,50" Orientation="Vertical" VerticalAlignment="Top">
<TextBox x:Name="Name" Height="21"
Text="{Binding Page.Name, UpdateSourceTrigger=PropertyChanged}"
BorderBrush="#FF3399FF" Margin="0,1" />
<TextBox x:Name="Index" Height="21"
Text="{Binding Page.Index, UpdateSourceTrigger=PropertyChanged}"
BorderBrush="#FF3399FF" Margin="0,1" />
</StackPanel>
<StackPanel VerticalAlignment="Bottom" Margin="0,0,0,20">
<Button Content="PageOne" x:Name="PageOne" Height="21"
HorizontalAlignment="Center" VerticalAlignment="Bottom"
Padding="2,1,5,1" MaxWidth="100" MinWidth="100" Margin="0,1"
Background="#FF3399FF" Foreground="White"/>
<Button Content="PageTwo" x:Name="PageTwo" Height="21"
HorizontalAlignment="Center" VerticalAlignment="Bottom"
Padding="2,1,5,1" MaxWidth="100" MinWidth="100" Margin="0,1"
Background="#FF3399FF" Foreground="White" />
</StackPanel>
</Grid>
</Window>
[/code]
Kết quả là
 Tải sourcecode tại đây, chúc các bạn thành công,
Phạm Tuân
Sau hai bài giới thiệu về Caliburn.Micro framework, hôm nay chúng ta sẽ cùng bắt tay vào làm một dự án nhỏ - HelloWorld.
Step 1: Add reference
Khi đã tạo xong một project WPF Application, chúng ta sẽ phải tải về các DLLs của Caliburn và add vào project hoặc làm việc này tự động bằng cách mở "Package Manager Console" và paste command dưới đây vào rồi Enter.
TOOL -> NuGet Package Manager -> Package Manager Console
[code language="html"]
Install-Package Caliburn.Micro
[/code]
Step 2: Tổ chức lại project
- Xóa 2 file MainWindow.*
- Xóa dòng StartupUri="MainWindow.xaml" trong file App.xaml
- Tạo mới 2 folder với tên lần lược là "Views" và "ViewModels"
Step 3: Xây dựng
- Tạo class Bootstrapper.cs
- Tạo class "ViewModels/MainViewModel.cs" và tạo một Window "Views/MainView.xaml"
- Xóa file "Views/MainView.cs"
- Changed nội dung các file "App.xaml", "App.cs" như sau
App.xaml
[code language="xml"]
<Application x:Class="HelloWorl.App"
xmlns="http://schemas.microsoft.com/winfx/2006/xaml/presentation"
xmlns:x="http://schemas.microsoft.com/winfx/2006/xaml"
xmlns:helloWorl="clr-namespace:HelloWorl">
<Application.Resources>
<ResourceDictionary>
<ResourceDictionary.MergedDictionaries>
<ResourceDictionary>
<helloWorl:Bootstrapper x:Key="bootstrapperex" />
</ResourceDictionary>
</ResourceDictionary.MergedDictionaries>
</ResourceDictionary>
</Application.Resources>
</Application>
[/code]
App.cs
[code language="csharp"]
/// <summary>
/// Interaction logic for App.xaml
/// </summary>
public partial class App : Application
{
/// <summary>
/// Constructor
/// </summary>
public App()
{
InitializeComponent();
}
}
[/code]
Bootstrapper.cs
[code language="csharp"]
internal class Bootstrapper: BootstrapperBase
{
/// <summary>
/// Constructor
/// </summary>
public Bootstrapper()
{
this.StartRuntime();
}
/// <summary>
/// Override this to add custom behavior to execute after the application starts.
/// </summary>
/// <param name="sender">The sender.</param>
/// <param name="e">The args.</param>
protected override void OnStartup(object sender, StartupEventArgs e)
{
base.OnStartup(sender, e);
// MainViewModel sẽ được hiểu là Datacontent của MainView
// Dòng dưới chỉ ra một View chính cho App
DisplayRootViewFor<MainViewModel>();
}
}
[/code]
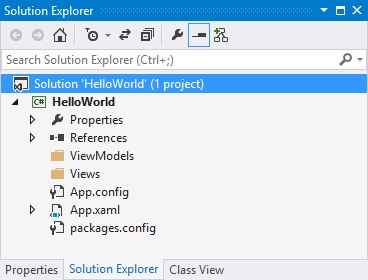
Ta có project như sau
Đến đây chúng ta đã xong phần Helloworld, F5 và nhận kết quả, tải sourcecode tại đây (vì các DLLs đã được xóa nên hãy mở mạng và Rebuild project để NuGet tải lại dll).
Vậy mời các bạn đón xem phần tiếp theo!
Phạm Tuân
Thứ Năm, 5 tháng 3, 2015
Như ở bài trước tôi đã giới thiệu về caliburn.mocro, bài tiếp theo này tôi sẽ hướng dẫn các bạn về cách tạo một project WPF hợp chuẩn mô hình MVVM(*) dùng Caliburn framework. Bài này cho ta cái nhìn cơ bản về cấu trúc một Project WPF-Caliburn...
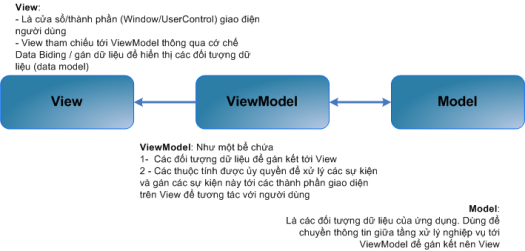
I> Hiểu MVVM Là Gì
Để tổ chức một project theo mô hình MVVM nói chung và Caliburn nói riêng chúng ta cần hiểu rõ MVVM là gì và cơ chế Mapping(View - ViewModel) mà Framework hiện tại hỗ trợ. Hai hình sau minh họa khã rõ mô hình MVVM

Class diagram
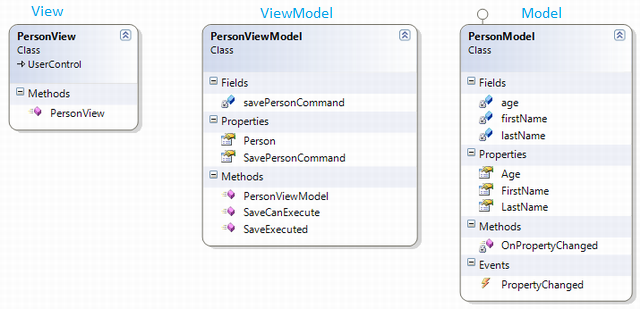
.gif)
II> Quy Ước Tổ Chức Một Project Của Caliburn

Theo quy ước của Caliburn, phần View-ViewModel-Model phải được đặt tên theo một quy ước để có thể tận dụng tối hiệu năng của framework - mà dễ thấy nhất đó là một View sẽ được tự động kết dính với một ViewModel( bạn sẽ có cơ hội cảm nhận về điều này sau) nếu bạn tuân các thủ quy ước sau.
| View Model | View | |
|---|---|---|
| Convention | <EntityName>ViewModel | <EntityName>View |
| Example 1 | ShellViewModel | ShellView |
| Example 2 | TabViewModel | TabView |
Vì View trong thực tế được thể hiện như một Page nên chúng ta hoàn toàn có thể đặt tên như bảng dưới đây
| View Model | View | |
|---|---|---|
| Convention | <EntityName>PageViewModel | <EntityName>Page |
| Example 1 | MainPageViewModel | MainPage |
| Example 2 | OrderPageViewModel | OrderPage |
Nếu chúng ta có một Namespace khá dài cho các ViewModel hoặc View, chúng ta phải tuân thủ cách đặt tên sau
| View Model | View | |
|---|---|---|
| Convention | <RootNS>.<ViewModelTypeName> | <RootNS>.<ViewTypeName> |
| Example 1 | MyProject.ShellViewModel | MyProject.ShellView |
| Example 2 | MyProject.MainPageViewModel | MyProject.MainPage |
Hoặc
| View Model | View | |
|---|---|---|
| Convention | <RootNS>.ViewModels.<ChildNS>.<ViewModelTypeName> | <RootNS>.Views.<ChildNS>.<ViewTypeName> |
| Example 1 | MyProject.ViewModels.ShellViewModel | MyProject.Views.ShellView |
| Example 2 | MyProject.ViewModels.Utilities.SettingsViewModel | MyPoject.Views.Utitlities.SettingsView |
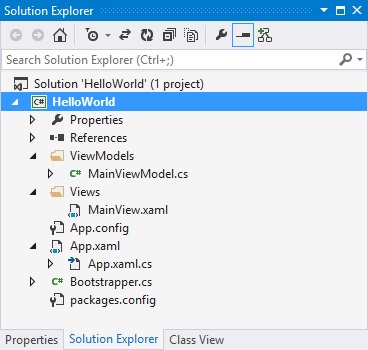
Dưới đây là một ví dụ về cách tổ chức một project Caliburn.Micro
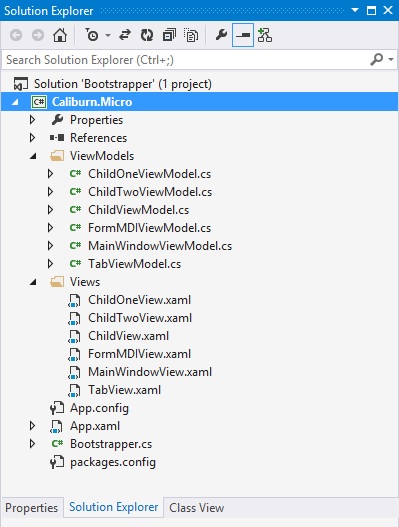
Hay

Tất cả những quy ước trên là bạn phải thực hiện chính xác nếu muốn tận dụng nhiều tính năng hay, song bạn hoàn toàn có thể thay đổi theo ý cá nhân vì đây là framework mã nguồn mở.
-----------------------------------------------------------------
- Tìm Hiểu Về Caliburn.Micro Framework Phần I
- Tìm Hiểu Về Caliburn.Micro Framework Phần II
Thứ Tư, 4 tháng 3, 2015
Caliburn.Micro Framework được những người phát triển nó nói một cách khiêm tốn là một Framework nhỏ bé nhưng cộng đồng Dev lại thấy rằng nó vô cùng mạnh mẽ. Framework này được thiết kế cho việc phát triển các ứng dụng xây dựng trên tất cả các nền tảng XAML(WPF, Silverlight, Windows Phone, Windows 8...). Hỗ trợ mạnh cho mô hình MV *, cho phép xây dựng các giải pháp của bạn một cách nhanh chóng, và bền vững.

I> Tính năng nỗi bật
Binding đơn giản từ View xuống ViewModel với x:Name, giảm thời gian thiết kế
*.XAML
[code language="xml"]
<ListBox x:Name="Products" />
[/code]
*.CS
[code language="csharp"]
// View sẽ được tự động binding đến property bênh dưới
public BindableCollection<ProductViewModel> Products
{
get; private set;
}
public ProductViewModel SelectedProduct
{
get { return _selectedProduct; }
set
{
_selectedProduct = value;
NotifyOfPropertyChange(() => SelectedProduct);
}
}
[/code]
Tự động Binding một Method với hành xử của View kèm các đối số tự động maping theo x:Name
*.XAML
[code language="xml"]
<StackPanel>
<TextBox x:Name="Username" />
<PasswordBox x:Name="Password" />
<Button x:Name="Login" Content="Log in" />
</StackPanel>
[/code]
*.CS
[code language="csharp"]
// Hàm trả giá trị cho biết có thể thực hiện Login command hay không
public bool CanLogin(string username, string password)
{
return !String.IsNullOrEmpty(username) && !String.IsNullOrEmpty(password);
}
// Hàm dưới được thực hiện với sự kiện Click của Button theo kiểu Command
// Các param sẽ được lấy giá trị từ View với name tương ứng paramName
public string Login(string username, string password)
{
// Do somethings...
}
[/code]
Ngoài ra Caliburn còn nhiều tính năng khác mạnh mẽ và thuận tiện hơn khi làm việc với mô hình MV*. Trong mô hình MVVM có sử dụng Caliburn chúng ta sẽ tuân thủ một số cấu trúc cho một project WPF-MVVM như sau( [*] ý chỉ là bất kỳ một ký tự hợp lệ nào nhập từ bàn phím)
- Các thành phần View(tức code XAML thể hiện một Window hoặc UserControl hoặc Page...) được đặc chung vào thư mục cha là "*View" hoặc "*Views"
- Các thành phần ViewModel(tức phần logic *.cs cho View tương ứng) được đặc trong cùng một thư mục cha là "*ViewMode" hoặc "*ViewModels"
II> Bắt đầu cùng Caliburn
Để khởi đầu một dự án với Caliburn.Micro trước tiên chúng ta cần tải thư viện này về theo hai cách thông dụng
- Dùng Nuget với command = "PM> Install-Package Caliburn.Micro", dán code này vào Tool->...->Package Manager Console
- Download trược tiếp từ codeplex với link
Thứ quan trọng nhất và là xương sống của Caliburn.Midro cũng như các MVVMFramework khác là Bootstrapper và IoC ngoài ra chúng ta có thể đọc thêm tại trang chủ Caliburn về các thành phần quan trọng trong framework này. Tôi sẽ sớm có nhiều bài viết về chủ đề liên quan cho người mới bắt đầu tìm hiểu về WPF-MVVM có dùng Caliburn.
-----------------------------------------------------------------
- Tìm Hiểu Về Caliburn.Micro Framework Phần I
- Tìm Hiểu Về Caliburn.Micro Framework Phần II
Chúc các bạn vui vẻ,
Tuân Phạm
Thứ Ba, 3 tháng 3, 2015
Hôm nay tôi sẽ hướng dẫn các bạn một số kỹ thuật với log4net, 3 kỹ thuật chúng ta cần nắm sau bài này là "Làm sao để tạo các file log riêng cho từng namspace", "Làm sao để các file log tự động được ghi vào thư mục có tên tương ứng với ngày hiện tại" và "làm sao để lọc thông tin cho một file log - nâng cao". Mời các bạn cùng theo dõi.
I> Tạo file riêng cho từng namspace
Để tạo một tập tin/kiểu log chúng ta thêm vào file config một thẻ appender với các thông số cở bản như bài trước và để tiến hành log cho một namspace ta dùng thẻ logger.

Format config như sau
[code language="xml"]
<!-- name của appender là tên bất kỳ-->
<appender name="rootTrace">
<!-- param -->
</appender>
<appender name="MyCompany">
<!-- param -->
</appender>
<appender name="MyCompany.MyCompany1">
<!-- param -->
</appender>
<appender name="MyCompany.MyCompany2">
<!-- param -->
</appender>
<root>
<level value="ALL"/>
<appender-ref ref="rootTrace"/>
</root>
<!-- name của logger chính là namespace muốn lọc-->
<logger name="MyCompany">
<level value="WARN" />
<!-- ref đến một appender-->
<appender-ref ref="MyCompany" />
</logger>
<logger name="MyCompany.MyCompany1">
<level value="WARN" />
<appender-ref ref="MyCompany.MyCompany1" />
</logger>
<logger name="MyCompany.MyCompany2">
<level value="DEBUG" />
<appender-ref ref="MyCompany.MyCompany2" />
</logger>
[/code]
Ví dụ: Chúng ta sẽ có một file log với tên "myLog.log", chứa toàn bộ log sinh ra từ namespace "Namespace.subNamespace" và loglevel = "DEBUG"
[code language="xml"]
<!-- config appender với type = RollingFileAppender-->
<appender name="myApenName" type="log4net.Appender.RollingFileAppender">
<file value="..\log\myLog.log"/>
<appendToFile value="true"/>
<rollingStyle value="Size"/>
<maximumFileSize value="25MB"/>
<maxSizeRollBackups value="100"/>
<staticLogFileName value="true"/>
<countDirection value="0"/>
<layout type="log4net.Layout.PatternLayout">
<conversionPattern value="%date{yyyy/MM/dd HH:mm:ss.fff} %-5level [%-4thread] %logger - %message%newline" />
</layout>
</appender>
<logger name="Namespace.subNamespace">
<level value="DEBUG" />
<!-- refer đến appender bạn muốn-->
<appender-ref ref="myApenName" />
</logger>
<root>
<level value="INFO" />
<!-- <appender-ref ref="myApenName"/> -->
</root>
[/code]
Lưu ý rằng: chúng ta không nên refer đến appender "myApenName" trong thẻ root vì thế này đồng nghĩa với việc log tất cả các namespace
II> Cách tạo các file log trong một thư mục được đặt tên theo ngày
Cụ thể là nếu hôm nay ngày 03/03/2015 thì chúng ta sẽ có thư mục mang tên "03-03-2015", thư mục này chứa tất cả các file log được tạo ra đúng ngày hôm nay.
Xem ví dụ sau đây,
[code language="xml"]
<appender name="Alllog" type="log4net.Appender.RollingFileAppender">
<!-- (1) -->
<param name="File" value="../Log/" />
<param name="DatePattern" value='yyyy-MM-dd"/Alllog.log"' />
<!-- (2) -->
<param name="StaticLogFileName" value="false" />
<param name="RollingStyle" value="Composite" />
<param name="AppendToFile" value="true" />
<param name="MaximumFileSize" value="5MB" />
<param name="MaxSizeRollBackups" value="50" />
<encoding value="utf-8" />
<layout type="log4net.Layout.PatternLayout">
<conversionPattern value="%date{yyyy/MM/dd HH:mm:ss.fff} %-5level [%-4thread] %logger - %message%newline" />
</layout>
<filter type="log4net.Filter.StringMatchFilter">
<stringToMatch value="test" />
</filter>
<filter type="log4net.Filter.DenyAllFilter" />
</appender>
[/code]
Các bạn chú ý hai thẻ mà tôi đặc giữa hai số (1) và (2); Dòng đầu chúng ta dùng dấu '/' thay vì '\' như thông thường; Dòng hai là đường dẫn lưu file log - đường dẫn này có một thư mục mà tên được lấy từ ngày hiện tại với format là "yyyy-MM-dd".
III> Các kỹ thuật filter nâng cao trong log4net
Như chúng ta cũng biết ở bài trước, LogLevel cũng là một filter để chúng ta có thể tùy chọn nội dung log phù hợp, kèm theo đó trong mỗi Appender có các filter riêng. Hôm nay, chúng ta sẽ cùng tìm hiểu thêm về filter trong mỗi Appender .
Nhắc lại: bài trước nói về thẻ filter tôi nhắc đến ba loại như sau: StringMatchFilter, LevelRangeFilter, LevelMatchFilter, DenyAllFilter; Hôm nay chúng ta có thêm một loại nữa là "LoggerMatchFilter"

1) Cách tạo Whitelisting by logger - danh sách các namespace được phép ghi log
Format như sau
[code language="xml"]
<filter type="log4net.Filter.LoggerMatchFilter">
<loggerToMatch value="myNamspace.comm" />
</filter>
<filter type="log4net.Filter.DenyAllFilter" />
[/code]
Bộ lọc LoggerMatchFilter mặc định giá trị của acceptOnMatch là True, tức là bộ lọc này là bộ lọc cho phép(các giá trị thõa điều kiện của bộ lọc này thì sẽ được ghi ra file). Ví dụ rên đây sẽ chỉ ghi ra log cho các nội dung log thuộc namespace là "myNamspace.comm", vì tất cả các log khác bị cấm (DenyAllFilter)
2) Cách tạo Blacklisting by logger - danh sách các namespace bị cấm ghi log
Format như sau
[code language="xml"]
<filter type="log4net.Filter.LoggerMatchFilter">
<loggerToMatch value="LoggerDeny" />
<acceptOnMatch value="false" />
</filter>
[/code]
Tất cả các log đều được ghi trừ log phát sinh tại namespace "LoggerDeny", chúng ta làm điều này bằng cách set giá trị cho thẻ acceptOnMatch là False
3) Cách tạo bộ LoggerMatchFilter gộp
* Format của việc gộp các LoggerMatchFilter
[code language="xml"]
<filter type="log4net.Filter.LoggerMatchFilter">
<loggerToMatch value="Noisy.Namespace.But.Important" />
</filter>
<filter type="log4net.Filter.LoggerMatchFilter">
<loggerToMatch value="Noisy.Namespace" />
<acceptOnMatch value="false" />
</filter>
[/code]
Ví dụ trên cho ta một file log chứa các log của namespace "Noisy.Namespace.But.Important" và các log của namespace "Noisy.Namespace" bị cấm ghi -> Song thực tế chúng ta không mấy khi dùng kiểu gộp này.
* Format của việc gộp LoggerMatchFilter với LevelRangeFilter hoặc StringMatchFilter
[code language="xml"]
<appender name="AllLog" type="log4net.Appender.RollingFileAppender">
<filter type="log4net.Filter.LoggerMatchFilter">
<loggerToMatch value="myNamespace" />
<acceptOnMatch value="false" />
</filter>
<filter type="log4net.Filter.LevelRangeFilter">
<acceptOnMatch value="true" />
<levelMin value="INFO" />
<levelMax value="FATAL" />
</filter>
<!-- param...-->
</appender>
<appender name="AllLog" type="log4net.Appender.RollingFileAppender">
<filter type="log4net.Filter.LoggerMatchFilter">
<loggerToMatch value="myNamespace" />
</filter>
<filter type="log4net.Filter.StringMatchFilter">
<stringToMatch value="test" />
</filter>
<filter type="log4net.Filter.DenyAllFilter" />
<!-- param...-->
</appender>
[/code]
Ví dụ này ghi tất cả các log có level từ INFO->FATAL và trừ log của namespace "myNamespace" hoặc ghi tất cả các log của namespace "myNamespace" và các log có chứa "test".
Chú ý rằng: nếu trong bộ gộp các thẻ filter có kiểu LoggerMatchFilter chúng ta nên để thẻ filter này lên trên các thẻ filter khác.
Chúc các bạn thành công,
Phạm Tuân
Đăng ký:
Nhận xét (Atom)